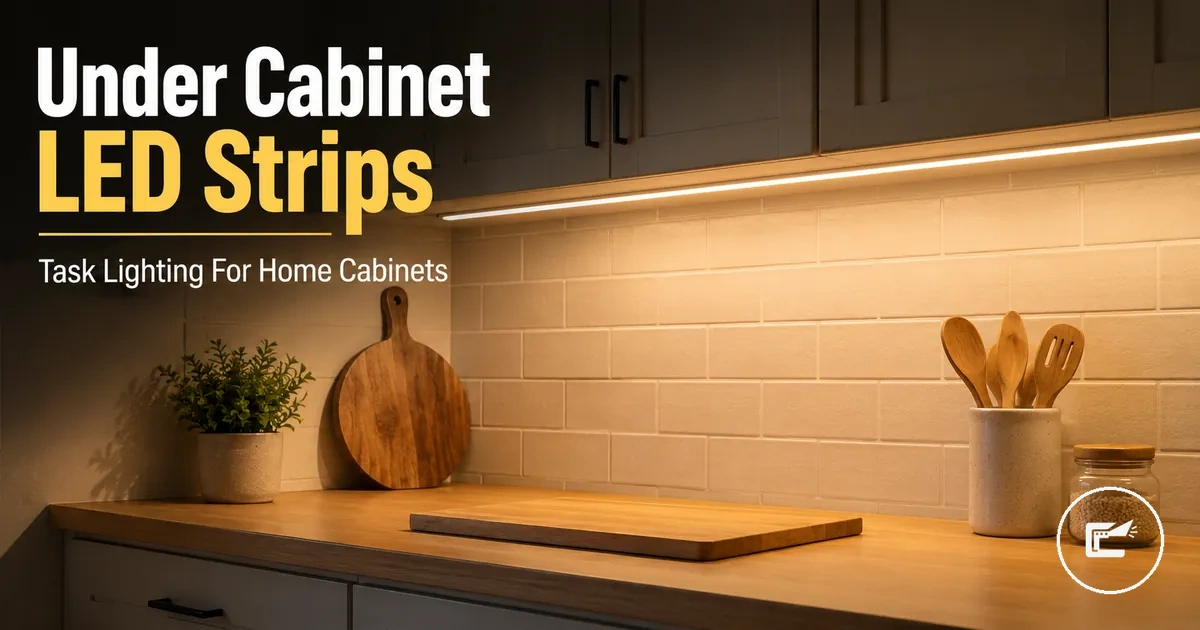
Under Cabinet LED Strip Lighting for Home Cabinets
Under cabinet LED strip lighting is a low-profile lighting choice used beneath home cabinets to improve countertop visibility and add a softer cabinet glow. For kitchen cabinets, the main decision is not only whether the strip lights the area, but whether its placement, light output, controls, kit parts, and safety conditions fit the cabinet space.
In kitchen cabinets, under cabinet strips can support task lighting where food prep, cleaning, or small appliance use needs clearer light. A warm white and dimmable setup may feel more comfortable for evening use when the strip output, surface finish, and control method match the space. COB strips with a diffuser can help create dot-free light when the strip type and diffuser fit support a smoother line.
The right cabinet lighting kit depends on cabinet location, driver and connector fit, plug-in access, and whether a motion sensor or manual control suits daily use. Brightness, glare, dimming behavior, and kit fit can vary by cabinet shape, countertop finish, and component compatibility, so each choice should be checked before purchase rather than treated as a universal match.
How Under Cabinet LED Strip Lighting Works in Cabinet Spaces
Under cabinet lighting uses an LED strip mounted beneath a cabinet to direct light onto a work area and nearby surfaces. The light is emitted from the cabinet space toward the countertop, helping improve visibility for everyday activities. How the light appears depends on strip position, beam direction, and the surfaces that receive the light.
Cabinet depth can change how light spreads across a countertop. A strip near the front edge may create a different countertop reflection than a rear placement. Surface color and finish may also influence how the reflected light is perceived.
How Under Cabinet LED Strip Lighting Works in Cabinet Spaces becomes easier to understand when viewing the light path from the cabinet to the work surface. The image below clarifies beam direction, countertop illumination, and the effect of cabinet depth on light spread. Actual results may vary depending on cabinet depth and LED strip output.
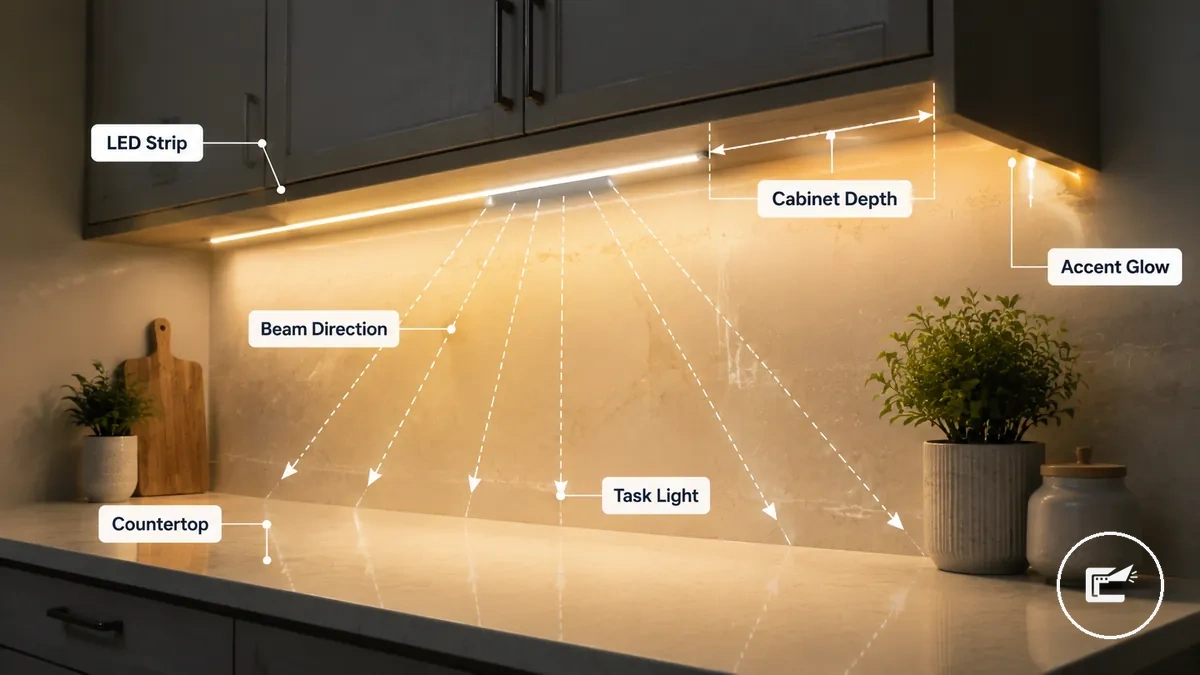
Under cabinet lighting can function as a task light or as an accent glow. A task light focuses on work-surface visibility for daily use, while an accent glow emphasizes a softer visual effect around the cabinet area.
Broader accessory topics are relevant only when they affect cabinet-use decisions, which is why this discussion remains connected to home LED strip and cabinet lighting accessories. Components and accessories matter primarily when they influence light distribution, beam direction, or countertop reflection within the cabinet space.
Where LED Strips Should Sit Under Cabinets
Strip position should match the intended light effect and cabinet geometry because visibility, glare, and shadow control depend on placement. The same strip location can produce different countertop results when cabinet depth, surface finish, or strip output changes.
Where LED Strips Should Sit Under Cabinets depends on how each placement zone affects light spread and comfort. The diagram below compares front, middle, and rear placement zones and helps organize placement choices without prescribing fixed measurements.

The checklist below helps verify whether a strip position aligns with the intended lighting effect and cabinet conditions.
- Front edge placement may improve task visibility but can create more noticeable hand shadows on the countertop.
- Middle placement often balances light spread and visual comfort when glare is a concern.
- Rear placement may create a softer glow and stronger backsplash reflection depending on surrounding surfaces.
- A diffuser channel can help with glare control and may reduce the appearance of visible dots.
- Cabinet depth and surface finish can influence how light spread is perceived.
Front edge strip position places more light toward the working area of the countertop. This placement may support task-focused use, but glare and shadows can vary when cabinet lips, viewing angles, or reflective finishes change.
Middle placement and rear placement shift the lighting effect in different ways. Middle placement may provide more even countertop coverage, while rear placement can emphasize backsplash reflection and a softer visual effect when cabinet conditions support that outcome.
Cabinet depth and surface finish can change how the same strip location behaves. A deeper cabinet may create a different light spread pattern than a shallow cabinet, and glossy surfaces may reflect light differently than matte surfaces.
Placement decisions should be resolved before focusing on mounting details. For guidance that continues from placement planning into practical execution, see under cabinet installation steps.
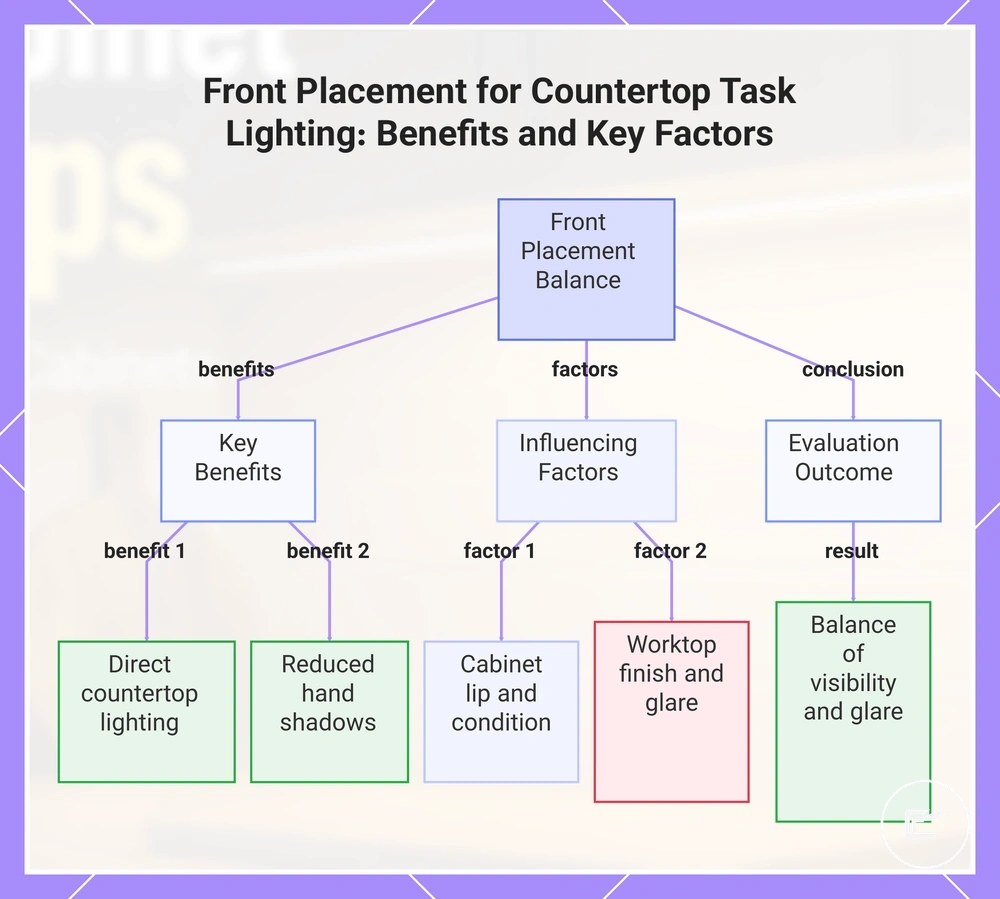
Front Placement for Countertop Task Lighting
Front placement usually prioritizes countertop task lighting because light reaches the working area more directly. Front placement can also help reduce hand shadows when the light is aimed appropriately, although the result may vary with cabinet lip design, cabinet condition, and worktop finish.
Front placement positions the under cabinet strip closer to the cabinet face, which may improve visibility across the countertop during daily tasks. A diffuser can help soften the light output and may reduce glare when the cabinet strip is visible from common viewing angles. Glare exposure often depends on strip position, eye level, counter reflectivity, and surrounding surface characteristics.
Front placement can create different outcomes across cabinet setups. A reflective worktop finish may increase perceived glare, while a deeper cabinet lip may change shadow behavior and light distribution. For that reason, front placement is often evaluated as a balance between countertop task lighting, hand shadows, glare comfort, and overall visibility rather than as a universal solution.
This chart shows the main benefits of front placement for under cabinet lighting and the key factors that influence its effectiveness, highlighting that it is a balance rather than a universal solution.
Middle or Rear Placement for Softer Cabinet Glow
Middle placement or rear placement usually creates a softer cabinet glow by setting the cabinet strip farther back from the front edge. This strip setback can reduce direct glare from common viewing angles, although the effect may vary with cabinet depth, backsplash finish, surface color, and strip output.
The trade-off between task visibility and glow becomes more noticeable as the cabinet strip moves farther from the cabinet face.
| Placement Condition | Lighting Effect |
|---|---|
| Middle placement | May balance countertop visibility with a softer cabinet glow. |
| Rear placement | May increase backsplash reflection and create a stronger wall wash effect. |
Middle placement and rear placement often rely more on reflected light than direct countertop illumination, which can reduce task intensity compared with a more forward strip position. A reflective backsplash may enhance backsplash reflection and wall wash, while cabinet depth can influence how far the glow extends beneath the cabinet. Visibility from seated or standing positions may also affect how noticeable the cabinet light appears and how comfortable the lighting effect feels.
Light Quality Choices for Under Cabinet LED Strips
Light quality depends on color appearance, output control, diode visibility, and diffusion. Light quality choices help organize comfort, visibility, and visual finish by connecting strip attributes to how cabinet lighting appears during everyday use. The perceived result may vary with surface reflection, cabinet materials, and viewing conditions.
Color appearance is often the first light quality decision. Warm white may create a softer cabinet glow and support countertop comfort, while neutral white can make surfaces appear more visually defined. Tunable white options may provide additional flexibility when lighting preferences change between tasks or times of day.
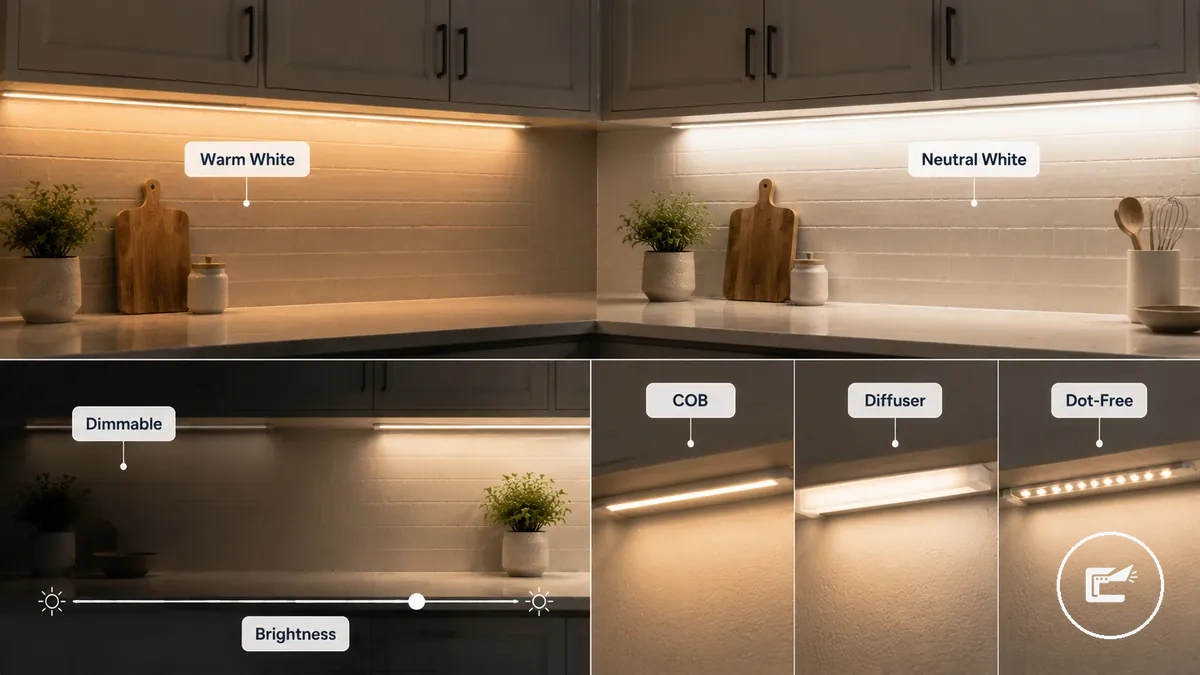
Light Quality Choices for Under Cabinet LED Strips are often easier to compare visually because color appearance and diffusion can change how the same cabinet space looks. The image above compares warm white output, diffused light, visible diode points, and smoother lighting effects.
| Feature | Value or condition | Cabinet effect | Decision note |
|---|---|---|---|
| Color appearance | Warm white, neutral white, or tunable white | Changes cabinet glow and visual finish | Select according to countertop comfort and appearance preference |
| Dimming | Dimmable light output | Adjusts brightness for different cabinet uses | May help balance visibility and lighting comfort |
| COB layout | Continuous LED arrangement | Creates smoother light output | Often considered when visible diode points are undesirable |
| Diffusion | Diffuser channel | Can create a more dot-free appearance | May improve visual comfort depending on placement |
| Surface reflection | Reflective or non-reflective surroundings | Influences perceived brightness and visual finish | Reflection can change how light quality is perceived |
Dimmable output, COB construction, and diffuser use are often evaluated together because they influence brightness, smooth light appearance, and diode visibility. Criteria related to brightness and color temperature can help connect light quality choices to cabinet-specific outcomes without relying on a single specification. A dot-free effect may depend on both COB design and diffuser selection rather than one feature alone.
Warm White, Neutral White, and Tunable White Output
Warm white, neutral white, and tunable white output are color temperature options that influence cabinet mood and work-surface visibility in kitchen cabinets. Perceived warmth, surface clarity, and backsplash appearance can vary with color temperature, surface color, counter finish, and surrounding light sources.
A compact comparison can help clarify how each color output is typically perceived under different conditions.
| Color Output | Typical Cabinet Effect |
|---|---|
| Warm white | May create a softer appearance that supports comfort during evening use. |
| Neutral white | May improve task visibility for food prep and make surface details appear more defined. |
| Tunable white | Can allow color temperature adjustment when lighting needs change throughout the day. |
Warm white and neutral white can appear different depending on backsplash color, countertop finish, and mixed lighting from nearby fixtures. Tunable white may offer more flexibility across changing conditions, but the preferred setting depends on how color temperature interacts with kitchen cabinets, work-surface visibility, and surrounding light sources. Because perception varies by environment, no color output produces the same visual result in every space.
COB Strips, Diffusers, and Dot-Free Cabinet Light
COB strips and diffusers can help reduce visible light dots and create a smoother under cabinet line along the cabinet underside. A dot-free light appearance depends on conditions such as LED spacing, diffuser opacity, channel depth, and strip brightness rather than on a single component alone.
A COB strip typically places light sources closer together, which may make individual light points less noticeable than wider LED spacing. A diffuser can soften the visual output, while channel depth can influence how effectively the light blends before reaching the viewing angle. When strip brightness is high or diffusion is limited, visible dots may still remain noticeable on the cabinet underside.
The visual difference is often between visible dots and a smoother light line rather than between two separate lighting styles. COB strips and diffusers can work together to improve visual finish, but the final dot-free light effect varies with LED spacing, diffuser characteristics, channel depth, and overall brightness.
This chart shows the key conditions and risk factors that determine whether a COB strip and diffuser produce a dot-free light line under cabinets.

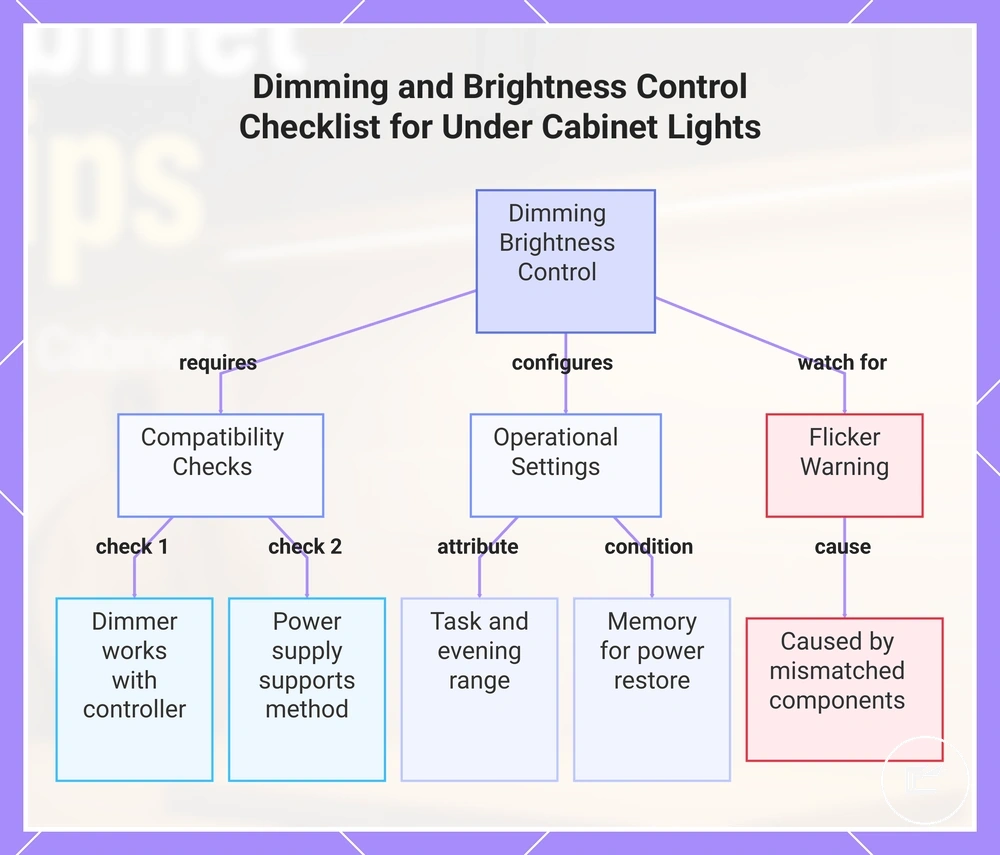
Dimming and Brightness Control Under Cabinets
Dimming and brightness control can let an under cabinet strip shift between brighter task lighting and lower-intensity evening use when the lighting kit supports adjustment. The available brightness range depends on the relationship between the dimmer, controller, and power supply rather than on the cabinet strip alone.
Before relying on dimming, it helps to confirm that the control components support the intended brightness changes.
- Check whether the dimmer is designed to work with the controller.
- Confirm that the power supply supports the selected brightness control method.
- Review the available brightness range for both task lighting and evening use.
- Consider memory behavior if the cabinet light should return to a previous setting after power is restored.
- Watch for flicker, which may occur when a dimmer, controller, and power supply are not matched correctly.
Dimming can change light intensity when the kit supports it, but compatibility varies by controller and power supply design. Flicker risk is often associated with control mismatches or unsupported dimming methods rather than with brightness control itself. For that reason, brightness control is usually evaluated as a system feature instead of assuming every dimmer works with every cabinet lighting kit.
This chart shows the key checks and considerations for dimming and brightness control in under cabinet lighting systems.
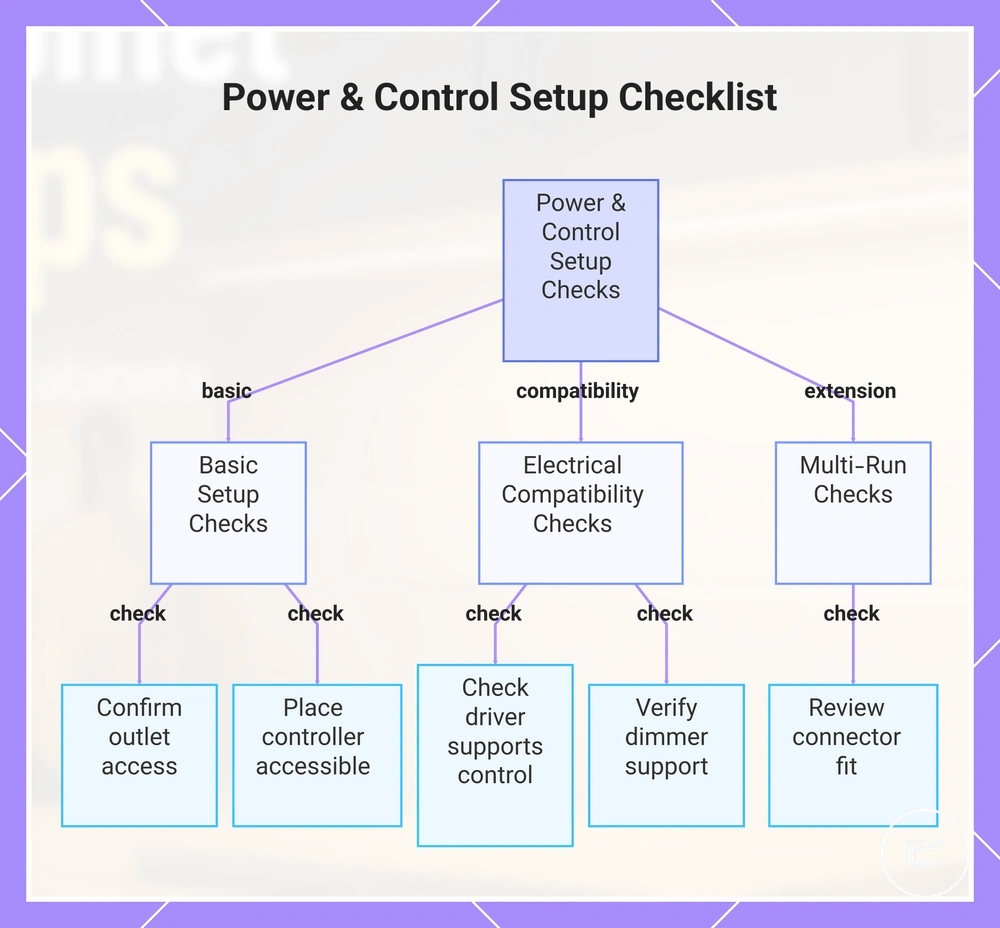
Power and Control Options for Under Cabinet Strip Use
Power and control options determine how easy an under cabinet strip is to use in daily use. A simple control setup may be enough for a short, accessible run, while a multi-run setup often requires closer attention to compatibility between power and control components. The right choice depends on access, wiring tolerance, and how the selected parts work together.
Plug-in power can be practical when outlet access is available and a visible cord is acceptable within the cabinet area. An inline switch may simplify daily use when it remains easy to reach. If outlet access is limited or the cord path becomes difficult to manage, the convenience of the control method may change.
A dimmer, motion sensor, and controller placement each influence how the cabinet light responds during daily use. A dimmer depends on driver compatibility to adjust brightness as intended, while a motion sensor relies on suitable detection range and placement for hands-free use. Controller placement can affect accessibility and may influence how easily the lighting system is operated.
The checklist below helps verify whether the selected power and control setup matches the cabinet layout and intended use.
- Confirm outlet access before selecting plug-in power.
- Check that the low-voltage driver supports the chosen control method.
- Place the controller where it remains accessible during daily use.
- Verify that dimmer support is available before expecting brightness adjustment.
- Review connector fit when extending, joining, or creating a multi-run setup.
Simple accessible runs may only require plug-in power and a reachable switch, while multi-run setups often benefit from additional compatibility checks because more components must work together. For deeper evaluation, power and connector compatibility can help clarify where component matching affects usability or safety. These checks reduce the risk of mismatches involving a low-voltage driver, dimmer, motion sensor, controller, or connector fit.
This chart shows the key verification checks for selecting and setting up power and control components for under cabinet lighting strips.
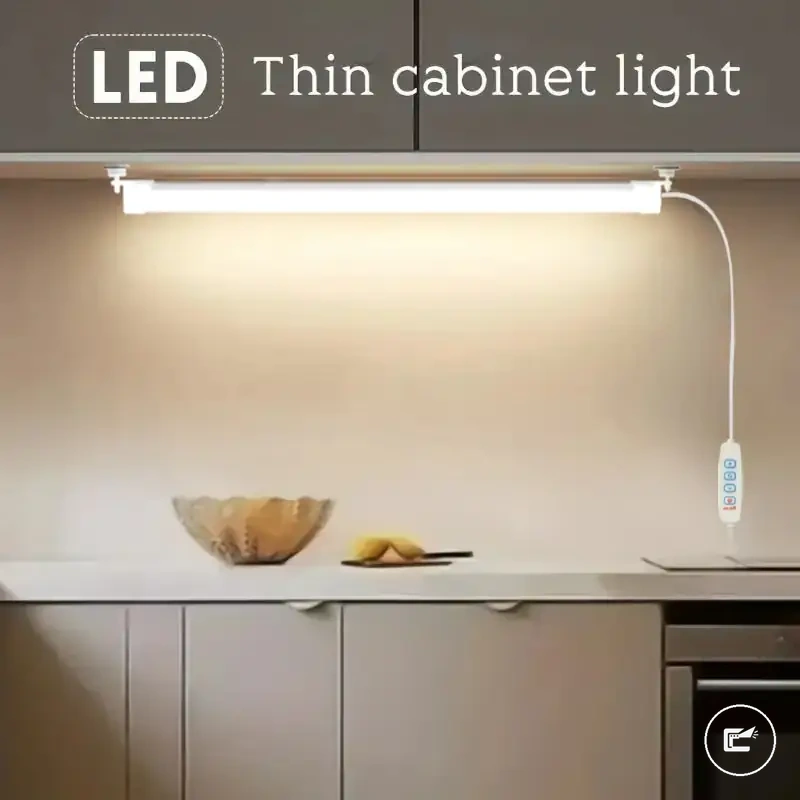
Plug-In Strip Lights for Simple Cabinet Setups
Plug-in strip lights are often suitable for simple cabinet setups when an outlet is available and a visible cord route is acceptable. Their suitability depends on outlet access, switch access, cabinet run length, and whether the kit includes the driver needed to power the cabinet strip.
Outlet location can affect how convenient a plug-in strip becomes during daily use. A larger adapter may require additional space around the outlet, while a visible cord may be more noticeable when the cable route cannot be concealed along the cabinet run. Switch access also matters because an easy-to-reach control point may improve everyday usability.
The pros-and-limits summary below helps clarify what plug-in convenience can and cannot solve.
| Pros | Limits |
|---|---|
| May simplify setup when a nearby outlet is already available. | Depends on outlet location and available cable routing. |
| Can be practical for a short cabinet run with convenient switch access. | A visible cord may affect appearance when the cable path remains exposed. |
| A kit with an included driver may reduce the number of separate components required. | Kit completeness varies, so driver inclusion should be confirmed before selection. |
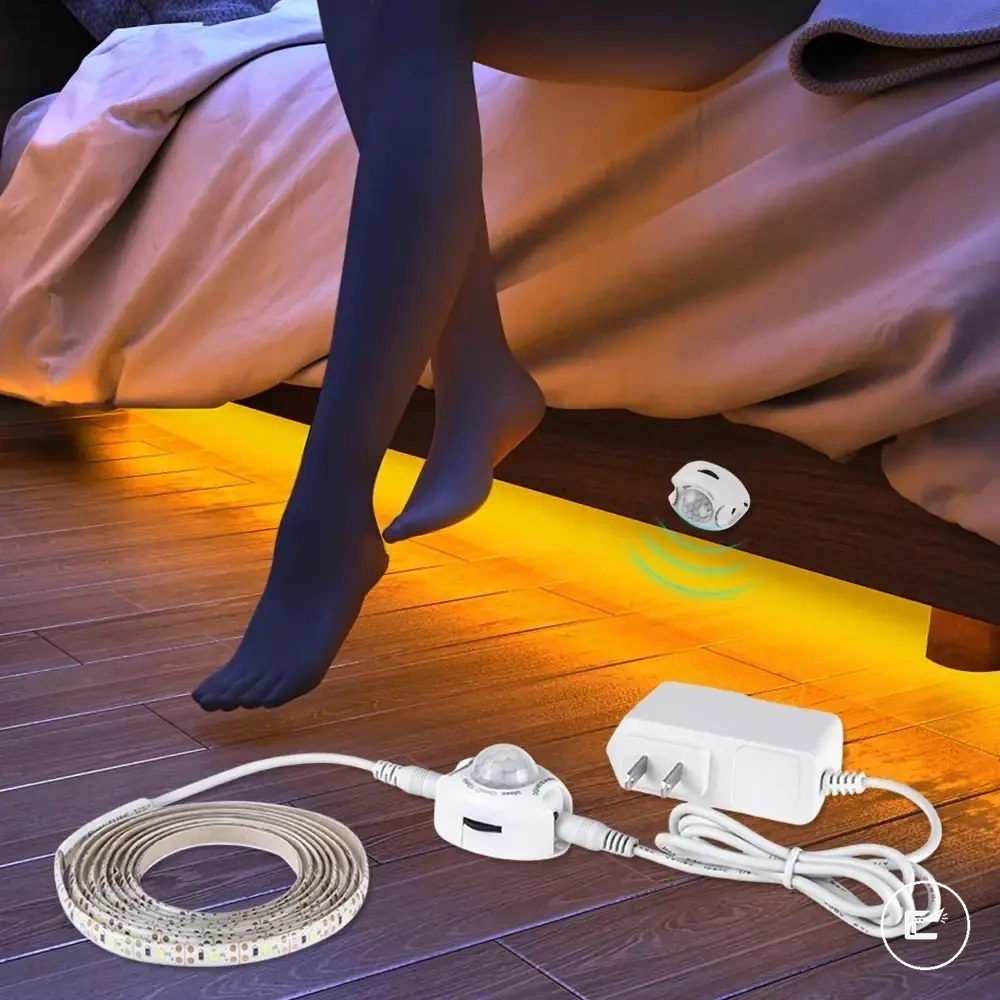
Motion Sensors and Hands-Free Cabinet Lighting
Motion sensors can support hands-free cabinet lighting when the sensor position matches movement patterns around the cabinet area. The benefit of a motion sensor depends on detection range, sensor angle, and whether hands-free control fits the intended use better than a switch or dimmer.
Motion sensors rely on detection behavior, so placement conditions can influence the outcome. A detection range that aligns with normal movement may improve hands-free use, while a mismatched sensor position may reduce responsiveness or increase false triggers. Delay timing also affects comfort because a light that switches off too quickly or remains active longer than expected may not suit the intended routine. False triggers may occur when nearby movement enters the detection area, making sensor placement an important selection criterion.
The checklist below helps assess whether a motion sensor matches the cabinet lighting setup.
- Check whether the detection range matches the normal movement path.
- Consider delay timing based on how long cabinet light is typically needed.
- Position the motion sensor to help reduce false triggers from nearby activity.
- Verify dimming compatibility if brightness adjustment is part of the control choice.
- Confirm that the selected power method supports the motion sensor configuration.
Dimming compatibility and power method can affect how a motion sensor works within the overall control system. Motion sensors may improve hands-free convenience when detection behavior matches the space, but results depend on sensor placement, control preferences, and component compatibility rather than on motion control alone.
When LED Strips Are the Right Under Cabinet Light Type
LED strips are often the better fit than puck lights or light bars when under cabinet lighting needs continuous light, a flexible run, and hidden placement along the cabinet underside. Cabinet light type depends on light spread, fixture visibility, installation tolerance, and the desired visual finish. LED strips may suit longer or irregular cabinet runs when broad task coverage is preferred over isolated light points.
| Light type | Strong fit | Trade-off | When to choose it |
|---|---|---|---|
| LED strips | Continuous light across a flexible run | May need a diffuser for a smoother visual finish | When hidden placement and broad task coverage are priorities |
| Puck lights | Spot effect for focused illumination | Light coverage may appear less continuous | When a simple install and localized lighting are acceptable |
| Light bars | Even spread from a rigid fixture | Less adaptable to irregular cabinet lengths | When cabinet dimensions align with the fixture size |
LED strips remain the reference choice when a concealed cabinet light and continuous light line are more important than fixture simplicity. Puck lights or light bars may be easier when cabinet dimensions are straightforward or when fewer accessories are preferred, because a diffuser is sometimes used to refine strip appearance. For a broader cabinet lighting type comparison, additional format differences can be evaluated beyond under cabinet strip suitability.
Choosing an Under Cabinet LED Strip Light Kit
An LED strip light kit depends on cabinet length, light quality preferences, power method, control options, and included accessories. A kit that suits one cabinet run may not suit another because strip length, mounting needs, and compatibility requirements can vary. Kit selection should organize fit, compatibility, and everyday use before any product choice is considered.
| Kit part | Required condition | What to check | Decision impact |
|---|---|---|---|
| Strip length | Matches cabinet run and coverage needs | Available length and layout flexibility | May affect coverage and extension requirements |
| Driver | Supports the strip voltage | Driver and voltage compatibility | May influence system compatibility |
| Connector | Fits strip type and run layout | Corner, extension, or joining requirements | May affect installation flexibility |
| Diffuser channel | Matches the desired visual finish | Compatibility with strip style or COB design | May improve light-line appearance |
| Dimming support | Works with the selected control method | Control compatibility | May affect brightness adjustment options |
| Motion control | Fits the intended usage pattern | Sensor and control support | May influence hands-free operation |
Strip length and strip type should align with the cabinet run because coverage needs vary by layout. A flexible cabinet strip may suit irregular runs, while a shorter and simpler run may require fewer accessories. The required strip length can also influence whether additional connectors or extensions are needed.
Driver, voltage, and connector match affect how the LED strip light kit functions as a complete system. A driver should match the strip requirements, while connector selection depends on cabinet layout and strip configuration. Mismatches may limit usability or require additional planning.
Diffuser channel, dimming support, and motion control affect how the cabinet light is used after installation. A diffuser channel may improve visual finish, while dimming support and motion control depend on compatibility with the selected kit components. These features are usually evaluated as usability criteria rather than standalone upgrades.
Simple plug-in kits may suit straightforward cabinet runs with minimal extension needs, while more planned cabinet runs often benefit from closer review of strip length, driver compatibility, connector requirements, color output, and mounting needs. Reviewing each kit part against its required condition can help clarify whether the LED strip light kit matches the cabinet run and intended use.
The products below are useful examples for comparing available options. Before buying, check that the compatibility criteria, key features, and product details match your needs.

Cabinet Length, Strip Size, and Coverage Fit
Cabinet length and strip size determine whether an LED strip light kit can cover the intended cabinet run with minimal gaps or excess strip. Coverage fit depends on cabinet length, strip length, cut points, and the physical space available for mounting and routing the cabinet strip.
Before selecting a kit, measure the cabinet run and the physical dimensions that may affect coverage and placement.
- Measure cabinet length to estimate the strip length needed for the intended coverage.
- Check cut points because excess strip may remain when the cabinet run does not align with available cutting intervals.
- Verify strip width against channel clearance if a mounting channel or diffuser channel is planned.
- Review corner turns where the cabinet run changes direction.
- Confirm power reach between the adapter location and the planned strip position.
- Check channel clearance around cabinet edges, lips, or mounting surfaces.
Cabinet length, strip size, and coverage fit should be evaluated together because cut points, strip width, channel clearance, corner turns, and power reach can influence the final layout. In a multi-cabinet run, additional planning may be needed when separate cabinet sections or adapter location constraints affect continuous coverage.
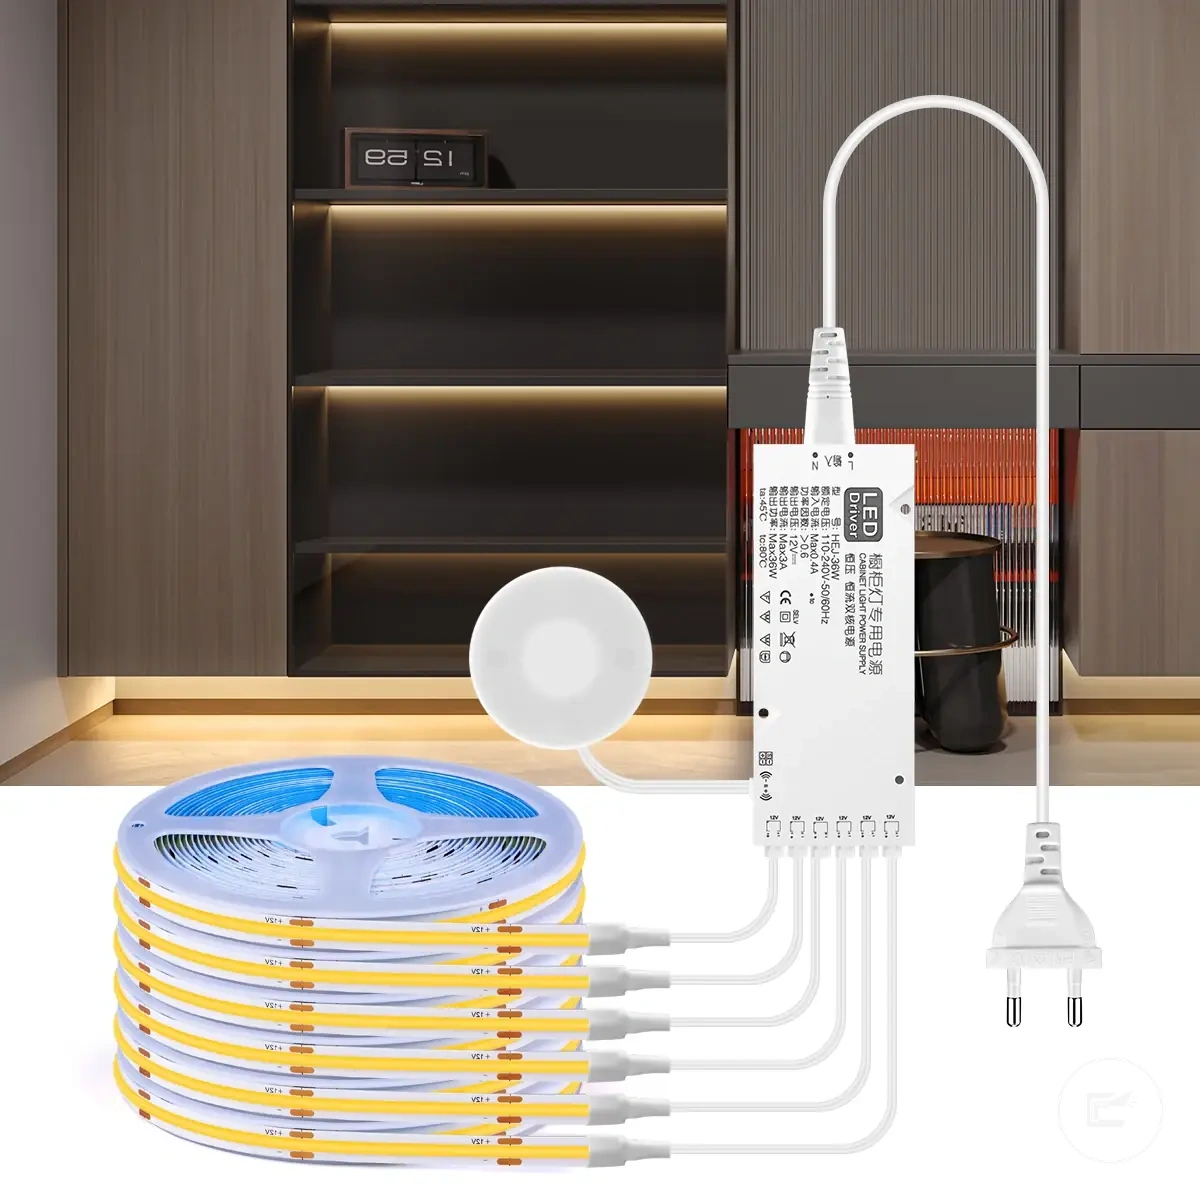
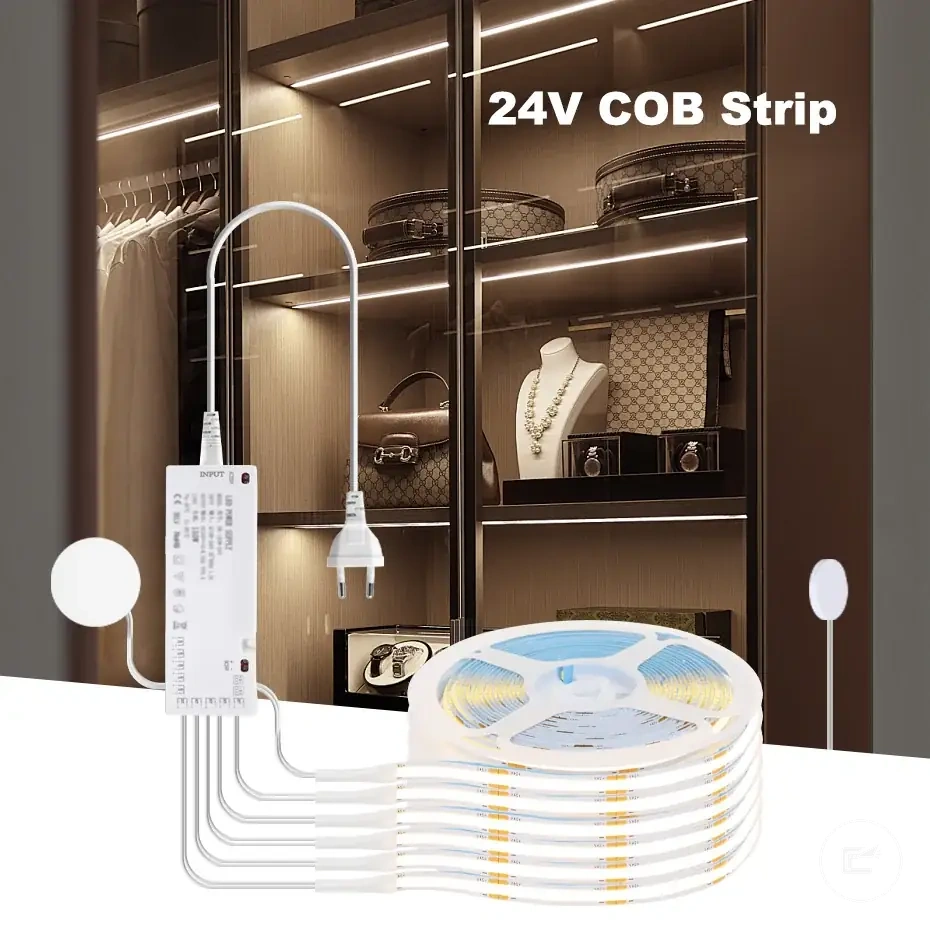
Included Drivers, Connectors, Channels, and Controls
Included drivers, connectors, channels, and controls determine whether a strip kit is complete for the intended cabinet setup. Kit completeness depends on component matching because a driver, connector, channel, or control can still require a voltage match, strip width match, or compatible control method for the planned cabinet run.
| Component | Match condition | Risk if missing or mismatched | Decision note |
|---|---|---|---|
| Driver | Correct voltage match for the cabinet strip | May limit operation if requirements differ | Check voltage match rather than relying on inclusion alone |
| Connector | Matches strip width and layout needs | May complicate joins or corner turns | Confirm connector style for the planned run |
| Extension lead | Reaches the required cabinet sections | May restrict placement options if insufficient | Review run length before selection |
| Diffuser channel | Fits strip width and mounting space | May affect the intended visual finish | Check channel clearance and dimensions |
| Controller, dimmer, or sensor | Matches the selected control method | May limit control functions if incompatible | Verify controller, dimmer, and sensor compatibility |
| Mounting clips | Suit the channel or strip mounting method | May affect mounting stability | Confirm mounting requirements before use |
Component matching matters more than component count. A driver requires the correct voltage match, a connector should align with strip width and corner-turn requirements, and a diffuser channel should suit both mounting clips and the intended visual finish. Included controls may only perform as expected when controller, dimmer, and sensor compatibility match the cabinet strip configuration.
Compatibility risks can become more noticeable when cuts, corner turns, or multiple strip segments are involved. In those situations, an included connector, extension lead, or controller may still require additional review because the cabinet run can introduce conditions that affect component matching.
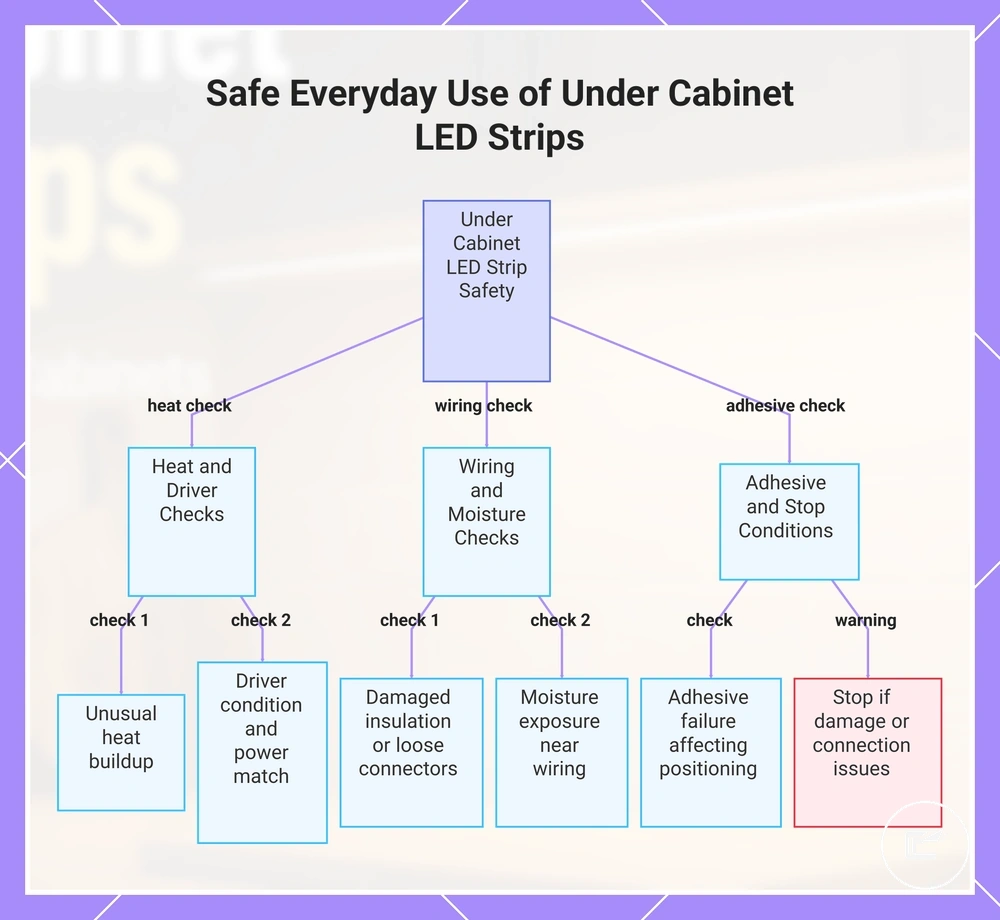
Safe Everyday Use of Under Cabinet LED Strips
Safe everyday use of under cabinet LED strips depends on keeping heat, wiring, adhesive, and controls within reasonable operating conditions. A cabinet strip is typically easier to use safely when the low-voltage driver maintains a suitable power match, the mounting surface remains stable, and cable routing avoids unnecessary strain. Safety conditions can vary by cabinet layout, operating duration, and the surrounding environment.
Safe everyday use also depends on managing heat buildup around the cabinet strip and low-voltage driver. Heat may become more noticeable when ventilation is limited, when an enclosed cabinet restricts airflow, or when long operating hours increase component temperature. Adhesive failure can also become more likely when the mounting surface is unsuitable or when heat affects long-term attachment.
Wiring condition should be checked periodically because damaged insulation, loose connectors, or moisture exposure can affect normal operation. Moisture may be more relevant near a cooking area where steam or condensation reaches the mounting surface. Loose connectors and damaged insulation are practical warning signs because they may indicate conditions that require closer inspection before continued use.
Safe everyday use includes knowing when to stop using the strip. Stop using the cabinet strip if visible damage, damaged insulation, loose connectors, significant adhesive failure, or moisture-related issues affect normal operation because those conditions may increase uncertainty about continued use. For a broader installation safety checklist, additional setup and inspection considerations can be reviewed after everyday safety cues are understood.
- Check for unusual heat buildup around the cabinet strip or low-voltage driver.
- Confirm that the low-voltage driver remains in suitable condition and maintains a power match with the strip.
- Look for damaged insulation, strained cables, or loose connectors.
- Watch for moisture exposure near the mounting surface or wiring path.
- Check for adhesive failure that may affect strip positioning.
- Stop using the strip if visible damage or connection issues affect normal operation.
This chart shows the key safety checks and stop conditions for everyday use of under cabinet LED strips.