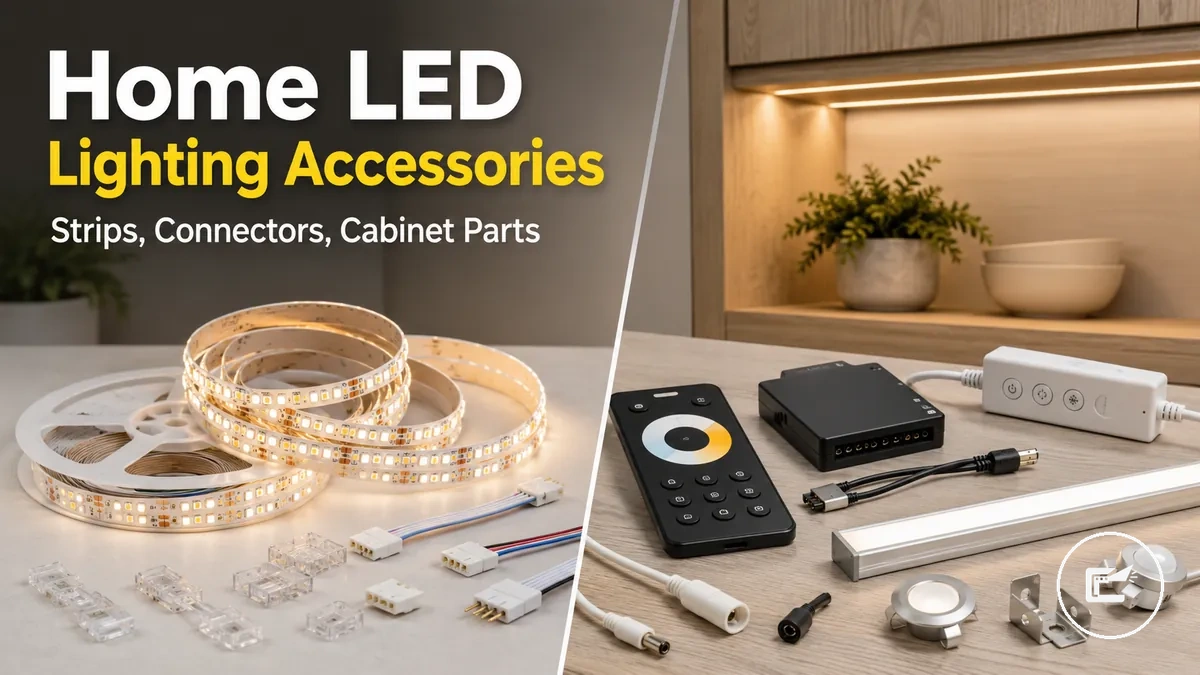
Home LED Strip and Cabinet Lighting Accessories for Cabinet and Home Lighting Setups
Home LED strip lighting accessories are the connected parts that help a cabinet or indoor strip lighting setup work as a usable lighting system. The accessory system can include an LED strip lighting kit, connectors, a power supply, a controller, a dimmer, mounting parts, and a diffuser channel when the setup needs cleaner placement or smoother light. This page frames home LED strip lighting accessories as a buying decision topic for understanding, comparing, and choosing cabinet lighting accessories without treating individual products as the main subject.
Parts, use cases, compatibility, and light quality need to be evaluated together because under cabinet lighting can change by cabinet material, strip type, power method, brightness need, and installer skill. A connector may fit one strip width but not another, a power supply may depend on the strip and controller, and a diffuser channel may affect the visible finish more than the light source itself. Kits, separate parts, and installation accessories can overlap, so the safer boundary is to treat each item as part of one setup rather than as an isolated purchase.
The main decision is not only whether LED strip lights can be placed under a cabinet, but whether the accessory choice supports the intended cabinet lighting result with compatible parts, controlled brightness, safe power routing, and a practical external price-check path. The first grounding step is to clarify what counts as home LED strip lighting accessories before comparing formats, power paths, light quality, or later product examples.
What Counts as Home LED Strip and Cabinet Lighting Accessories
Home LED strip and cabinet lighting accessories are the accessory system that supports, powers, controls, mounts, or refines cabinet and indoor strip lighting setups. This category includes the parts that work with LED strips rather than merchant offerings or standalone purchasing options. The accessory-system boundary covers supporting components used around strip lighting and cabinet-use applications.
The category includes both core and supporting components, while excluding unrelated lighting products that do not contribute to the strip-lighting system. Depending on the model, voltage, control method, or installation context, a kit may include certain parts and omit others. For a more detailed breakdown of what these lighting accessories include, it helps to separate accessory functions from complete kit variations.
- LED strips used as the primary lighting element within the accessory system.
- Connectors and power parts that help link and energize compatible components.
- Controllers and dimmers that may provide adjustment or control functions when supported by the setup.
- Channels and diffusers that can influence placement, light distribution, and visual finish.
- Mounting parts used to secure or position cabinet lighting parts.
- Cabinet-use components intended for under-cabinet, shelf, or similar indoor lighting contexts.
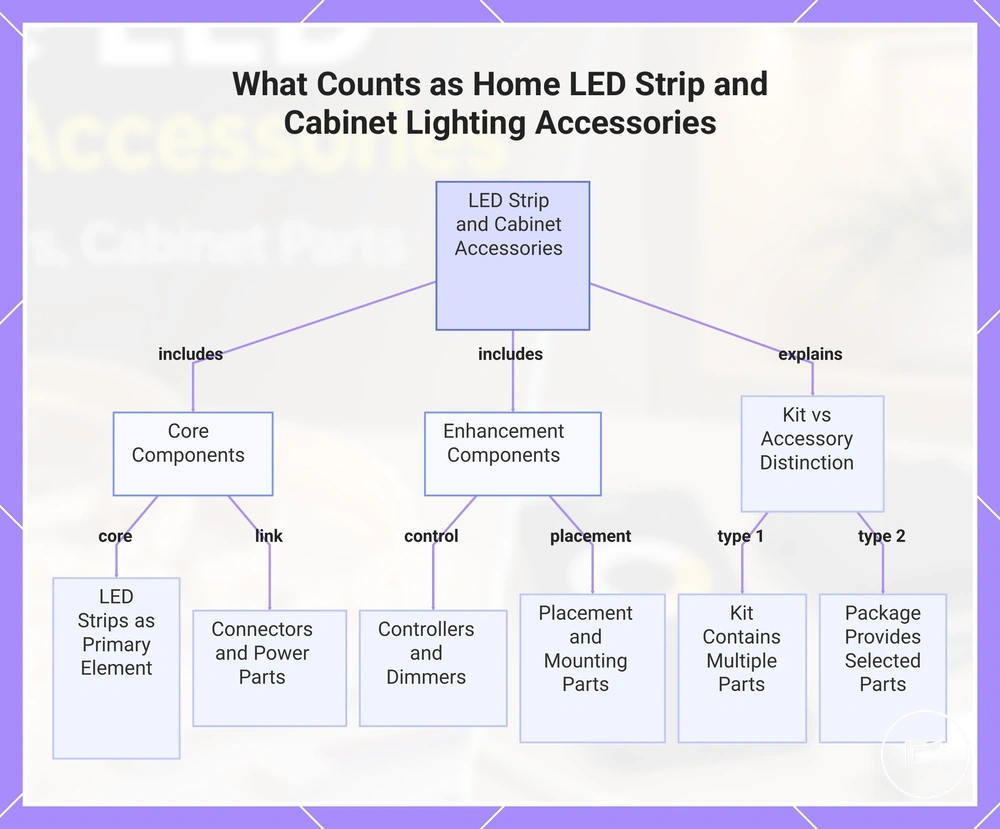
A complete lighting kit and a separate accessory package are not necessarily the same category. A kit may contain multiple accessory parts, while another package may provide only selected LED strip kit parts, so included parts and missing parts can vary by intended use and configuration.
This chart shows the main components and the distinction between complete kits and separate accessory packages for home LED strip and cabinet lighting setups.
Core Parts in an LED Strip Lighting Kit
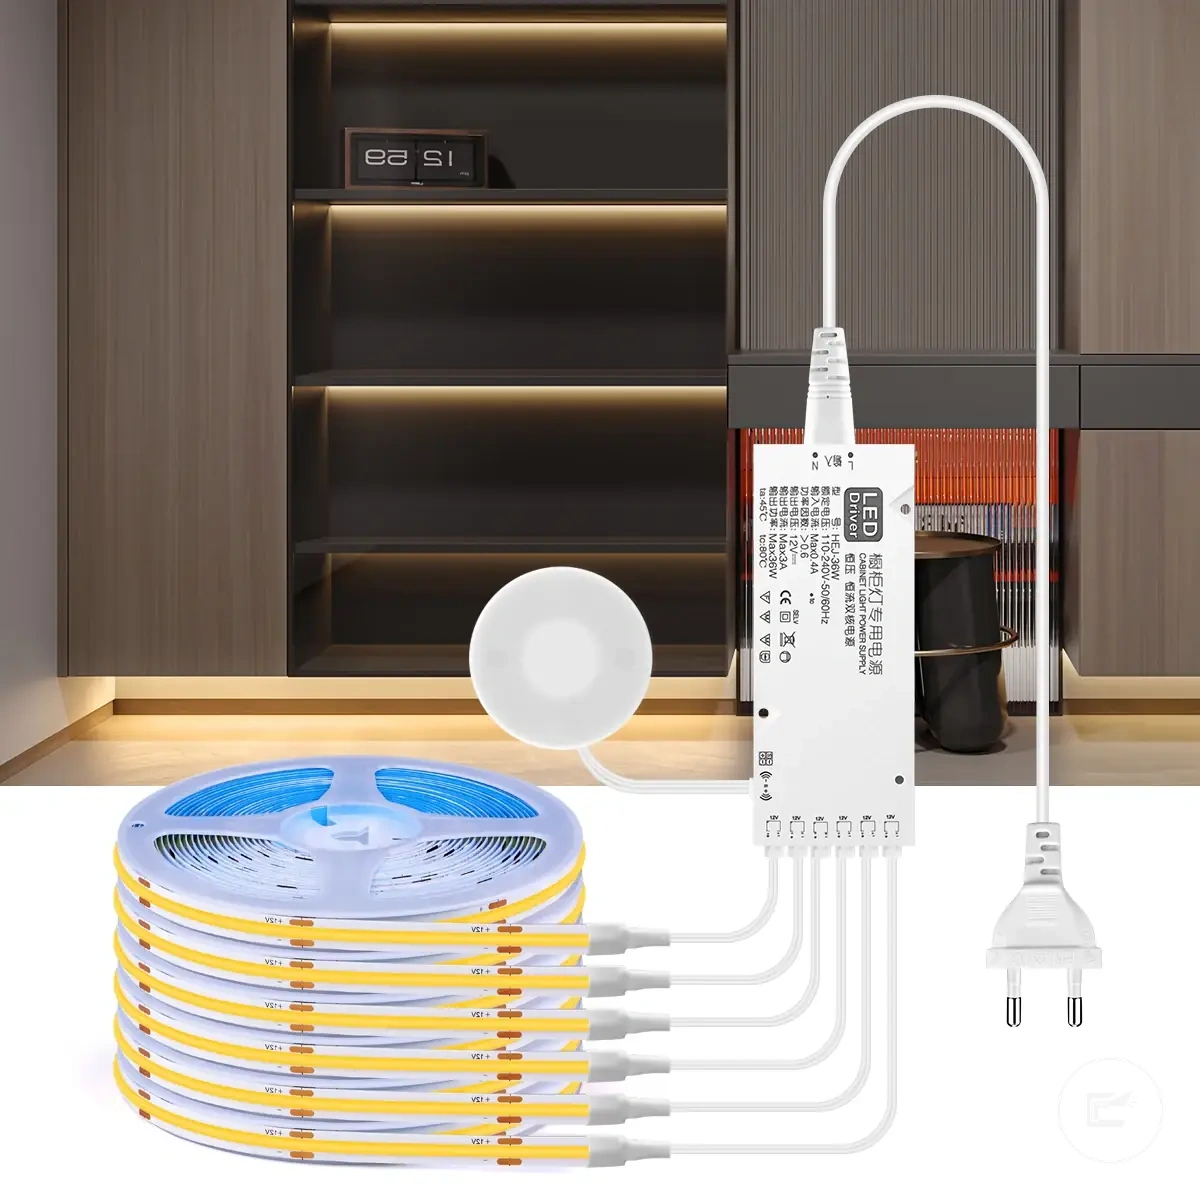
An LED strip lighting kit is a connected part system that combines lighting, power, control, and mounting components for cabinet use. The LED strip provides light, while supporting components help the system operate, fit the intended space, and achieve the desired level of control or finish. Kit completeness depends on matching the included parts to the power, control, and mounting requirements of the planned setup.
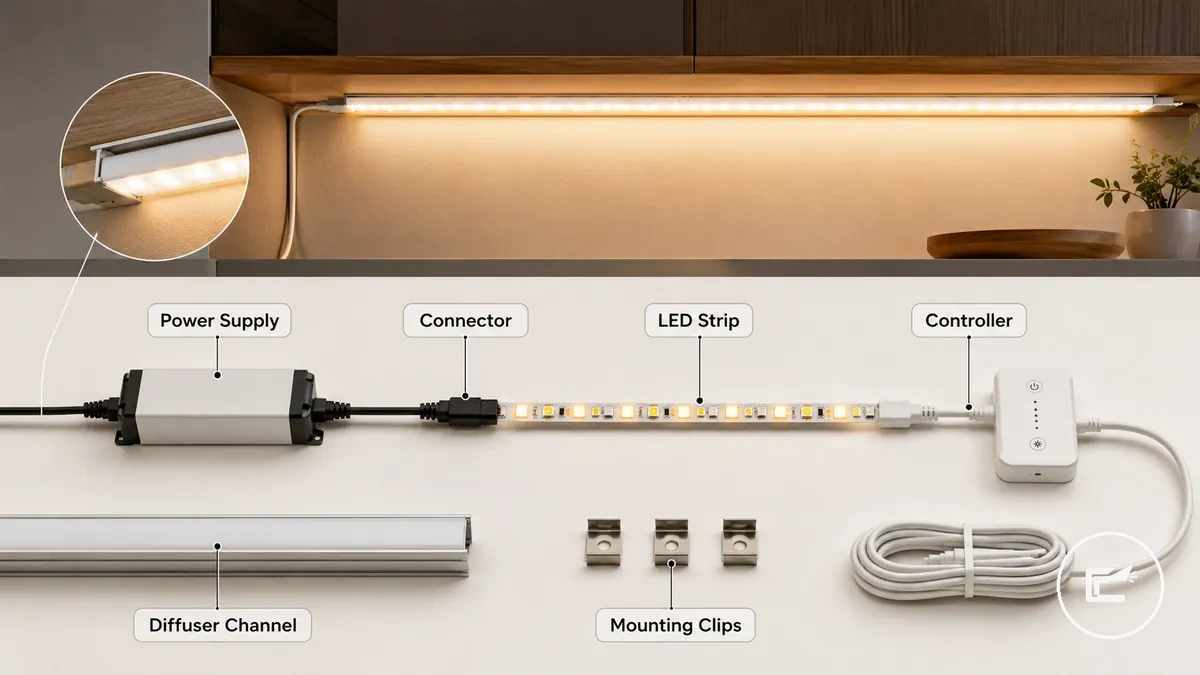
The image highlights the core parts commonly found in an LED strip lighting kit and clarifies how each component contributes to the overall system. The table connects each part group to its attribute, condition, and decision impact.
| Entity/Part | Attribute/Criterion | Value/Condition | Effect/Risk/Decision |
|---|---|---|---|
| LED strip | Light source | Should match the intended lighting purpose and system requirements | Directly affects operation and lighting outcome |
| Power supply | Power delivery | Must match the strip's power requirements | Supports reliable operation and reduces mismatch risk |
| Connector | Connection fit | Fit may depend on strip width and design | Affects compatibility between parts |
| Controller or dimmer | Control function | May vary by control method and kit design | Influences adjustment and control options |
| Diffuser channel | Light presentation | Used when a cleaner finish or softer light distribution is desired | Can affect appearance and light output presentation |
| Mounting clips and cable | Installation support | Requirements may vary by cabinet layout and routing needs | Affects placement stability and cable management |
LED strip lighting kits can vary by purpose, voltage requirements, and mounting needs. A cabinet lighting kit may include all major part groups, while another accessory kit may require selected components to be chosen separately, creating a potential buying risk when a needed part is not included.
LED strips, tape lights, bars, and cabinet lighting formats
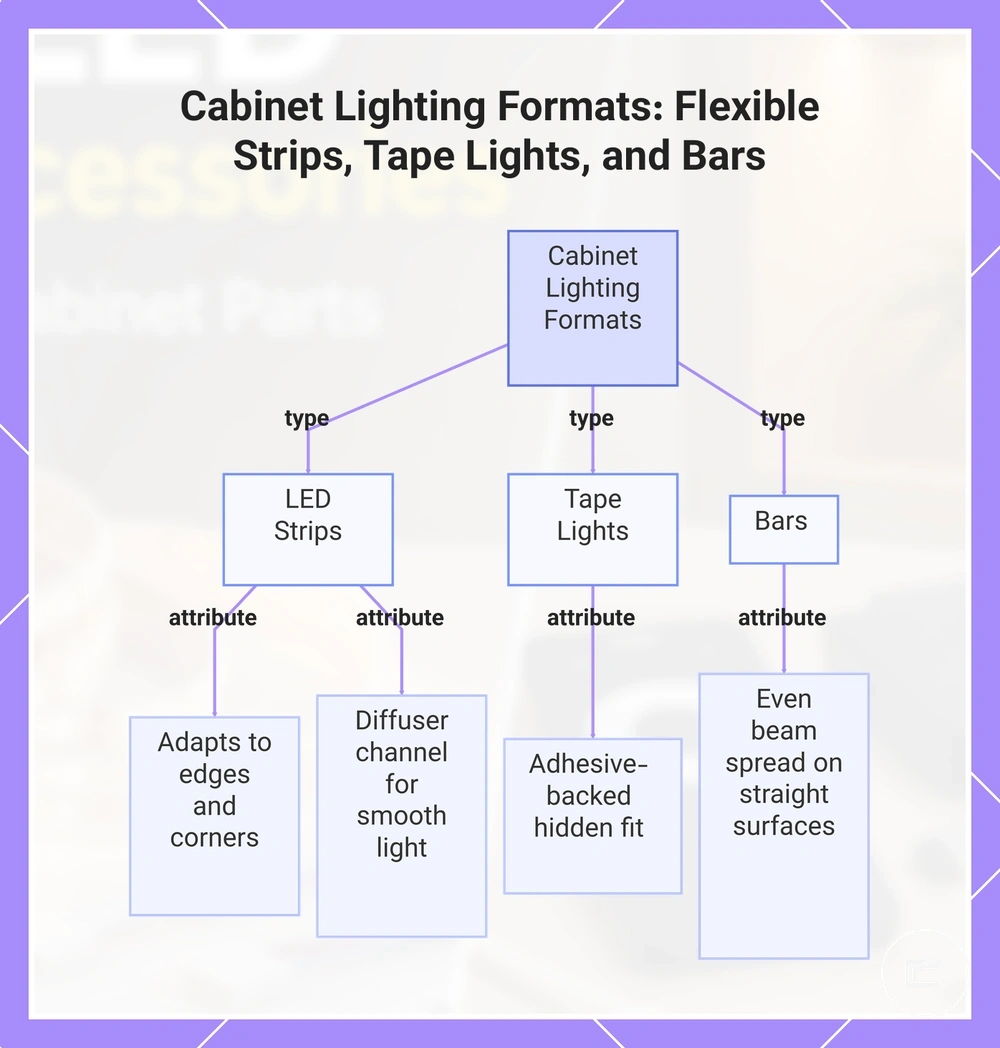
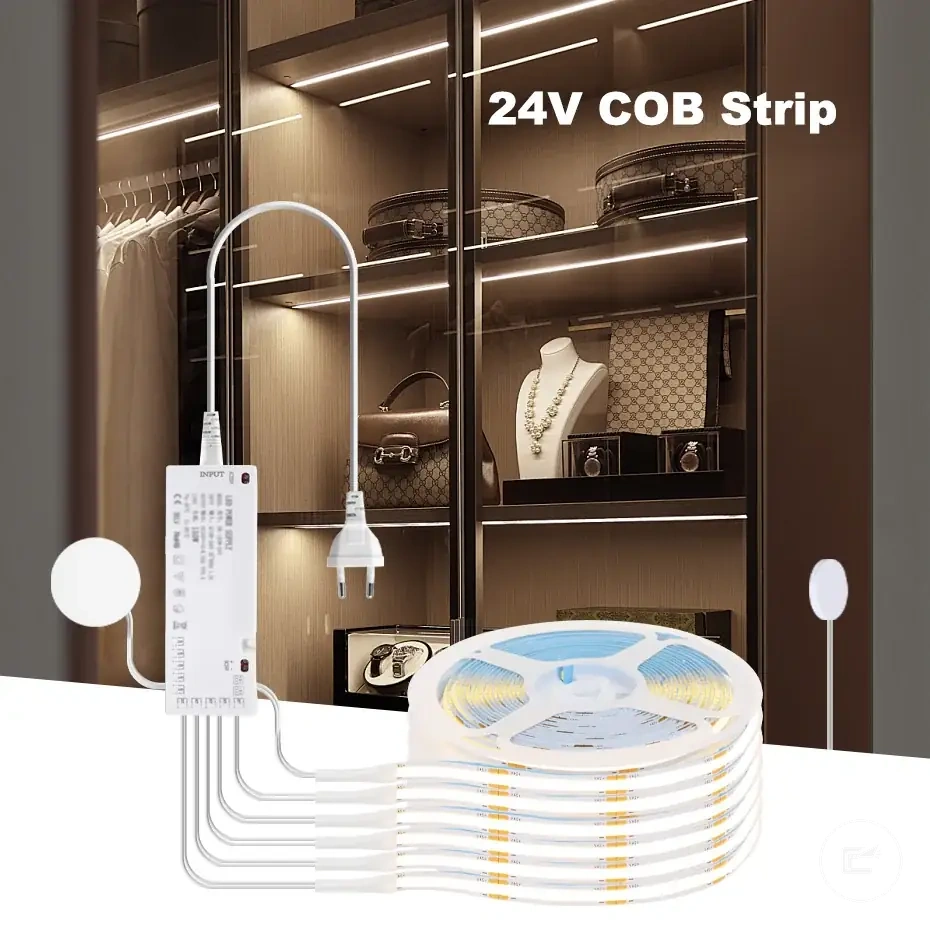
LED strips, tape lights, bars, and cabinet lighting formats differ mainly in flexibility, beam spread, mounting surface requirements, and visible finish. LED strips and tape lights are typically flexible formats that can follow cabinet edges and longer runs, while bars use a rigid body that may suit straight mounting surfaces. Differences in bendability, light continuity, and cabinet visibility can influence how each format fits a specific cabinet layout.
- LED strips: Flexible strip lights that can adapt to cabinet edges, corners, and changing placement paths when greater flexibility is needed.
- Tape lights: LED tape often includes adhesive-backed mounting, which may support a hidden fit and a cleaner visible finish on suitable surfaces.
- Bars: Light bars use a rigid body and may provide a more structured installation with an even beam spread across straight sections.
- Diffuser-equipped strip formats: A diffuser channel can help create smoother light continuity and a more refined visible finish.
- Cabinet lighting formats: Format choice depends on flexibility needs, mounting surface conditions, beam spread preferences, and cabinet visibility requirements. For a broader format overview, compare cabinet lighting types.
As a contrastive example, bars or pucks may fit better on short, fixed cabinet sections where a rigid mounting surface is available, while LED strips may be easier to place when the layout includes corners, curves, or longer continuous runs.
This chart compares the key features of the main cabinet lighting formats: flexible LED strips, tape lights, and rigid bars.
Power supplies, connectors, controllers, and dimmers
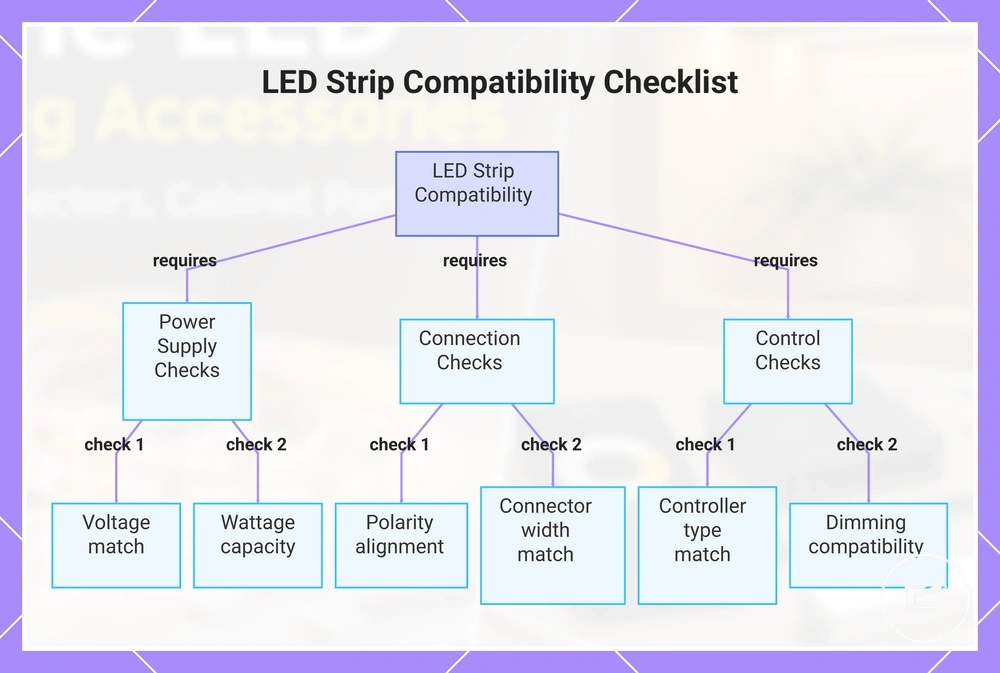
Power supplies, connectors, controllers, and dimmers must match key compatibility conditions before LED strip lighting can operate reliably. A power supply affects voltage and wattage capacity, a connector affects fit and signal continuity, and a controller or dimmer affects control behavior. Compatibility depends on the specifications of the connected components, so matching requirements should be checked before selecting parts.
The functional control layer can be verified with the following checklist:
- Voltage: The power supply voltage should match the voltage identified for the LED strip and related control components.
- Wattage capacity: Power supply capacity should be suitable for the connected strip length and expected lighting load according to product labeling.
- Polarity: Polarity markings should align across connected parts because polarity differences may affect operation.
- Connector width: Connector width should match the LED strip format to support proper fit.
- Controller type: The controller should correspond to the LED strip type and intended control behavior.
- Dimming compatibility: A dimmer may require compatibility with both the controller and lighting system before adjustment functions operate as expected.
A mismatched power supply, incorrect connector width, or polarity mismatch may prevent normal operation or create troubleshooting issues. Compatibility decisions should be verified against the specifications shown on the relevant component labels because voltage, wattage capacity, polarity, and dimming compatibility can vary by product design.
This chart shows the key compatibility checks for power supplies, connectors, and controllers when selecting components for LED strip lighting.
Channels, diffusers, clips, cables, and mounting parts
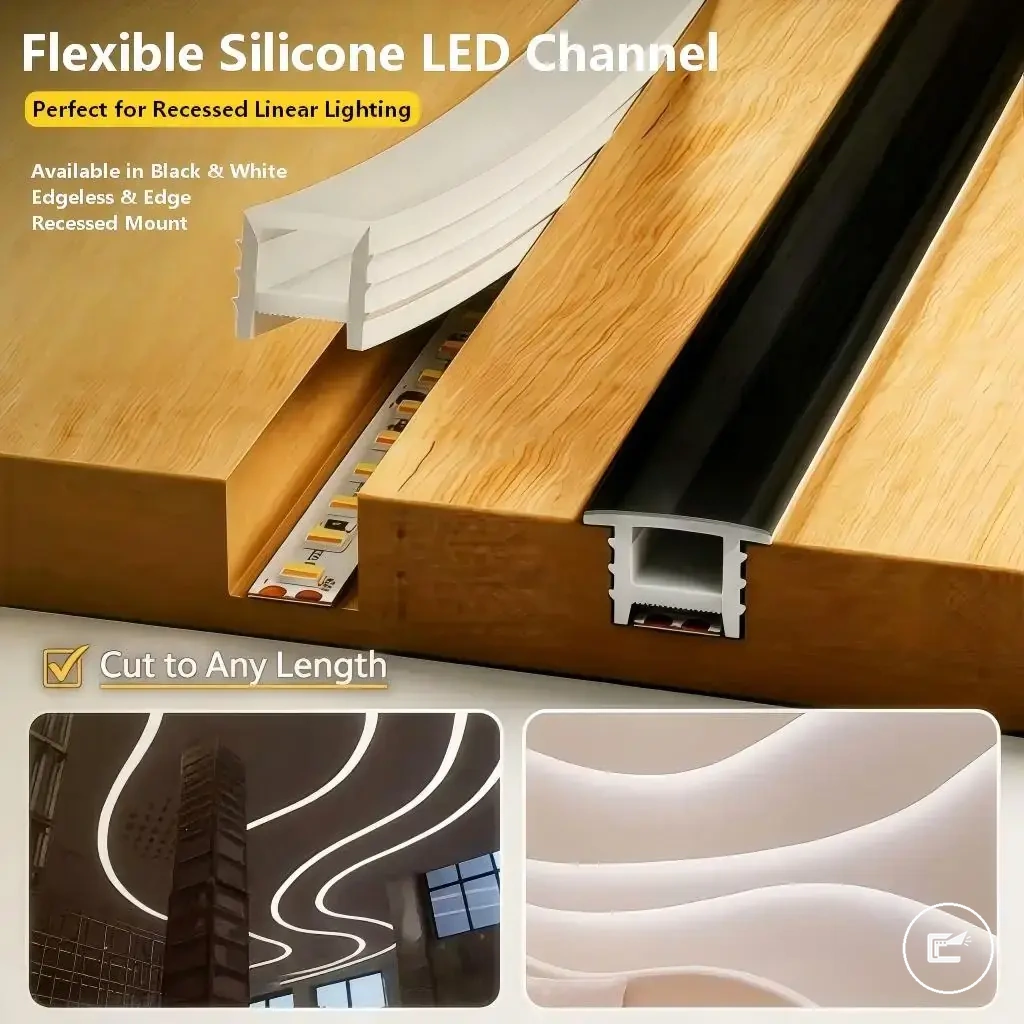
Channels, diffusers, clips, cables, and mounting parts are finishing components that shape the visible result of an LED strip lighting setup. These parts can influence appearance, light distribution, cable routing, and mounting support, while outcomes related to durability, glare, hotspot visibility, or heat handling may vary by material, diffuser opacity, mounting method, and surface fit.
The following attributes help explain how these parts affect the finished installation:
| Part | Attribute | What it changes |
|---|---|---|
| Channels | Material | May influence support, visible finish, and heat-handling characteristics depending on channel design and conditions. |
| Diffusers | Diffuser opacity | Can affect glare visibility, hotspot appearance, and perceived light distribution. |
| Clips | Mounting method | May improve mounting support when adhesive alone is less suitable for the surface. |
| Cables | Cable routing | Can influence neatness, cabinet-edge organization, and wiring visibility. |
| Mounting parts | Surface fit | May affect positioning stability and visible finish depending on the mounting surface. |
For example, a diffuser channel or mounting clip may matter more than adhesive alone when a cleaner visible finish is desired or when surface fit conditions make attachment more challenging. These parts do not guarantee a specific outcome, but they can influence light presentation, mounting support, and overall neatness when selected for the intended environment.
Cabinet and Home Use Cases for LED Strip Lighting
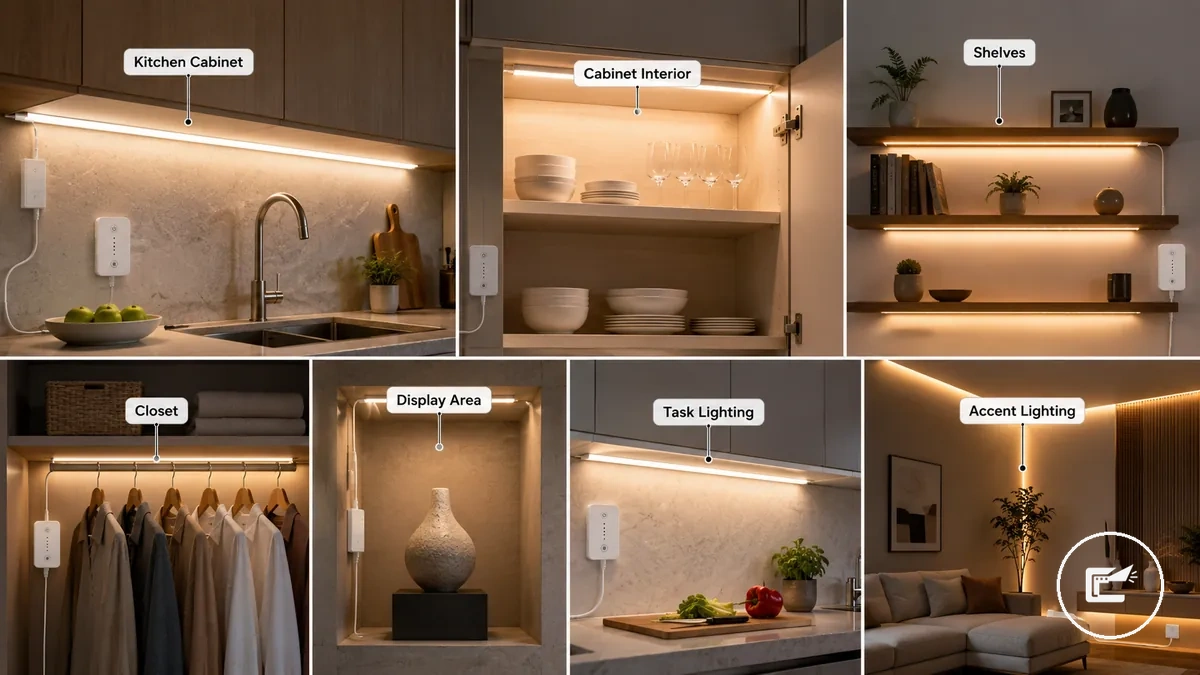
Cabinet use cases change LED strip lighting accessory requirements because placement affects brightness needs, control preferences, mounting conditions, and power needs. Kitchen cabinets, cabinet interiors, shelves, closets, display areas, and other indoor cabinet lighting locations often require different accessory combinations depending on visibility goals, access needs, and installation surfaces.
These cabinet and home use cases demonstrate how placement context can influence accessory selection and potential decision risks. The image highlights common placement examples and shows how accessory needs can change between locations.
| Use case | Main lighting goal | Helpful accessory condition | Decision risk |
|---|---|---|---|
| Kitchen cabinets | Task lighting for work surfaces | Suitable brightness control, mounting support, and power capacity | Lighting output may not match task visibility needs |
| Cabinet interiors | Access lighting and visibility | Motion sensor options and low-profile strip placement | Access areas may remain difficult to view in certain conditions |
| Shelves | Display lighting and visibility | Neat cable routing and appropriate mounting parts | Visible wiring or inconsistent presentation |
| Closets | Item identification and access | Control options that align with usage patterns | Lighting behavior may not match access requirements |
| Display areas | Highlighting displayed items | Diffuser use, visible finish considerations, and color temperature selection | Glare or visible hotspots depending on placement context |
| Indoor accent lighting | Accent lighting around cabinet or shelf features | Control flexibility and mounting compatibility | Brightness levels may not create the intended visual effect |
Task lighting and accent lighting often lead to different accessory priorities. A kitchen cabinet setup used for task lighting may emphasize visibility and control, while an accent lighting application may place greater emphasis on diffuser use, visible finish, and how the lighting integrates with the surrounding placement context.
Kitchen under-cabinet task lighting
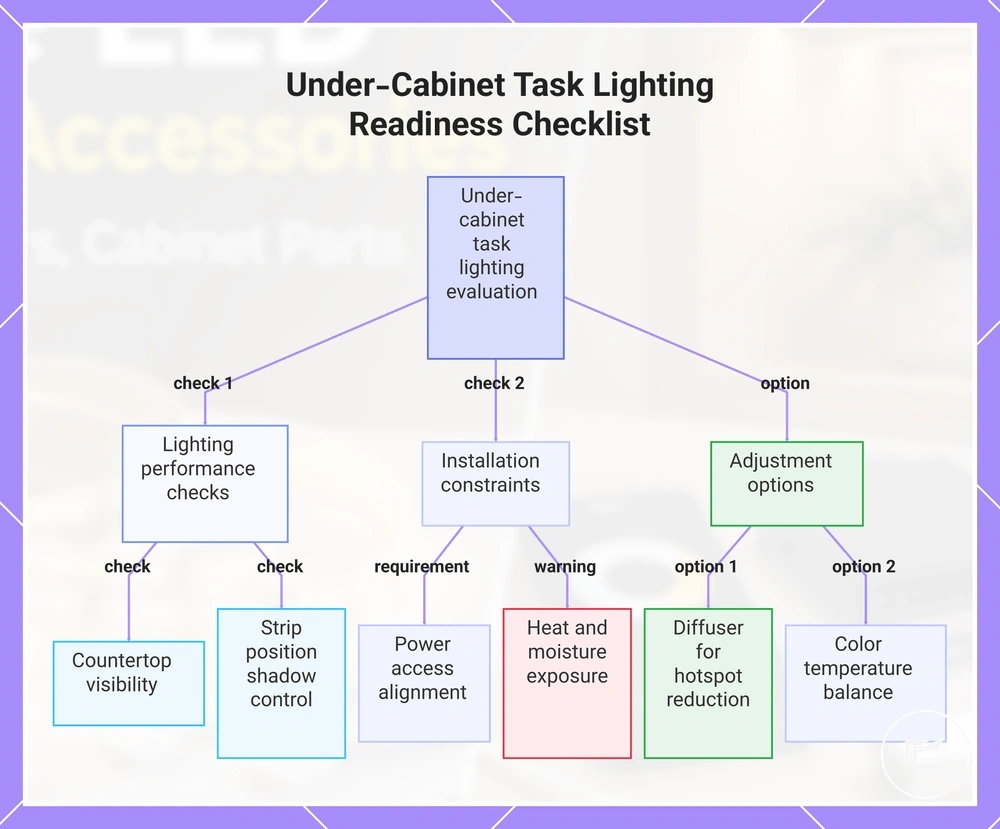
Kitchen under-cabinet task lighting has higher visibility requirements because countertop tasks often depend on clear illumination, shadow control, and suitable light placement beneath cabinets. Countertop visibility can vary by strip position, cabinet depth, surface reflection, and surrounding light conditions, so accessory choices may need to support task visibility while accounting for power access, heat proximity, and nearby moisture conditions.
Kitchen under-cabinet task lighting can be evaluated with the following readiness checklist:
- Countertop visibility should be considered based on the intended task area and the amount of usable light reaching the work surface.
- Strip position may influence shadow control because placement along the cabinet underside can change how light reaches the countertop.
- A diffuser may help reduce visible hotspots and surface reflection when direct light points are noticeable.
- Warm white or neutral white choices may depend on the preferred balance between visual comfort and task visibility.
- Power access should align with cabinet underside lighting conditions and the planned setup location.
- Heat proximity and moisture exposure may affect setup choices depending on the surrounding kitchen environment.
For example, when a countertop shows visible light points or uneven task-light distribution, a diffuser or higher strip density may help improve lighting consistency because hotspot visibility can become less noticeable. For broader placement considerations related to under cabinet LED strip lighting, placement context and accessory selection should be evaluated together.
This chart shows the key factors to check when evaluating kitchen under-cabinet task lighting, including lighting quality, installation constraints, and adjustment options.
Cabinet interiors, shelves, closets, and display areas
Cabinet interiors, shelves, closets, and display areas often shift the lighting goal from direct task visibility toward access lighting, accent lighting, or display clarity. In these placement contexts, accessory choices may depend more on motion sensors, low-profile strips, hidden wiring, lower brightness preferences, and surface constraints than on maximum light output. The intended use of the space can influence whether visibility, presentation, or convenient access becomes the primary requirement.
Accessory needs can vary by placement context:
- Cabinet interiors: Interior cabinet lighting may benefit from low-profile strips, concealed wiring, and lower brightness levels when the goal is access visibility without drawing attention to lighting components.
- Shelves: Shelf lighting may use hidden wiring, diffuser channels, or concealed strip placement when display clarity and a cleaner visible finish are preferred.
- Closets: Closet strip lighting may benefit from motion sensors when access lighting is needed during use, although suitability can depend on power access, low-voltage options, and placement conditions.
- Display areas: Display areas may benefit from controlled brightness, diffuser use, and careful strip placement when highlighting displayed items while limiting visible hotspots or reflections.
- Surface constraints: Available mounting space, surface fit, and routing paths may influence whether low-profile strips, concealed channels, or alternative accessory arrangements are practical.
For example, a motion sensor may provide practical value in a closet where hands-free access is preferred, while a concealed channel may be more useful on a shelf where hidden wiring and display clarity are higher priorities.
Lighting Format Choices Before Comparing Products
Lighting format choice depends on cabinet layout and lighting goal before any product or kit evaluation begins. A lighting format can influence installation tolerance, beam shape, replacement ease, cabinet appearance, power planning, and finish quality, so the most suitable option depends on how the lighting will be used and where it will be installed. An LED strip, tape light, bar light, puck light, kit, or separate accessories path may each fit different cabinet situations.
The comparison below focuses on format-level decisions before comparing individual products.
| Format/path | Main advantage | Main limitation | Best-fit cabinet situation |
|---|---|---|---|
| LED strip | High flexibility for continuous or hidden runs | Power planning and accessory selection may require additional evaluation | Cabinets where adaptable routing and a concealed lighting line are preferred |
| Tape light | Low-profile lighting format that may support discreet placement | Finish quality can depend on mounting conditions and supporting accessories | Cabinet interiors or edges where a compact lighting type is preferred |
| Bar light | Rigid body that may simplify alignment across straight sections | Usually offers less flexibility for corners or irregular layouts | Task-oriented cabinet areas with predictable mounting surfaces |
| Puck light | Focused illumination for a specific task zone or display point | Beam shape is typically more concentrated than continuous lighting formats | Cabinets, shelves, or display areas requiring localized lighting |
| Kit | May combine related components into a coordinated option set | Included parts may not suit every cabinet requirement | Users seeking a pre-grouped cabinet light format with supporting accessories |
| Separate accessories | Allows component selection around specific requirements | Requires more evaluation of compatibility, flexibility, and power planning | Cabinet setups with specialized control, layout, or finish-quality goals |
Product evaluation should follow format fit rather than replace it. For example, a bar light or puck light may be favored when a defined task zone and replacement ease are priorities, while an LED strip may be preferred when flexibility and a hidden run are more important. No single lighting format suits every cabinet situation because beam shape, cabinet appearance, mounting conditions, and accessory requirements can differ.
Flexible strip lights versus bars, pucks, and tape lights
Flexible strip lights involve a trade-off between flexibility and fixture shape, while bars, pucks, and tape lights differ in mounting style, spread, visibility, modularity, and replacement effort. The most suitable option depends on cabinet layout, desired light effect, and whether concealed placement, focused illumination, or easier replacement is the primary goal.
| Option | What changes | When it fits |
|---|---|---|
| Flexible strip lights | Support long runs, concealed placement, and a smooth lighting line with adaptable shape | May fit cabinets where continuous illumination and flexible routing are priorities |
| Tape lights | Provide a low-profile form with relatively limited fixture visibility | May fit cabinet interiors or edges where discreet mounting is preferred |
| Bar lights | Use a rigid form that can simplify mounting alignment and modular replacement | May fit task zones with straight mounting surfaces and defined lighting areas |
| Puck lights | Create a focused pool of light with a more visible fixture and concentrated spread | May fit display areas, shelves, or locations requiring targeted illumination |
A rigid bar light or puck light may be preferable when replacement effort, fixture access, or a focused task zone matters more than creating a continuous concealed lighting line. Flexible strip lights can suit many cabinet layouts, but shape, mounting conditions, spread requirements, and visibility goals ultimately influence the decision.
Kit bundles versus separate cabinet lighting accessories
Kit bundle versus separate cabinet lighting accessories depends on whether simplicity or configuration control is the higher priority. A kit bundle may reduce setup friction by grouping included parts into a single path, while separate cabinet lighting accessories may provide more control over fit, upgrade room, and replacement flexibility when specific requirements already exist. The decision often depends on installation tolerance, compatibility risk, and whether the lighting system is being built from the beginning or adjusted later.
| Decision criterion | Kit bundle | Separate accessories |
|---|---|---|
| Completeness | May include the main parts needed for a coordinated setup | Allows only the required parts to be selected |
| Compatibility risk | May reduce compatibility checking between included components | Usually requires more compatibility verification across separate parts |
| Upgrade room | Can be more limited when changes are needed later | May provide greater upgrade room through individual component selection |
| Installation tolerance | May suit users seeking a simpler starting path | Depends more on matching components to the intended setup |
| Replacement flexibility | Replacement choices may depend on the original bundle structure | Can make it easier to replace a connector, controller, or existing strip individually |
A kit bundle may suit a first-time setup when included parts align with the intended cabinet lighting plan, while separate cabinet lighting accessories may be more appropriate when replacing one part of an existing system. Neither decision path is universally better because completeness, compatibility risk, upgrade room, and replacement flexibility depend on the specific lighting situation.
Compatibility Factors That Shape the Final Setup
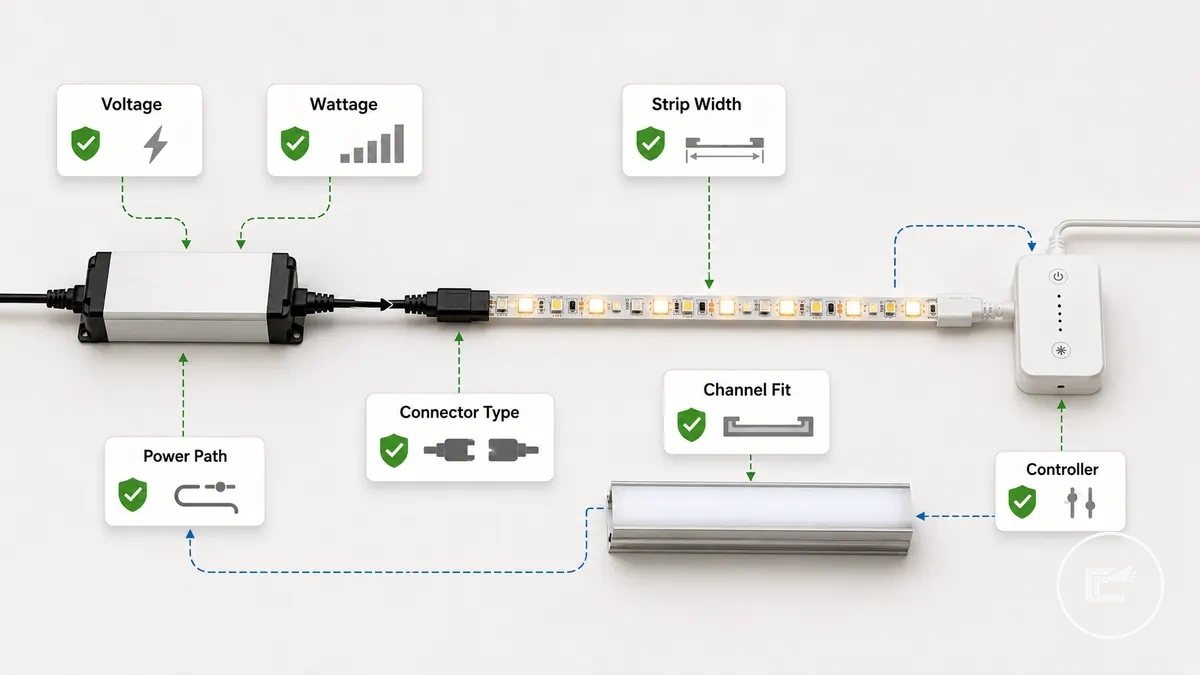
Compatibility depends on linked part conditions, not on the accessory category alone. Voltage, wattage, strip length, connector type, strip width, controller type, channel fit, and power path should be checked against product labels or specifications because one mismatch can affect setup fit, control behavior, visible finish, or safe operation.
The diagram shows how compatibility relationships connect the LED strip, connector, power supply, controller, and diffuser channel. Use the table below as a decision-level check before assuming selected parts will work together.
| Component | Attribute to check | Condition/value | Effect or decision |
|---|---|---|---|
| Power supply | Voltage | Should match the voltage required by the LED strip and controller | Helps determine whether the power path is suitable for operation |
| Power supply | Wattage | Should be evaluated against strip length and labeled power demand | Reduces mismatch risk when the lighting run changes |
| LED strip | Strip length | May affect power planning and control requirements | Influences whether the selected parts remain suitable for the setup |
| Connector | Connector type and strip width | Should match the strip format and contact layout | Affects component fit and signal continuity |
| Controller | Controller type | Should match the LED strip type and intended control behavior | Influences dimming, color, or switching behavior where supported |
| Channel or diffuser | Channel fit | Should allow suitable strip placement and diffuser clearance | Affects visible finish, mounting fit, and heat-handling conditions |
| Power path | Plug-in, hardwired, or battery route | Should match the intended access, control, and installation context | Determines which accessory path is practical before detailed wiring decisions |
Broad accessory selection should stop at matching conditions, while detailed wiring, repair, or installation decisions belong in a more specific process context. For deeper criteria around compatibility and component planning, label-based specifications and setup conditions should guide the final decision.
Voltage, power supply capacity, and strip length fit
Voltage, power supply capacity, and strip length fit depend on matching conditions across the lighting setup. A voltage match helps determine whether the LED strip and power source can operate together, while power supply capacity and strip length influence available wattage headroom, brightness consistency, and safety. As strip length increases along a cabinet path, the relationship between power demand and available capacity becomes more important.
Use the following checklist when evaluating power-fit conditions:
- Voltage match: The voltage shown on the LED strip should match the voltage identified for the power supply and related control components.
- Power supply capacity: Power supply capacity should be evaluated against the expected lighting load so adequate wattage headroom remains available.
- Strip length: Longer strip length may increase power demand and can affect brightness consistency across the cabinet run length.
- Voltage drop: A long run may increase voltage drop risk, which can contribute to uneven brightness or dimming along parts of the cabinet path.
- Cabinet run length: The physical route of the strip can influence power requirements, especially when the lighting path extends across multiple cabinet sections.
- High-brightness or long-run setups: Higher-output strips or extended runs may require closer review of voltage, power rating, and manufacturer limits before assumptions about brightness or safety are made.
Product labels and manufacturer limits should guide voltage, power supply capacity, and strip length decisions because wattage headroom, voltage drop behavior, brightness, and safety can vary by model and installation conditions.
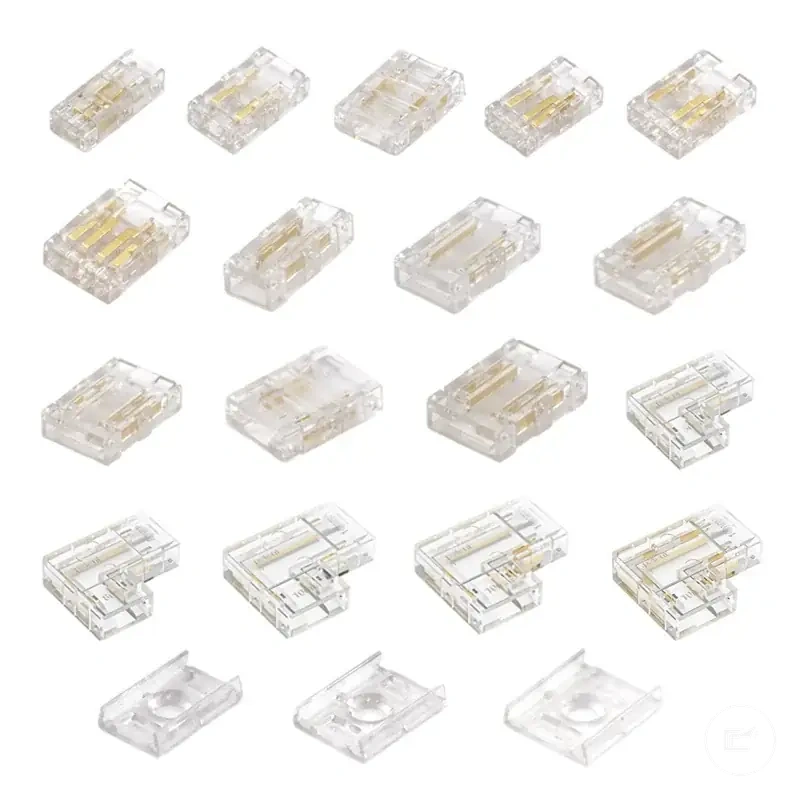
Connector type, strip width, controller type, and channel fit
Connector type, strip width, controller type, and channel fit depend on matching physical and control conditions, and physical fit can fail even when voltage is correct. A connector type that does not align with strip width or pin count, a controller type that does not match the LED form, or a channel fit that lacks suitable diffuser clearance may affect operation, control behavior, or installation suitability.
Use the following grouped fit checks when evaluating compatibility:
- Physical connector fit:
- Connector type should correspond to the strip width and connection format.
- Pin count should match the strip design and connector layout.
- COB and SMD strips may require different connector considerations depending on the strip profile.
- Control fit:
- Controller type should align with the LED strip form and intended control behavior.
- Dimmer type may need to match the controller type and strip configuration to support expected adjustment functions.
- Control match depends on product specifications rather than connector appearance alone.
- Channel fit:
- Channel internal width should accommodate the strip profile without assumptions about fit.
- Diffuser clearance may affect installation suitability and visible finish.
- Channel fit can vary by strip thickness, diffuser design, and mounting conditions.
For example, a setup may have the correct voltage and power source, yet still fail to achieve proper fit if the connector type does not match the strip width or if the channel internal width does not provide suitable diffuser clearance.
Plug-in, hardwired, battery, and motion-sensor power paths
Plug-in, hardwired, battery, and motion-sensor power paths depend on how cabinet location, convenience expectations, and installation tolerance align with the lighting setup. A plug-in power method may suit locations with outlet access, while hardwired paths emphasize wiring permanence. Battery and motion sensor options may fit locations where outlet access is limited or where access lighting is preferred, but recharge needs and power capacity should also be considered.
The comparison below highlights how each power path can affect convenience, limitations, and safety expectations.
| Power path | Convenience | Limitation | Safety note |
|---|---|---|---|
| Plug-in | May support a simpler setup when outlet access is available | Visible cable routing may affect placement options | Suitability depends on outlet location and setup conditions |
| Hardwired | Can provide greater wiring permanence | Usually offers less flexibility for relocation or modification | Qualified electrical help may be appropriate depending on installation conditions |
| Battery | May support placement where outlet access is limited | Recharge or battery maintenance can become an ongoing requirement | Power capacity may vary based on usage patterns and lighting demands |
| Motion sensor | May provide automatic sensor control for access lighting | Sensor behavior can vary by placement and operating conditions | Suitability depends on location, control path, and intended use |
Hardwired choices should be evaluated carefully because wiring permanence and installation conditions may require professional assessment or qualified electrical help before a final decision is made.
Light Quality Choices for Cabinets and Home Spaces
Light quality is the visible result of multiple lighting attributes working together to influence comfort, visibility, cabinet appearance, and buying confidence. Brightness affects task visibility, light output, and eye comfort, while color temperature changes the perceived white tone of a space. CRI, dimming, diffusion, COB density, hotspot control, and motion control can further influence how cabinet surfaces, stored items, and surrounding areas appear. The most suitable light-quality combination depends on room purpose, cabinet depth, surface reflectivity, and the intended lighting outcome.
Light-quality choices can change how a cabinet installation looks and functions even when the lighting hardware remains the same. The table below shows how key attributes affect visible results and when they are most relevant.
| Light attribute | What it changes | When it matters |
|---|---|---|
| Brightness | Influences task visibility, light output, and eye comfort | When cabinet depth, work surfaces, or visibility requirements vary |
| Color temperature | Changes the white tone from warmer to more neutral appearances | When room purpose and desired atmosphere differ |
| CRI | Can affect how colors, finishes, and materials appear | When display visibility or surface appearance is important |
| Dimming | Allows light levels to be adjusted for different activities | When a cabinet area serves both task and ambient purposes |
| Diffusion | Can create smoother light and reduce visible hotspots | When visible finish and reflected light are concerns |
| COB density | May influence hotspot control and lighting uniformity | When a smoother light appearance is preferred |
| Motion control | Can automate lighting based on access conditions | When cabinet interiors, closets, or access lighting are used frequently |
For example, task lighting may benefit from brightness levels that support visibility, ambience lighting may rely more on color temperature and dimming, and display lighting may place greater emphasis on CRI, diffusion, and hotspot control. Cabinet surfaces with noticeable reflections can also respond differently to diffusion and COB density choices. For broader evaluation criteria related to brightness and color selection, light-quality attributes should be assessed together rather than individually.
Brightness, color temperature, and task visibility
Brightness, color temperature, and task visibility depend on cabinet use case and surface conditions rather than a single lighting setting. Brightness influences visibility level and eye comfort, while color temperature affects white tone, surface appearance, and how tasks are perceived within the space. Task visibility can vary based on output class, cabinet depth, countertop reflectance, and whether the lighting supports work, storage access, or display purposes.
Use the following checklist when evaluating task visibility needs:
- Brightness should align with the intended task visibility requirement and the cabinet depth being illuminated.
- Color temperature may depend on room purpose, with warm white often associated with ambience and neutral white or cool white sometimes preferred for task-oriented visibility.
- Countertop reflectance can influence how light output appears, especially on glossy or highly reflective surfaces.
- Output class should be considered alongside visibility needs rather than selected solely for maximum brightness.
- Eye comfort may depend on the relationship between brightness, viewing distance, and surrounding surface conditions.
- Task visibility should be evaluated within the actual cabinet environment rather than by relying on a universal brightness or white-tone preference.
For example, a kitchen cabinet used for food preparation may benefit from a different balance of brightness and color temperature than a display cabinet where appearance and object visibility are the primary concerns.
Dimming, diffusion, COB strips, and hotspot control
Dimming, diffusion, COB strips, and hotspot control affect how smooth light appears and how cabinet surfaces reflect that light. Smooth light depends on strip density, diffuser depth, and the control method being used, while visible finish can vary with glare, LED dot visibility, surface reflectivity, and cabinet geometry. No single method is required for every cabinet setup because visual results depend on installation conditions and lighting goals.
| Method | What it changes | Condition to check |
|---|---|---|
| Dimming | Adjusts brightness levels for comfort and light feel | Dimmer compatibility should align with the controller and lighting setup |
| Diffusion | Can reduce LED dot visibility and create smoother light | Diffuser depth and diffuser channel design may influence visible finish and glare control |
| COB strips | May provide greater continuous light appearance and support hotspot control | Strip density, installation conditions, and viewing distance can affect light continuity |
| Hotspot control | Helps manage visible bright points and reflected light patterns | Surface reflectivity, cabinet underside depth, and lighting placement may change hotspot visibility |
For example, hotspots may become more noticeable on glossy countertops or in shallow cabinets where surface reflectivity and limited diffuser depth make individual light points easier to see.
Buying Decision Criteria for LED Strip and Cabinet Lighting Accessories
Buying decision criteria should follow use case, compatibility, light quality, and safety before any product comparison begins. Room purpose, accessory completeness, power path, control method, mounting finish, and replacement fit can influence whether a lighting setup remains suitable after installation, so a buying decision should focus on matching requirements rather than product popularity or promotional claims.
The criteria table below connects key buying criteria to practical selection signals. Each criterion should be evaluated against installation requirements rather than treated as a universal requirement.
| Criterion | What to check | Condition/value | Buying decision |
|---|---|---|---|
| Room purpose | Primary lighting objective | Task lighting, ambience, display, or access lighting | Select accessories that align with the intended use case |
| Accessory completeness | Included parts versus required parts | Complete kit or individually selected components | Assess whether additional accessories may still be required |
| Power path | Power source approach | Plug-in, hardwired, battery, or sensor-based setup | Choose a power path that matches installation conditions |
| Control method | Adjustment and operation needs | Switching, dimming, or sensor control preferences | Confirm that the control method supports the intended lighting behavior |
| Mounting finish | Visible appearance after installation | Concealed, exposed, or diffuser-supported finish | Choose accessories that support the preferred mounting finish |
| Replacement fit | Future maintenance considerations | Individual component replacement or bundled replacement path | Consider how future changes may affect replacement fit |
| External price-check | Offer comparison readiness | Comparable specifications and accessory scope | Use pricing comparisons only after suitability is confirmed |
A complete kit may reduce the risk of missing accessory components when a coordinated setup is preferred, while separate parts may provide more flexibility when specific requirements already exist. A safer installation path may deserve greater consideration when wiring complexity, power access, or mounting conditions introduce additional decision factors.
External price-check readiness becomes more useful after compatibility, light quality, accessory completeness, power path, control method, mounting finish, and replacement fit have been reviewed. A structured buying checklist can support decision-making when comparing external merchant offers against the same selection criteria.
Here are product examples that may make comparison easier. Before buying, always review the compatibility criteria, essential features, and product details.

Room purpose, lighting effect, and installation tolerance
Room purpose, lighting effect, and installation tolerance act as a local decision filter because accessory suitability depends on how the lighting will be used, how it should appear, and how much setup effort is acceptable. These criteria help narrow accessory choices by connecting use case, brightness expectation, visible finish, mounting confidence, wiring tolerance, and maintenance burden to the intended cabinet lighting outcome.
- Room purpose:
- Task lighting may prioritize brightness expectation and direct visibility where cabinet activities require clearer illumination.
- Accent lighting may place greater emphasis on visible finish and the desired lighting effect rather than maximum output.
- Display lighting may focus on presentation quality and how displayed items appear under the selected lighting effect.
- Convenience-focused lighting may favor simpler operation and reduced maintenance burden for routine access.
- Lighting effect:
- The desired lighting effect can influence whether a subtle glow, focused illumination, or a more noticeable cabinet lighting appearance is preferred.
- Brightness expectation should align with the intended use case rather than assuming higher output is more suitable.
- Visible finish may influence whether concealed or more noticeable accessory placement is appropriate.
- Installation tolerance:
- Mounting confidence may affect whether a user prefers simpler attachment methods or more involved installation approaches.
- Wiring tolerance can influence whether plug-in, adhesive-supported, or more permanent setups deserve consideration.
- Maintenance burden may become an important criterion when future adjustments, battery changes, or component access are expected.
A renter may prefer a low-effort setup with greater reversibility, while a homeowner with higher mounting confidence and wiring tolerance may consider a wider range of accessory options when installation conditions allow.
Accessory completeness, upgrade room, and replacement fit
Accessory completeness, upgrade room, and replacement fit reduce buying risk only when the included parts fit the intended setup and support future changes when needed. Kit completeness may improve setup readiness, but included components should still be reviewed because replacement fit, future upgrade options, and replacement availability can depend on the overall system configuration.
- Included power supply: May reduce readiness risk when voltage and strip length requirements align with the planned installation.
- Connector types: Can reduce replacement-fit risk when the connector types correspond to the existing strip and intended connection method.
- Controller support: May improve upgrade room when future dimming, control adjustments, or other future changes are being considered.
- Spare mounting parts: Can reduce installation disruption if mounting components need adjustment or replacement later.
- Channel compatibility: May lower fit-related risk when the selected channel accommodates the intended strip and diffuser arrangement.
- Replacement availability: Can support future maintenance when compatible replacement parts remain available for the setup.
A missing connector type, compatible channel, or controller support component may limit the final setup even when most other parts are present, which is why accessory completeness should be evaluated together with upgrade room and replacement fit.
Safety and Installation Checks Before Choosing Accessories
Safety checks filter unsuitable accessory choices before purchase by identifying conditions that may affect installation suitability, heat management, power requirements, and mounting reliability. Cabinet materials, power load, heat, wiring conditions, and user skill level should be evaluated before selecting accessories because a suitable lighting setup depends on more than compatibility and appearance alone.
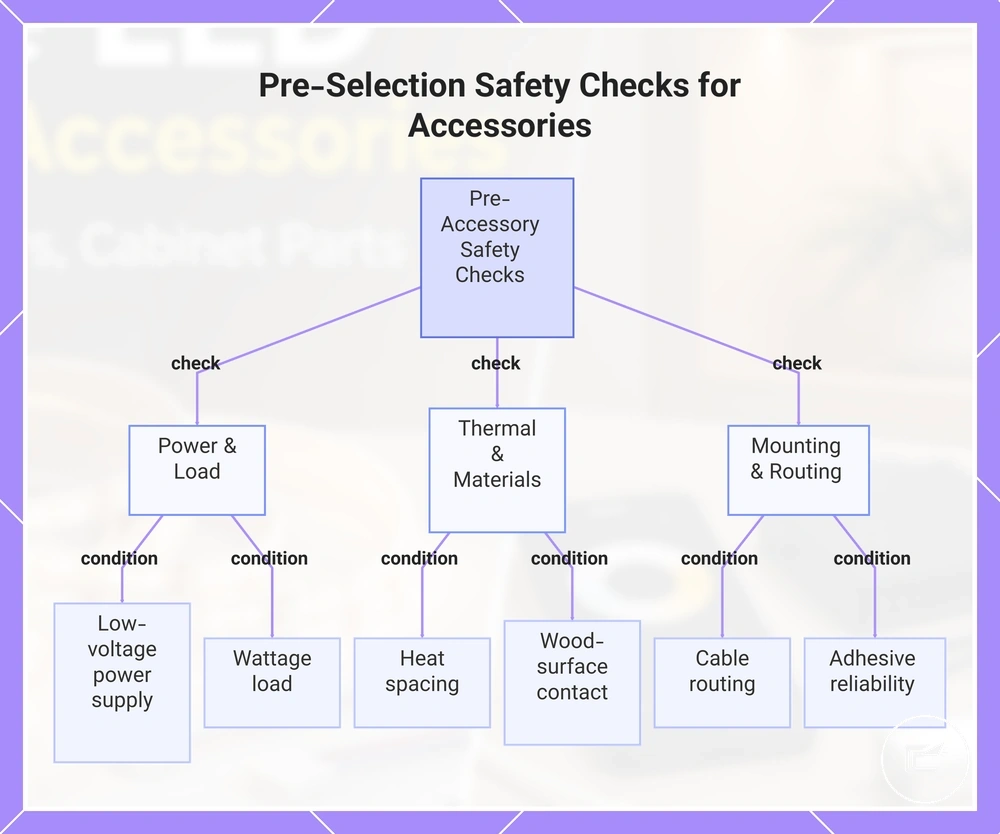
Use the following safety checklist as an installation risk check before moving forward with accessory selection. Each item connects a condition to a potential safety implication without replacing manufacturer instructions or qualified electrical advice.
- Low-voltage power supply: A low-voltage power supply should correspond to the intended lighting system to reduce the likelihood of unsuitable power selection.
- Wattage load: Wattage load should be considered alongside planned strip length and connected accessories because power demand can vary by setup.
- Heat spacing: Adequate heat spacing may help reduce heat buildup where lighting components are installed in enclosed cabinet areas.
- Wood-surface contact: Wood-surface contact should be evaluated together with mounting method and heat conditions when accessories are placed near cabinet materials.
- Cable routing: Cable routing should allow wires to remain protected from pinching, abrasion, or unintended interference during normal use.
- Adhesive reliability: Adhesive reliability may affect mounting stability when cabinet surfaces, temperature conditions, or surface finishes vary.
- Professional help conditions: Professional help may be appropriate when installation conditions extend beyond straightforward accessory selection or involve more complex electrical considerations.
When a project begins to involve electrical modifications, uncertain wiring conditions, or installation requirements that exceed normal accessory selection, it may be more appropriate to review safety before installation and follow manufacturer instructions before continuing. If installation planning becomes the primary concern rather than accessory selection, a dedicated guide covering installation steps may be more appropriate than treating the task as a simple accessory purchase.
This chart shows the key safety and installation checks to perform before selecting accessories, grouped into power, thermal, and mounting categories.
Fire-risk, heat, wood-surface, and power-load checks
Fire-risk, heat, wood-surface, and power-load checks can reduce installation risk, but they do not remove it. These safety conditions depend on power draw, ventilation, surface material, and installation quality, so accessory suitability may change when heat risk, mounting conditions, or power-load checks indicate additional concerns.
Use the following local safety checklist to evaluate conditions that may affect accessory suitability:
- Overheating signs: Heat buildup, unusual warmth, or visible stress around lighting components may indicate that ventilation or power conditions should be reviewed.
- Overloaded power supply: An overloaded power supply can increase heat risk when power draw approaches the limits of the intended setup.
- Enclosed channel: An enclosed channel with limited ventilation may contribute to greater heat accumulation depending on installation conditions.
- Adhesive failure: Adhesive failure can create a mounting risk when surface preparation, temperature conditions, or long-term exposure affect attachment strength.
- Wood surface contact: Wood surface placement should be evaluated together with heat spacing and mounting conditions because heat behavior may vary by installation.
- Cable pinch point: A cable pinch point may affect insulation condition when cable routing places wires under pressure, near edges, or in restricted spaces.
For example, a diffuser channel or protected power supply may help reduce heat concentration and mounting risk, but proper ventilation, spacing, installation quality, and ongoing safety checks remain important because no accessory eliminates all fire-risk or heat-related concerns.
When installation complexity may require qualified electrical help
Accessory selection becomes an installation-risk issue when installation complexity extends beyond choosing compatible components and begins to involve wiring conditions, power uncertainty, or structural modifications. Qualified electrical help may be appropriate when hardwiring, hidden wiring, load calculations, moisture proximity, or unfamiliar power components create conditions that are difficult to assess with confidence.
Use the following stop-signal checklist to identify situations where a professional assessment may be warranted:
- Hardwiring: Hardwiring can introduce installation complexity that may require qualified electrical help rather than simple accessory selection.
- Hidden wiring: Hidden wiring may create uncertainty around cable routing, access conditions, and installation risk.
- Load calculations: Uncertain load calculations can make it difficult to determine whether the planned power arrangement remains appropriate.
- Cabinet drilling: Cabinet drilling may affect routing paths, mounting conditions, or concealed areas that deserve additional evaluation.
- Moisture proximity: Moisture proximity can change installation considerations depending on the environment and component placement.
- Repeated flicker: Repeated flicker may act as a troubleshooting signal when the underlying cause remains unclear.
- Unfamiliar power components: Unfamiliar power components may increase the need for a qualified electrician when system behavior or compatibility cannot be assessed confidently.
These conditions create a safety boundary where professional assessment may be more appropriate than continued accessory selection alone. When the goal shifts from planning to execution, detailed installation guidance belongs in a dedicated installation context rather than a product-selection discussion.