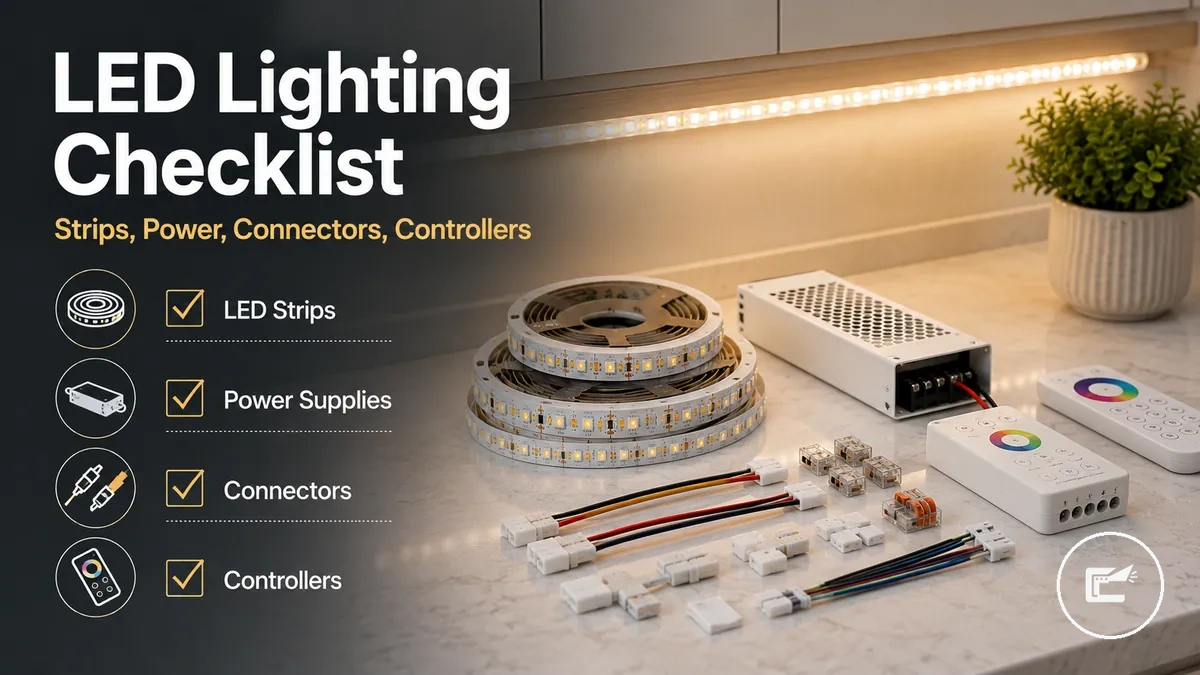
Home LED Strip and Cabinet Lighting Buying Checklist
Home LED strip and cabinet lighting accessories are decision-support parts used to plan a strip kit, cabinet lighting setup, power supply, connectors, controller, dimming method, diffuser, and motion sensor before following an external price-check path. This buying checklist helps verify fit, light quality, compatibility, installation readiness, safety, and offer confidence without treating the page as a product catalogue.
The checklist separates the purchase decision into practical checks. Cabinet size, strip length, cabinet surface, brightness, color temperature, diffusion, voltage, power method, and control type can change whether a home LED strip lighting setup suits the intended cabinet lighting use.
Fit and compatibility should stay conditional because strip lights, LED tape, connectors, power supply labels, controller ratings, diffuser channels, and mounting parts may vary by kit and use case. A strip kit may be suitable when the cabinet route, power load, connector path, control method, and safety checks match the planned setup. A different cabinet LED lighting option may be worth comparing when the cabinet run, power access, surface condition, or appearance goal does not match the available parts.
Use the first checklist cluster to confirm the buying path before comparing offers:
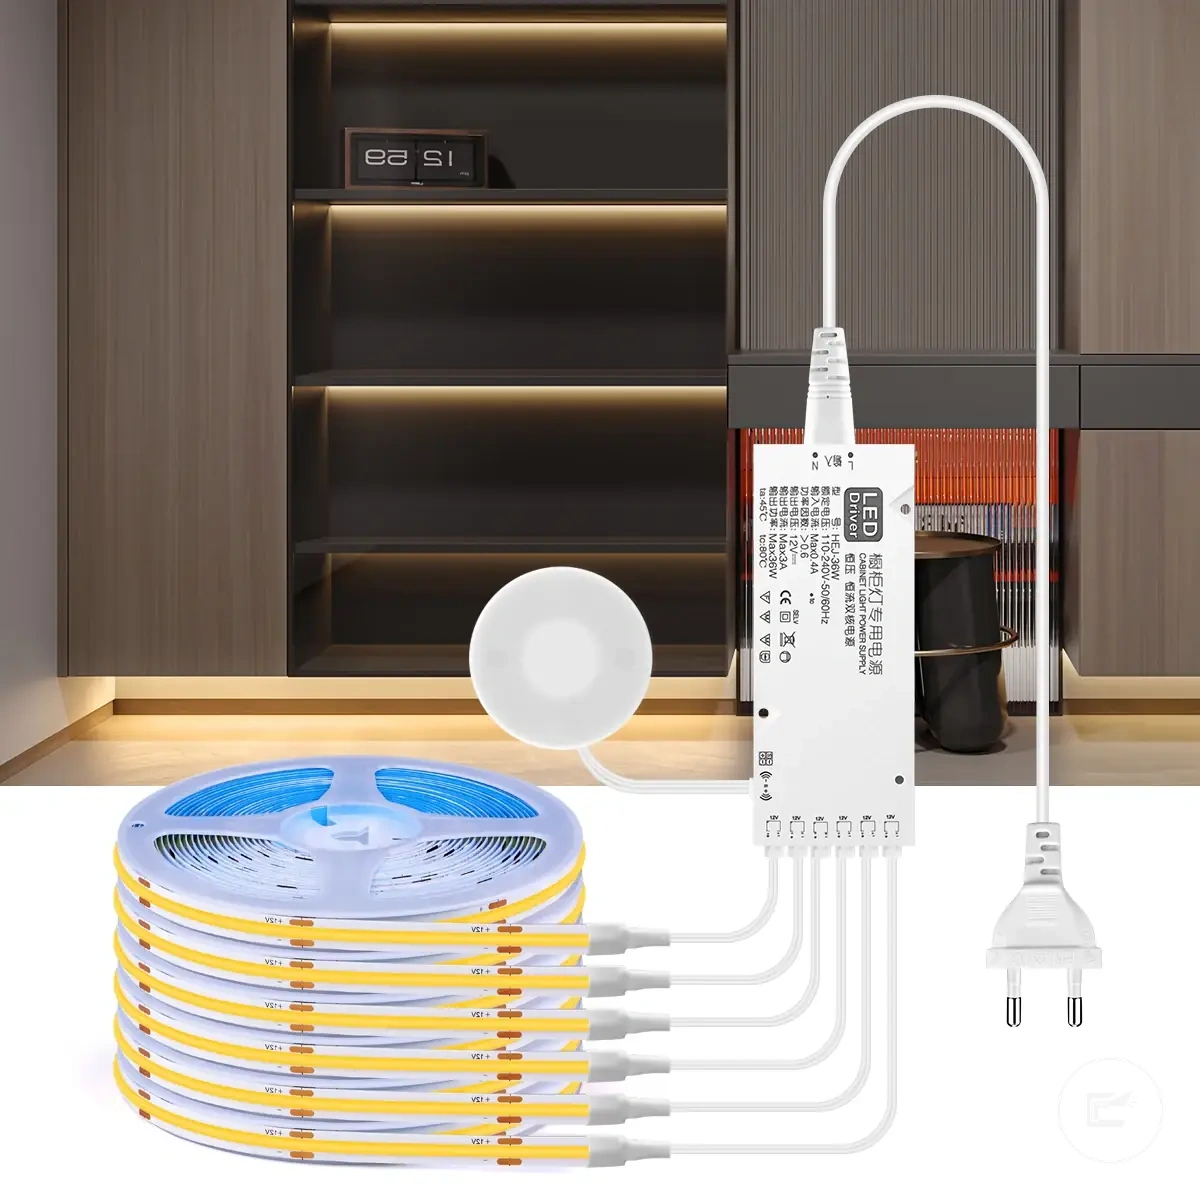
- Check whether the strip kit includes the strip, power supply, connectors, controller, and mounting accessories needed for the cabinet route.
- Match brightness, color temperature, dimming, and diffuser needs to the cabinet surface and intended lighting effect.
- Verify compatibility across voltage, power method, connector type, controller support, and motion sensor use before treating an offer as purchase-ready.
Application and Kit Scope Checks
home LED strip and cabinet lighting accessories should match the intended cabinet use case before finer specifications are evaluated. Under cabinet lighting for kitchens, shelves, display cabinets, and small storage areas may require different strip length, kit contents, and accessory coverage.
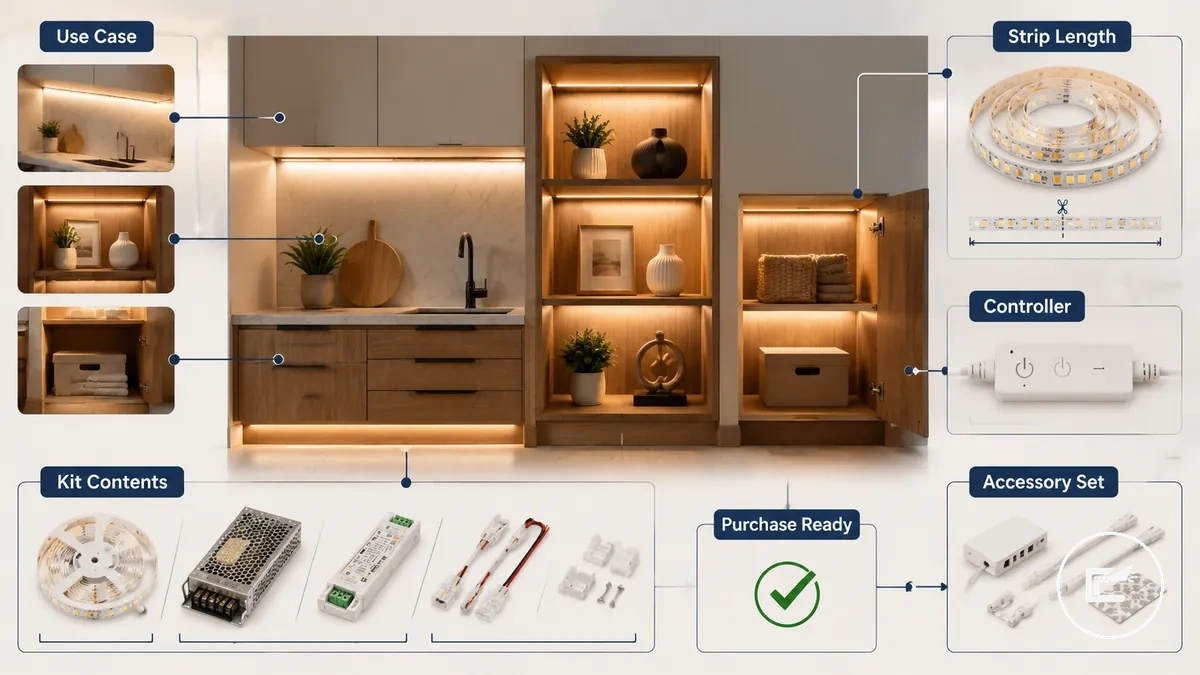
A cabinet bundle may be offered as a complete lighting kit, a partial strip kit, or a separate accessory set. The scope of the bundle matters because a power supply, connector, controller, mounting clips, or other supporting parts may or may not be included.
Purchase readiness is usually easier to assess after the cabinet location, strip length, and accessory coverage have been reviewed together. A missing part can increase compatibility risk, while a complete kit may reduce the need to source additional components before moving to the next evaluation stage.
- Confirm the use case and cabinet location, including under cabinet areas, shelves, display cabinets, or small storage spaces.
- Check whether the planned strip length appears appropriate for the intended coverage area.
- Review kit contents for a strip, power supply, controller, and connector.
- Verify that the included controls align with the intended cabinet lighting setup.
- Check for mounting clips or related mounting accessories when surface attachment is planned.
- Identify missing accessories that may require a separate accessory bundle.
- Classify the option as a complete kit, partial kit, or separate accessory set before assessing purchase readiness.
Cabinet location, strip length, and coverage fit
Cabinet location, strip length, and coverage fit depend on how the lighting run follows the cabinet area. A shelf or display cabinet may require additional checks when the cabinet span includes changes in depth, direction, or mounting position that could create a coverage gap or shadow.
Measure the cabinet width and full run length before assessing fit. The required length should follow the actual strip route, including any corner path, because layout conditions can influence coverage consistency and unused strip sections.
- If cabinet width exceeds the planned strip length, a coverage gap may remain along the cabinet area.
- If strip length extends beyond the measured run length, unused sections may increase layout waste.
- If a corner path is part of the strip route, the bend condition may influence coverage continuity around the cabinet span.
- If a shelf or display cabinet contains recessed areas, mounting position may affect shadow formation.
- If the lighting run changes direction, required length should follow the complete run length rather than a straight-line measurement.
- If unusual cabinet shapes are present, compare the planned strip route with the intended coverage area to identify potential gaps or shadow zones.
This chart shows the key measurements, coverage gap risks, and shape or mounting checks needed to assess LED strip fit for cabinets.

Complete kit versus separate accessory bundle
A complete kit is usually the better choice when the planned cabinet lighting setup benefits from having the main components included together. A complete kit may reduce missing parts risk because the strip, power supply, connector, controller, channel, and mounting hardware are often packaged as a coordinated kit package. A separate accessory bundle can be more suitable when existing components are already available or when greater flexibility is needed.
Kit completeness can influence both convenience and mismatch risk. Missing parts may delay setup progress, while a separate accessory bundle may better suit a custom run, non-standard connector path, or specific control method that requires a tailored component set.
| Option | Better when |
|---|---|
| Complete kit | The planned setup benefits from having the strip, power supply, connector, controller, channel, and mounting hardware included in one package for added convenience. |
| Separate accessory bundle | The cabinet lighting run requires more flexibility, replacement components, or adjustments for a custom run, non-standard connector path, or specific control preference. |
Use these criteria to choose the right setup based on the planned lighting run, component requirements, and desired level of customization.
Light Output and Appearance Checks
Light output and appearance checks depend on whether the cabinet lighting is intended for task visibility or ambient display lighting. Brightness, lumens, LED density, color temperature, and visual finish can influence how the illuminated surface appears once the strip is installed.
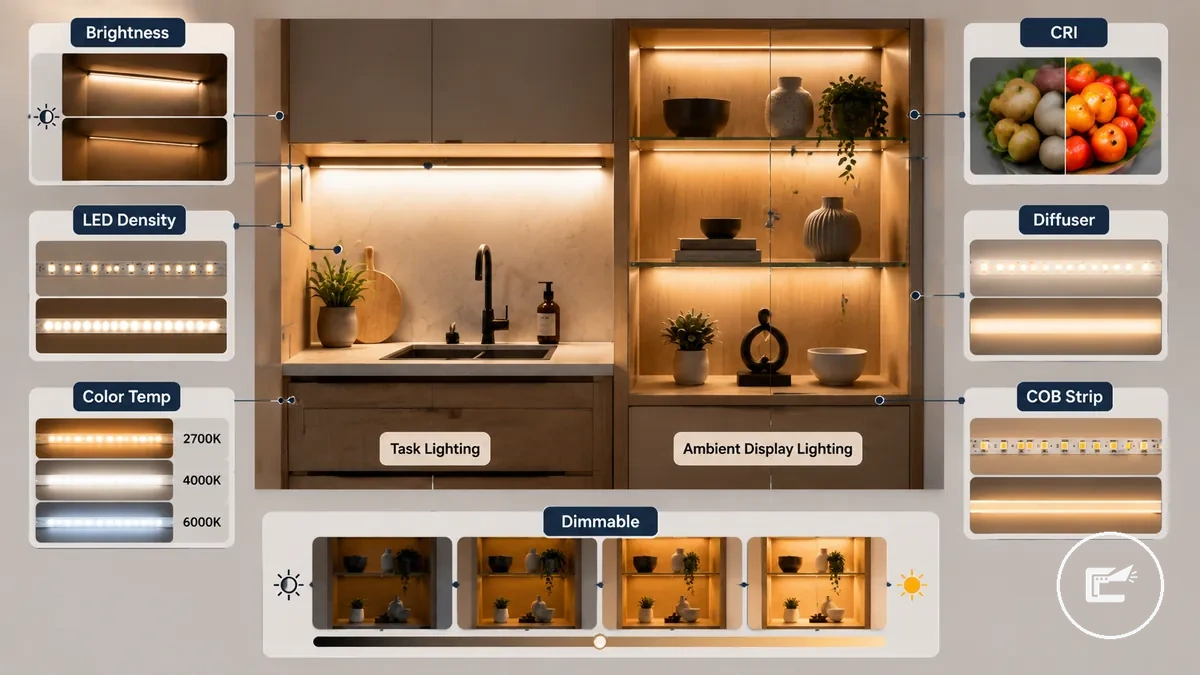
Light quality depends on more than brightness alone. Color temperature and CRI can influence surface appearance, while a diffuser, COB strip format, and LED density may affect glare levels and the visibility of visible dots. These light quality criteria help distinguish task lighting needs from ambient display lighting goals.
Task lighting may benefit from stronger light output and improved visibility across the cabinet area, while ambient display lighting may place greater emphasis on diffusion, dimmable control, and visual uniformity. The preferred balance depends on the intended lighting purpose and cabinet layout.
| Attribute | What to check | Why it matters | Risk if ignored |
|---|---|---|---|
| Brightness | Review stated brightness and lumens | Influences task lighting visibility | Light output may not match expectations |
| LED density | Check spacing and LED density | Can affect light continuity and shadow appearance | Uneven coverage or noticeable gaps |
| Color temperature | Compare warm white, neutral white, and cool white options | Affects perceived surface appearance | Lighting tone may not suit the intended setting |
| CRI | Review color-rendering information when available | Can influence how colors appear under the light | Less accurate color appearance |
| Dimming | Check whether the light is dimmable | Allows adjustment between task and ambient use | Reduced control over light output |
| Diffusion | Review diffuser availability or compatibility | Can help soften glare and improve uniformity | Increased glare or visible light points |
| COB | Check whether a COB strip format is used | May reduce visible dots and improve visual continuity | More noticeable individual LED points |
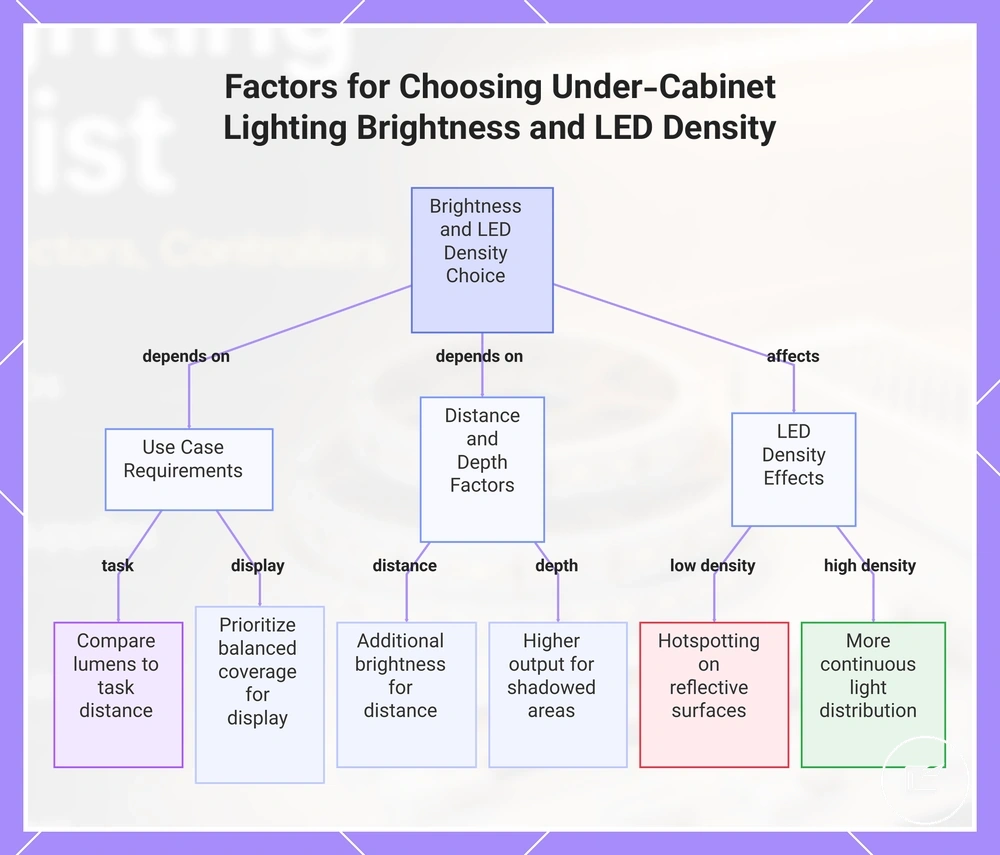
Brightness, LED density, and task-lighting needs
Brightness and LED density depend on the intended task lighting or display use case and the distance between the light source and the illuminated surface.
Brightness is commonly described through lumens, while LED density reflects the spacing of LEDs along the strip. Task lighting often benefits from light output that supports visibility at the planned worktop distance, while display lighting may prioritize balanced coverage. Cabinet depth, strip spacing, and mounting position can influence shadow formation, hotspotting, and overall coverage.
- If the worktop distance increases, additional brightness may be needed to maintain task visibility across the cabinet area.
- If LED density is lower and strip spacing is more noticeable, hotspotting may become more visible on reflective or light-colored surfaces.
- If cabinet depth creates shadowed areas, higher light output may help improve coverage where under-lighting could occur.
- If the intended use is detailed task lighting, compare stated lumens with the working distance rather than judging brightness by appearance alone.
- If LED density is higher, light distribution may appear more continuous and reduce visible spacing between light points.
This chart shows how the intended use case, worktop distance, cabinet depth, and LED density affect the optimal brightness and light distribution for under-cabinet strips.
Color temperature, CRI, and cabinet light quality
Color temperature and CRI depend on the cabinet material, room tone, and intended task because the most suitable light color varies by surface appearance and use case. Light color and rendering quality can influence perceived warmth, task clarity, food visibility, and the appearance of cabinet finishes.
Warm white, neutral white, and cool white can create different visual effects depending on the cabinet finish and surrounding environment. A wood cabinet may appear warmer under warm white light, while neutral white may support task clarity in many kitchen settings. CRI affects color rendering and can influence how food items, cabinet surfaces, and material details appear under the light.
| Choice | Typical effect | Good fit | Watch for |
|---|---|---|---|
| Warm white | Warmer ambience and softer surface appearance | Wood cabinet finishes and comfort-focused spaces | May provide less visual contrast for detailed tasks |
| Neutral white | Balanced light color and task clarity | Kitchen work areas and mixed-use cabinet lighting | Results may vary with cabinet finish and room tone |
| Cool white | Crisper appearance and stronger visual definition | Cabinets where visibility is a priority | May appear less warm in some interiors |
| High-CRI | Improved color rendering and food visibility | Cabinet lighting where surface appearance matters | Should be considered alongside color temperature |
COB strips, diffusion, and visible diode control
Visible diode control depends on strip type, LED density, viewing angle, mounting angle, and diffuser use rather than a single product feature. A COB strip, diffuser channel, or hidden mounting approach can help create a smoother appearance when cabinet conditions support the chosen setup.
Visible diode patterns are often easier to notice when a strip is exposed near a cabinet edge or viewed directly from a shallow angle. A diffuser channel with a diffusion cover may help soften glare and reduce diode visibility, while a COB strip can provide smoother light when LED density and viewing conditions align. Hidden placement may also reduce direct sightlines to the strip, which can make visible diodes less noticeable.
| Option | Appearance outcome | Watch for |
|---|---|---|
| COB strip | May provide smooth light with fewer visible dots in many viewing conditions | Smooth-light appearance still depends on mounting angle and viewing distance |
| Standard strip plus diffuser channel | Can reduce visible diode patterns and support glare control | Results may vary with LED density, channel depth, and diffusion cover design |
| Hidden-mount strip | May reduce diode visibility by limiting direct viewing angles | Visible diodes can still appear if the strip remains exposed from the cabinet edge |
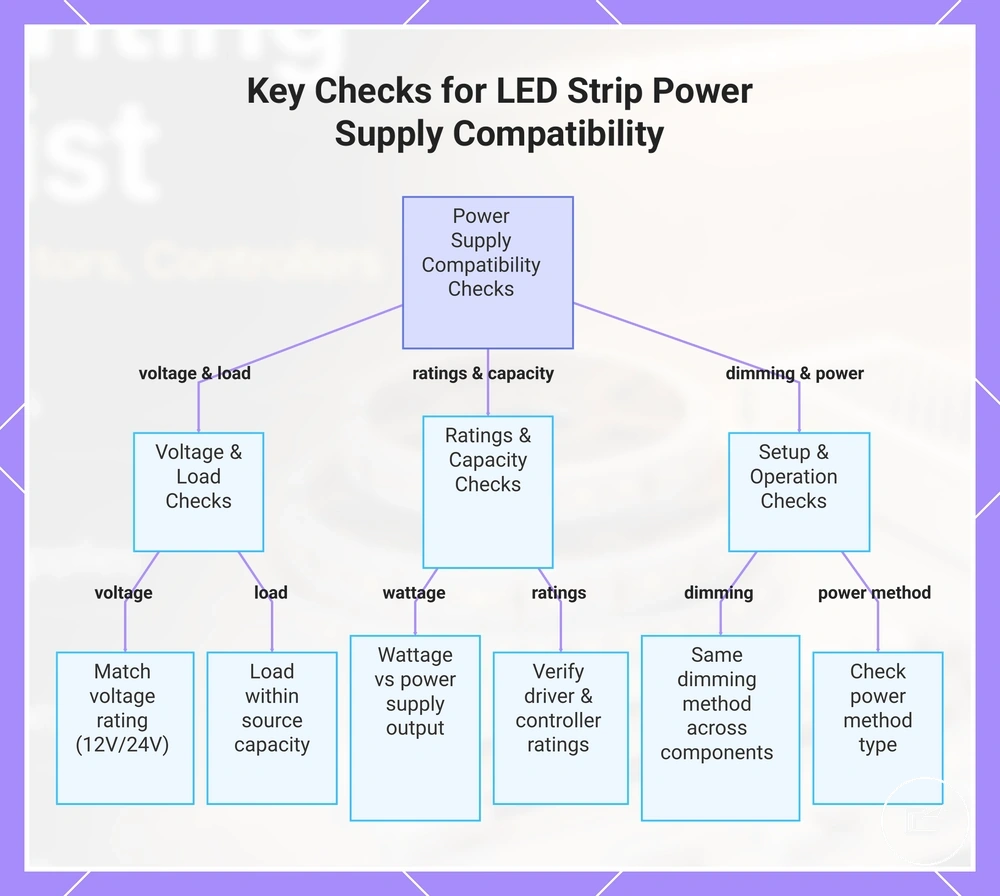
Power Supply and Voltage Checks
Power supply compatibility depends on the strip, driver, controller, voltage, and power method matching the requirements of the same LED strip system. A voltage or load mismatch may affect operation, reduce dimming reliability, or increase the risk of component incompatibility.
Voltage and load should be reviewed together before comparing options. A 12V strip typically requires a matching 12V power supply or driver, while a 24V strip typically requires a matching 24V unit. The strip, controller, driver, and wattage ratings should be checked as part of a broader compatibility checklist to help reduce mismatch risk and support more reliable operation.
- Voltage check: Confirm that the strip, power supply, driver, and controller use the same voltage rating, such as 12V or 24V.
- Wattage check: Compare strip wattage requirements with the rated output of the power supply or driver.
- Driver capacity check: Verify that the driver rating can accommodate the expected load.
- Load check: Confirm that the planned load does not exceed the labeled capacity of the power source.
- Controller rating check: Verify that the controller is rated for the strip voltage and expected load.
- Dimming check: Review whether the controller, driver, and strip are intended to support the same dimming method.
- Power method check: Confirm whether the system is designed for a plug-in adapter, transformer, or other stated power method.
Power method selection can influence compatibility and planning requirements. Plug-in options are often easier to evaluate, while hardwired setups may involve additional electrical considerations and can benefit from qualified guidance. Comparing available power method options may help clarify which approach aligns with the intended cabinet lighting setup.
This chart groups the essential compatibility checks for LED strip power supplies into voltage/load, ratings/capacity, and dimming/power method categories.
12V or 24V strip and driver matching
Voltage labels must match unless the manufacturer specifies otherwise.
Strip voltage, driver output, and controller rating should be verified together before evaluating other power details. A 12V strip requires a matching 12V driver output, while a 24V strip requires a matching 24V driver output. This label check helps reduce mismatch risk, but voltage matching alone does not confirm overall compatibility, performance, or operating conditions.
- Voltage label: Check the strip voltage label and confirm whether it is marked 12V or 24V. A different driver voltage creates a mismatch.
- Driver output: Review the driver output or adapter output label and verify that it matches the strip voltage requirement. A mismatch may prevent compatible operation.
- Controller rating: Confirm that the controller rating supports the same 12V or 24V system as the strip and driver. Different voltage ratings can affect compatibility.
- Extension-run considerations: Check voltage labels on all connected low voltage components when extensions are used, because a mismatch can be harder to identify across longer runs.
Wattage headroom and power method readiness
Wattage headroom depends on whether the driver capacity can accommodate the expected power load from the planned strip length. Comparing watts per metre, total run length, and rated capacity can help identify potential overload conditions before selecting a power setup.
Headroom is a purchase-readiness check that depends on the relationship between power load and driver capacity. If the estimated load approaches the rated capacity, overload, heat buildup, or dimming instability may become more likely under certain conditions. Manufacturer labels for strip wattage, controller load, and rated capacity provide the most useful comparison points when evaluating margin.
- Strip wattage: Check the stated watts per metre on the strip label and use it as the basis for estimating total load.
- Total run length: Compare the planned total run length with the watts per metre rating to understand how strip length affects power load.
- Driver capacity: Verify that the driver rating appears suitable for the estimated load and includes headroom beyond the expected demand.
- Controller load: Review controller load ratings and confirm they align with the planned strip load.
- Margin check: If the estimated load is close to the rated capacity, additional headroom may help reduce the risk of overload or dimming instability.
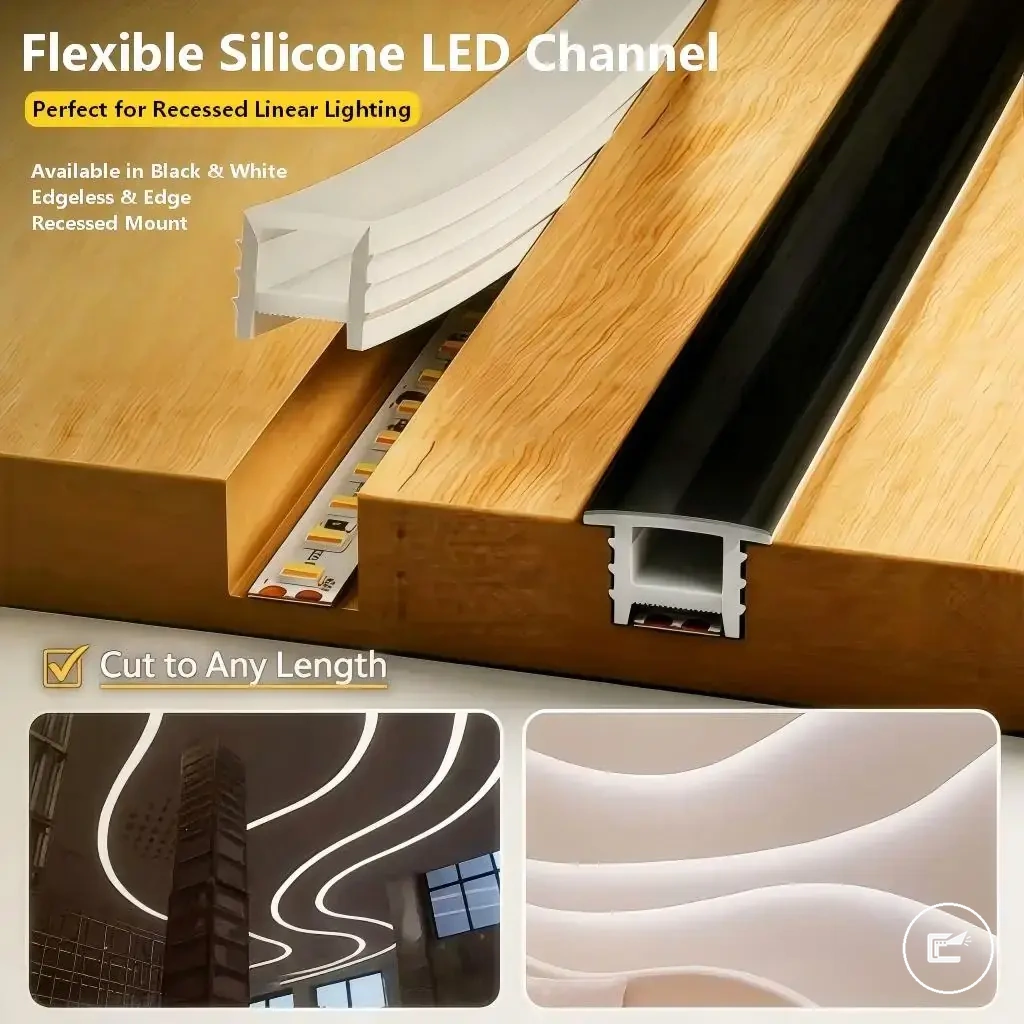
Connector and Channel Fit Checks
Connector and channel fit checks depend on whether each accessory physically matches the selected LED strip and cabinet path. Strip width, pin type, polarity, channel size, diffuser cover, cable path, and mounting condition should be verified before treating the accessory set as compatible.
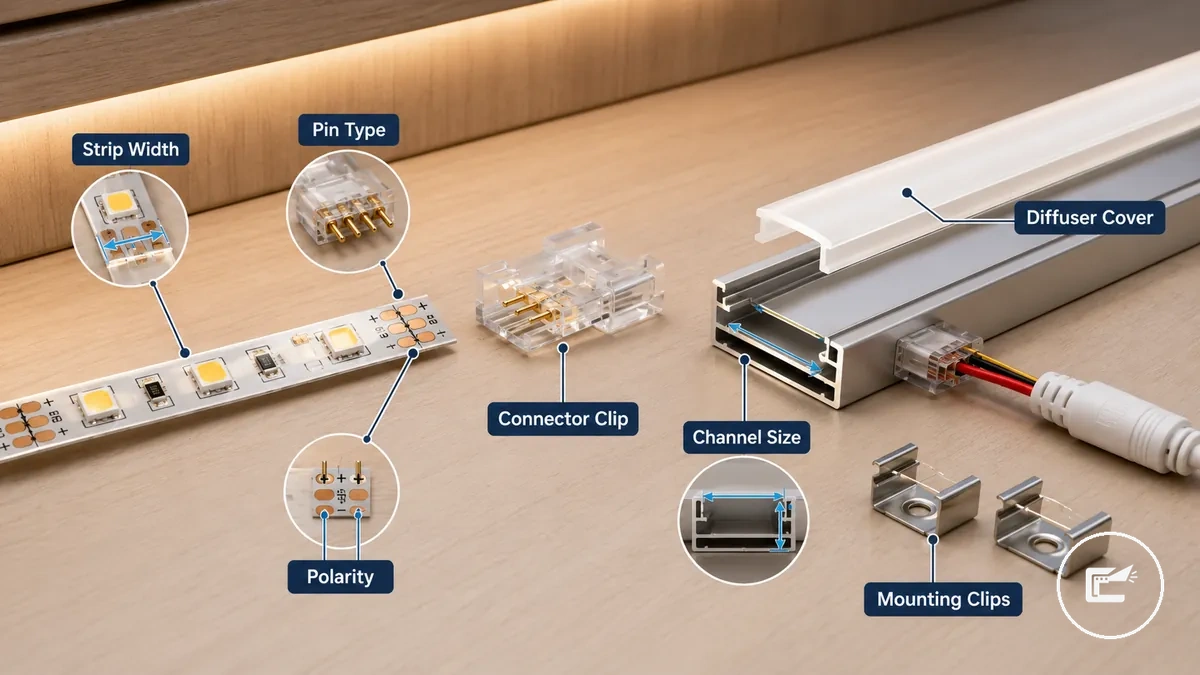
Connector fit is mainly about the electrical contact area and the physical strip format. A connector may appear suitable only when the strip width, pin type, polarity, and contact layout match the strip being used. A corner connector, solderless connector, or extension cable may be useful when the cabinet path changes direction or needs a longer cable route, but each part still needs a label or fit check.
Channel fit is different from connector compatibility because the strip must sit inside the channel and align with the diffuser and mounting clips. An aluminum channel can improve appearance when the strip, diffuser cover, and mounting condition suit the cabinet surface. A poor size match may affect fit, connection access, or the final light finish.
| Part | Match this attribute | Buying risk | Check before purchase |
|---|---|---|---|
| Connector | Strip width, pin type, and polarity | Poor contact or incompatible connection | Confirm the connector matches the strip layout and contact area |
| Corner connector | Corner path, pin type, and strip width | Connection mismatch around cabinet turns | Check whether the corner connector suits the planned bend or turn |
| Extension cable | Cable path, connector ends, and polarity | Loose or mismatched extension path | Verify the extension cable matches the connector system and route |
| Channel | Channel size and strip width | Strip may not sit correctly inside the channel | Compare the strip width with the channel interior size |
| Diffuser | Diffuser cover and channel shape | Cover may not attach or may change the visual finish | Confirm the diffuser is intended for the selected channel |
| Mounting clips | Channel profile and cabinet surface | Mounting may not hold the channel as planned | Check that the mounting clip suits the channel and surface condition |
Strip width, pin type, and connector path
Strip width, pin type, and connector path must match the selected connector before a solderless connector or corner connector is considered suitable. Connector fit depends on the strip contact area, contact pad layout, polarity, and route conditions rather than appearance alone.
Connector path constraints can influence which connector style may be appropriate. A straight connector path may suit a standard solderless connector, while a corner path may require a corner connector or extension lead. Connection success can vary when bend direction, strip contact design, pin count, or polarity alignment differs from the connector specification.
- Strip width: Verify that the connector clip matches the strip width to reduce fit mismatch risk.
- Pin type: Check that the pin type and pin count align with the strip contact arrangement.
- Contact pad: Compare the contact pad layout with the connector contact area before purchase.
- Polarity: Confirm that polarity markings can align between the connector and strip contact points.
- Corner path: If the route changes direction, check whether a corner connector suits the bend direction and corner position.
- Extension lead: If the connector path requires additional reach, verify that the extension lead matches the connector system and strip contact design.
Aluminum channel, diffuser, and mounting hardware fit
If the LED strip will sit inside an aluminum channel, the channel, diffuser, mounting clips, adhesive, and cabinet surface need to match before purchase. Channel fit is both a mounting decision and an appearance decision because the same part can affect secure fit, smooth light, and installation risk.
The internal width of the aluminum channel should suit the strip, and the diffuser should match the selected LED profile or channel shape. Adhesive may depend on the cabinet surface condition, especially on glossy, dusty, or warm surfaces. Heat path and mounting method should also be reviewed because a channel or adhesive choice does not guarantee durability or heat control in every cabinet setup.
- Channel width: Check the internal width of the aluminum channel against the strip width to reduce fit mismatch risk.
- Diffuser type: Verify that the diffuser or diffuser cover is intended for the selected channel when smoother light or glare reduction is desired.
- Mounting method: Compare mounting clips and adhesive options with the planned cabinet surface before assuming the channel will hold securely.
- Surface condition: Treat glossy, dusty, textured, or warm cabinet surfaces as caution points because adhesive performance may vary.
- Heat path: Review whether the channel placement allows reasonable heat movement, but avoid treating the channel as a guaranteed heat solution.
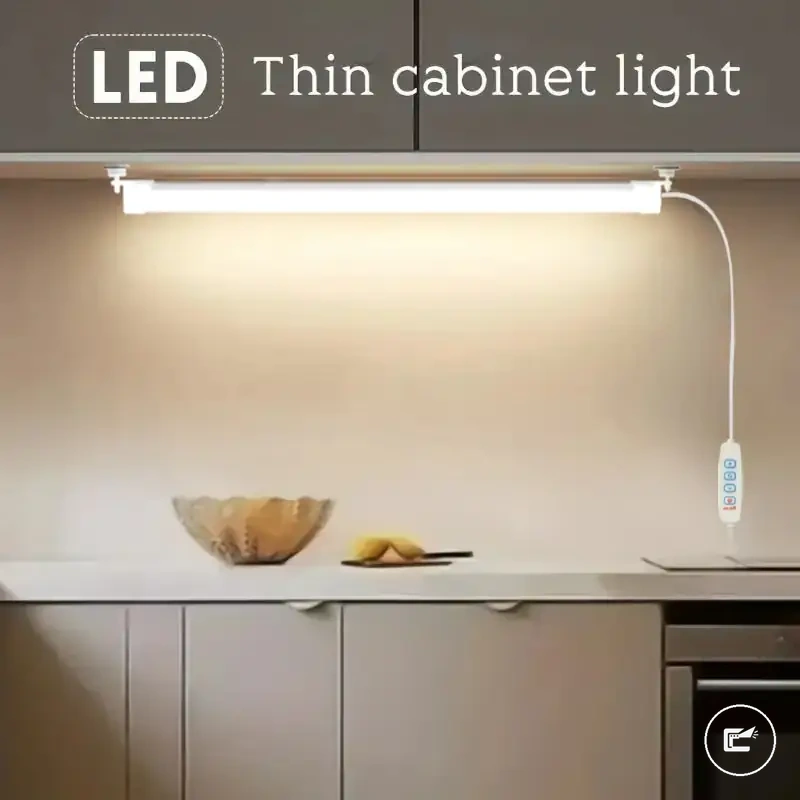
Control Feature Checks
Control feature selection depends on how the cabinet lighting will be used and whether the chosen control method matches the lighting system. A dimmer, remote, smart control, plug-in switch, or motion sensor can be useful when the trigger method, convenience level, and controller compatibility align with the intended cabinet use case.
Control types differ in how lighting is activated and adjusted. A dimmer may support brightness control for task lighting, a plug-in switch may suit a simple setup, and a motion sensor may be useful when hands-free cabinet use is preferred. A remote or smart control can add convenience when direct access to the switch location is less practical, but the value depends on the intended control behavior.
| Control feature | Best use case | Compatibility check | Avoid when |
|---|---|---|---|
| Dimmer | Task lighting with adjustable brightness control | Confirm controller compatibility with the dimming method | Brightness adjustment is unlikely to be used |
| Remote | Cabinets where distance-based control is convenient | Check controller compatibility and intended control range | A nearby switch already provides easy access |
| Smart control | Lighting setups that may benefit from scheduling or app control | Verify controller compatibility with the selected control method | Only basic on-off operation is needed |
| Plug-in switch | Simple cabinet use with direct manual control | Confirm compatibility with the selected power and controller arrangement | Hands-free operation is preferred |
| Motion sensor | Hands-free cabinet use with automatic activation | Review sensor switch compatibility, timer behavior, and operating range | Automatic triggering may be unnecessary |
Controller compatibility should be reviewed before selecting additional features because not every control device suits every lighting setup. A timer, motion sensor, dimmer, or smart control may add convenience when it matches actual usage patterns, while unnecessary functions can increase complexity without improving everyday usability.
Dimmers, remotes, smart controls, and motion sensors
Control type selection depends on how the cabinet lighting is expected to behave during everyday use. A dimmer, remote, smart control, or motion sensor may be appropriate when its interaction method, controller compatibility, and level of automation match the intended cabinet lighting routine.
Selection conditions often depend on whether manual control, remote access, app control, or hands-free activation is the priority. Controller compatibility should be checked before choosing a control type because convenience features may add complexity when they do not align with the lighting system or the intended use pattern.
- Dimmer: Suitable when brightness adjustment is important for task lighting; check controller compatibility because not every controller supports the same dimming method.
- Remote: Useful when manual control from a distance improves convenience; verify compatibility because control functions may vary between systems.
- Smart control: May suit lighting setups that benefit from app control or scheduling; avoid added complexity if simple switching is the primary goal.
- Motion sensor: Helpful when hands-free operation is preferred; review controller compatibility because automatic activation may not suit every cabinet use case.
Sensor range, auto-off timing, and cabinet use case
Motion sensor cabinet light usefulness depends on placement, detection range, auto-off timing, and user movement around the cabinet or storage area. A motion sensor may improve convenience when it can trigger consistently within the intended cabinet use case, but false trigger or missed activation outcomes can occur when placement conditions are not suitable.
Motion sensor behavior depends on detection conditions around the cabinet door, sensor position, obstruction risk, and power source. A sensor switch may trigger, miss, or delay activation when shelves, stored items, door movement, or placement angles affect the detection path. Auto-off timing can also influence convenience because the lighting response should align with normal cabinet access patterns.
- Detection range: Check whether the detection range suits the cabinet or storage area because limited coverage may contribute to missed activation.
- Detection angle: Review sensor placement and cabinet door movement because entry direction can influence trigger behavior.
- Auto-off timing: Confirm that the auto-off timing aligns with expected cabinet use because timing that feels too short or too long may reduce convenience.
- Obstruction risk: Look for shelves, stored items, or cabinet structures that may create obstruction and increase false trigger or missed activation risk.
- Power source: Verify that the power source supports the intended motion sensor operation and control method.
- Brightness behavior: Check whether the lighting response matches the intended occupancy trigger behavior for cabinet access.
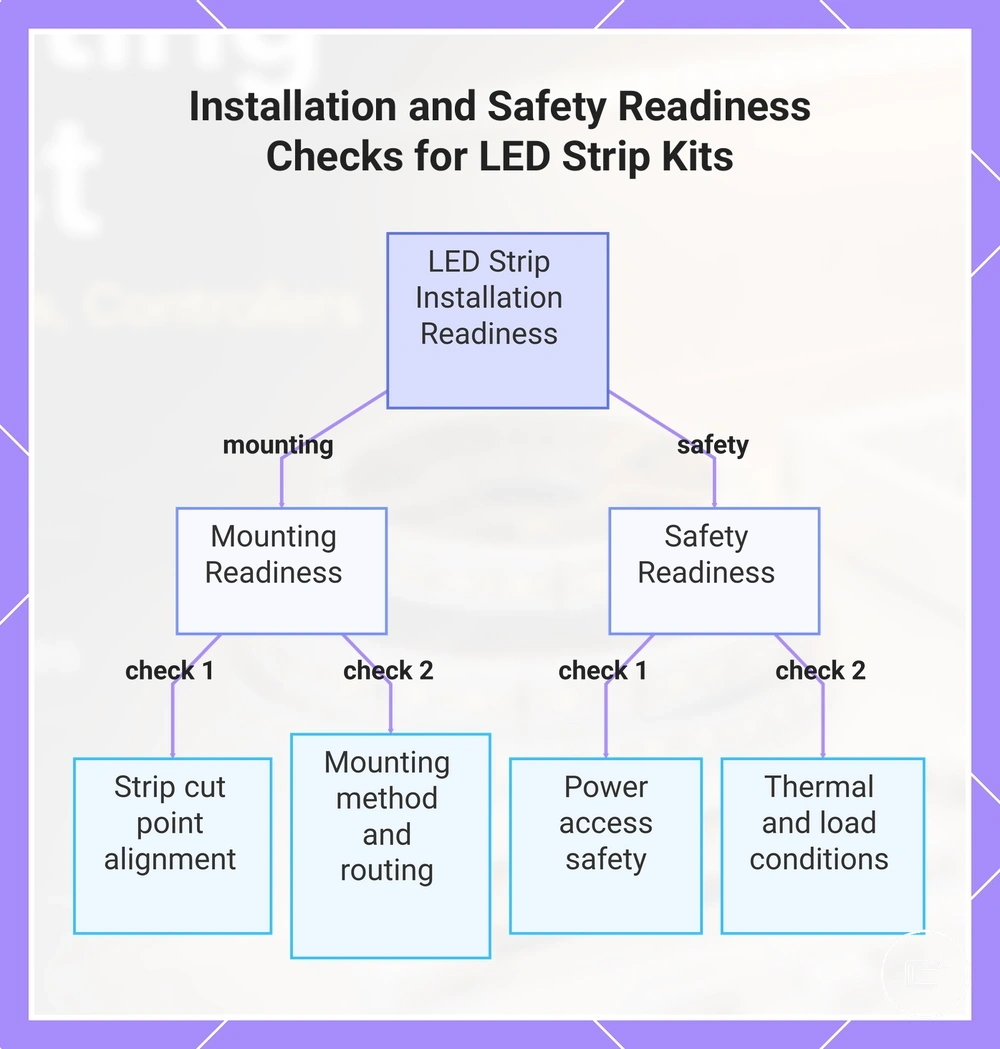
Installation and Safety Readiness Checks
If the chosen LED strip kit must fit within a cabinet with limited space, installation readiness depends on whether the mounting method, routing path, power access, and cabinet conditions align with the intended setup. A kit may suit the lighting goal but still require a different configuration when cabinet constraints affect fit or setup safety.
Mounting readiness focuses on physical fit before installation. Cut points should align with the planned strip length, routing should support clean wire hiding, and the cabinet surface should be suitable for adhesive or clips. Cabinet corners, shelves, and access points can influence whether the selected kit can be mounted cleanly.
Heat and safety readiness focus on load conditions, ventilation, and power access. If heat buildup, uncertain wiring conditions, or limited airflow are concerns, additional safety checks may be more appropriate before choosing a kit. Hardwired or higher-risk setups can also benefit from qualified electrical guidance rather than relying only on purchase-readiness checks.
Installation readiness checklist:
- Physical fit — Cut points: Confirm that strip cut points align with the required cabinet length.
- Physical fit — Routing: Check whether routing allows clean wire hiding without creating difficult cable paths.
- Physical fit — Adhesive and clips: Verify that the mounting method suits the cabinet surface and installation conditions.
- Safety condition — Power access: Confirm that power access is available without creating unnecessary cable exposure.
- Safety condition — Heat: Review ventilation and placement conditions that may affect heat management.
- Safety condition — Load: Check whether the expected load appears suitable for the planned power arrangement and kit design.
This chart organizes the key readiness checks for installing an LED strip kit, separating mounting fit and safety conditions.
Cut points, routing, adhesive, clips, and wire hiding
Clean routing depends on whether the LED strip kit supports the planned strip length, corner route, cable path, and cabinet layout. Cut points, mounting accessories, and cable exit options should align with the intended route because routing constraints can affect wire hiding and the overall installation appearance.
Routing feasibility is often determined before installation begins. A strip and mounting accessory combination may support a cleaner layout when cut marks match the required length, the cabinet surface suits adhesive or clips, and the cable exit location reduces visible-wire exposure along the cabinet edge.
- Cut points: Verify that cut points or cut marks align with the planned strip length and route.
- Corner route: Check whether the strip and accessories can follow the intended corner route without creating an unsuitable cable path.
- Cable clips: Review whether clips are available to help secure wires along the cabinet surface or edge.
- Adhesive backing: Confirm that the adhesive approach is suitable for the cabinet surface because results can vary by surface condition.
- Mounting channel: Check whether a mounting channel may support cleaner routing or a more discreet cable path.
- Cable exit: Verify that the cable exit location can reach power access while helping limit visible wires within the cabinet view.
Heat, load, and cabinet surface safety
Heat, load, and cabinet surface safety depend on whether the lighting setup has suitable ventilation, adequate driver capacity, and mounting conditions that fit the intended cabinet environment. Overheating risk may increase when heat accumulates in an enclosed space, the load approaches driver capacity, or the mounting surface creates challenges for stable installation.
Risk levels can vary based on thermal behavior, cabinet surface condition, cable condition, and available airflow. Limited ventilation, a surface that may not suit adhesive mounting, or a small load margin can increase the likelihood of heat-related concerns. An aluminum channel may be a more suitable accessory choice when mounting conditions or heat management requirements need additional support.
Caution checklist:
- Driver capacity: If the lighting load appears close to driver capacity, a setup with more load margin may reduce load-related risk.
- Ventilation: If the strip system will operate in an enclosed space, check whether ventilation is sufficient to limit heat buildup.
- Cabinet surface: If the cabinet surface may not support adhesive reliably, clips or an aluminum channel may be a more suitable mounting option.
- Cable condition: If cables appear pinched, stressed, or difficult to route cleanly, a different accessory arrangement may support a safer layout.
- Heat behavior: If heat may concentrate near the mounting surface, review channel and mounting options that better suit the cabinet conditions.
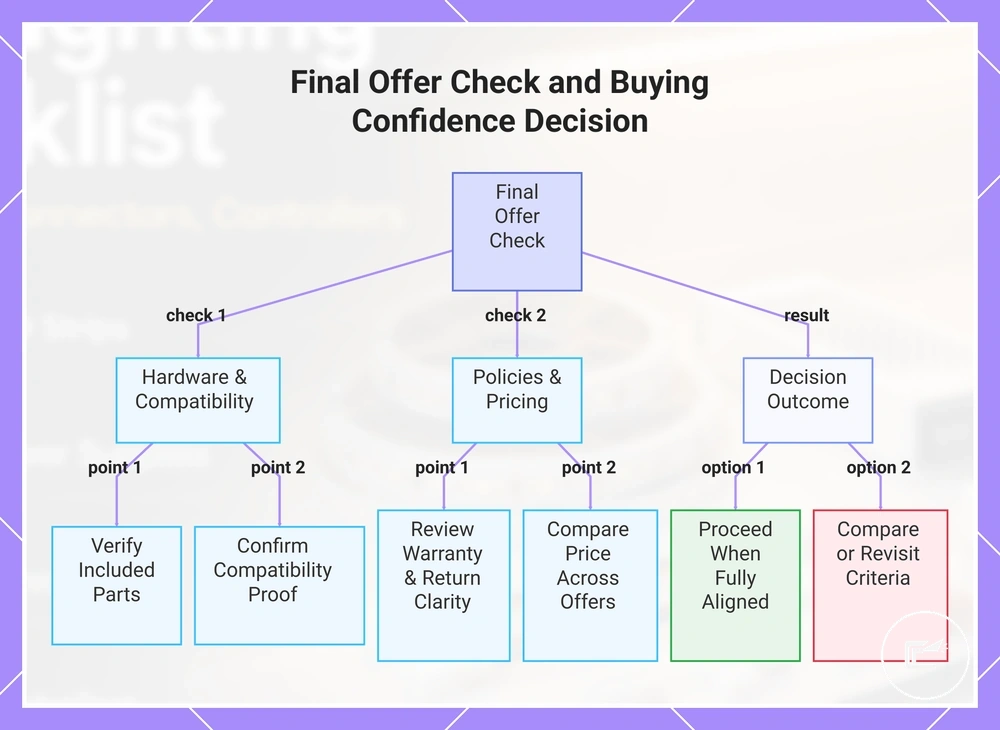
Final Offer and Buying Confidence Checks
Buying confidence depends on whether the offer satisfies the fit, compatibility, control, installation, and safety conditions already reviewed. A final checklist helps compare the offer against the required conditions before making a purchase-readiness decision.
An offer check should begin with included parts. Missing accessories can create delays when the planned setup depends on connectors, controllers, mounting hardware, power components, or channels that are not clearly included.
Final checklist:
- Included parts: Verify that the included parts support the intended lighting setup and do not create obvious missing accessories.
- Compatibility proof: Check labels and ratings that support compatibility with the planned strip system and control method.
- Warranty cues: Review available warranty cues and support information as part of the overall offer check.
- Return clarity: Confirm that return clarity is easy to understand when comparing similar options.
- Price-check path: Use a price-check path across comparable offers rather than relying on a single option.
If multiple offers appear suitable, compare lighting types before deciding. A different lighting type may be worth considering when unresolved compatibility, routing, control, or mounting concerns remain.
Proceed when the offer aligns with the required conditions and no significant gaps remain. Compare another lighting type when a different approach may better suit the cabinet environment, or revisit setup criteria when compatibility proof, included parts, or installation requirements remain uncertain.
Buying confidence is usually stronger when the offer check, included parts, compatibility proof, warranty cues, return clarity, and setup requirements align with the intended use case. Consistent decision signals across the final checklist can support a more confident next step.
The products below are useful examples for comparing available options. Before buying, check that the compatibility criteria, key features, and product details match your needs.


This chart shows the two main verification areas for a final offer check and the decision outcomes that determine whether to proceed or reconsider a different lighting type.