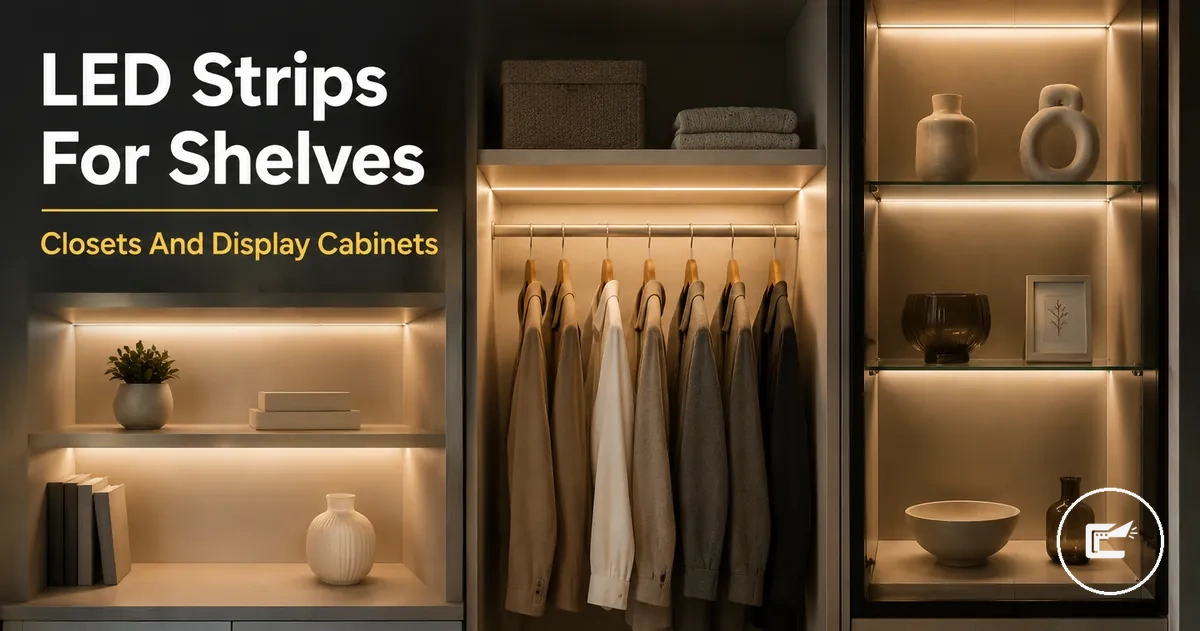
LED Strip Lighting for Shelves, Closets, and Display Cabinets
LED strip lighting for shelves, closets, and display cabinets refers to furniture-level lighting that supports visibility, display effect, hidden placement, and controlled light quality inside compact storage or presentation spaces. This page covers shelves, closets, wardrobes, bookcases, and display cabinets as the controlled scope.
A shelf, wardrobe, or glass cabinet can feel dark even when the surrounding room has enough light, because objects, doors, panels, and shelf edges can block the light path. Hidden strips, diffusion, and reachable sensor control can make the lighting easier to use, but the result depends on space depth, surface finish, and power access.
This furniture-use page belongs inside the broader home LED strip and cabinet lighting accessories cluster because strips, connectors, controllers, channels, and low-voltage power parts often work together. It is a focused use-case page, not a full indoor placement guide or a full installation guide.
The main decision is whether the space needs practical access light, display lighting, or a softer accent effect. Placement, light quality, switching behavior, and power access should be checked together before moving into the first storage-and-display fit discussion.
- Space fit depends on shelf depth, cabinet shape, door movement, and whether the strip can stay visually controlled.
- Placement should support hidden strips, lower glare risk, and fewer visible LED dots when the viewing angle is close.
- Light quality may need diffusion, warm white, or neutral white depending on objects, clothing visibility, glass shelves, and reflections.
- Control and power planning should consider sensor control, controller access, and nearby low-voltage power access without assuming one setup fits every furniture type.
Where LED Strip Lighting Works Best in Small Storage and Display Spaces
LED strip lighting works best in small storage spaces and display spaces where visibility, a suitable mounting surface, and nearby power access can be accommodated within the furniture itself. Shelves, bookcases, closets, wardrobes, display cabinets, glass cabinets, and enclosed compartments provide defined areas where light can be directed more precisely. Suitability may still depend on cabinet depth, surface condition, cable routing, and viewing angle.
Where LED Strip Lighting Works Best in Small Storage and Display Spaces becomes clearer when different furniture types are compared by purpose and constraint. The image below illustrates how shelves, closets, wardrobes, and display cabinets can require different lighting positions based on storage access or display needs.
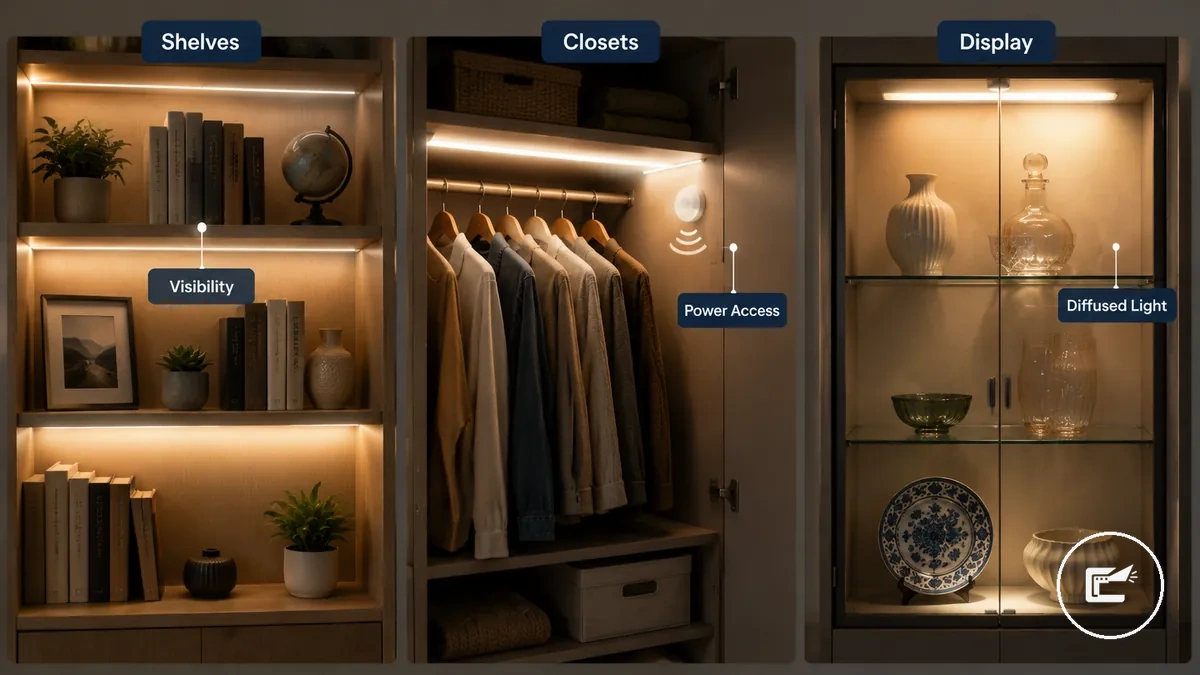
Open shelves often focus on object visibility and front-edge presentation. Enclosed closets and wardrobes may place greater emphasis on daily access, motion sensor use, and convenient visibility. Display cabinets and glass cabinets often use lighting to support presentation, where reflections and diffusion can influence the final display effect.
The table below organizes small storage and display spaces by space type, lighting need, placement condition, and likely outcome. It also highlights where LED strip lighting may serve practical visibility needs and where it may function more effectively as accent or display lighting.
| Space type | Main lighting need | Placement condition | Best-fit outcome |
|---|---|---|---|
| Shelves | Object visibility | Front-edge or concealed mounting surface | Improved visibility for stored or displayed items |
| Bookcases | Shelf lighting | Consistent cable path and hidden strip position | More even illumination across shelves |
| Closets | Daily access visibility | Nearby power access and reachable control | Convenient storage lighting during routine use |
| Wardrobes | Practical visibility | Interior mounting surface and optional sensor control | Light directed toward frequently accessed areas |
| Display cabinets | Display lighting | Hidden strips and controlled viewing angle | Accent-focused presentation of displayed objects |
| Glass cabinets | Object presentation | Attention to reflections and diffusion | Display effect with reduced visibility of individual LED dots |
| Enclosed compartments | Interior visibility | Managed brightness and power access | Better illumination in shadowed storage areas |
Furniture-scale storage and display applications remain the focus of this section. For broader location comparisons beyond furniture lighting, see indoor placement options.
Lighting Goals for Shelves, Closets, Wardrobes, and Display Cabinets
Lighting goals change according to furniture use. Shelves often emphasize visibility, closets and wardrobes focus on daily access, and display cabinets place greater emphasis on display lighting and accent effect. The intended lighting purpose influences brightness direction, shadowing control, and how objects are viewed within the space.
Lighting Goals for Shelves, Closets, Wardrobes, and Display Cabinets become easier to compare when visibility, access, and display needs are viewed side by side. The image below illustrates how different furniture contexts can require different lighting priorities while using LED strip lighting as a shared method.
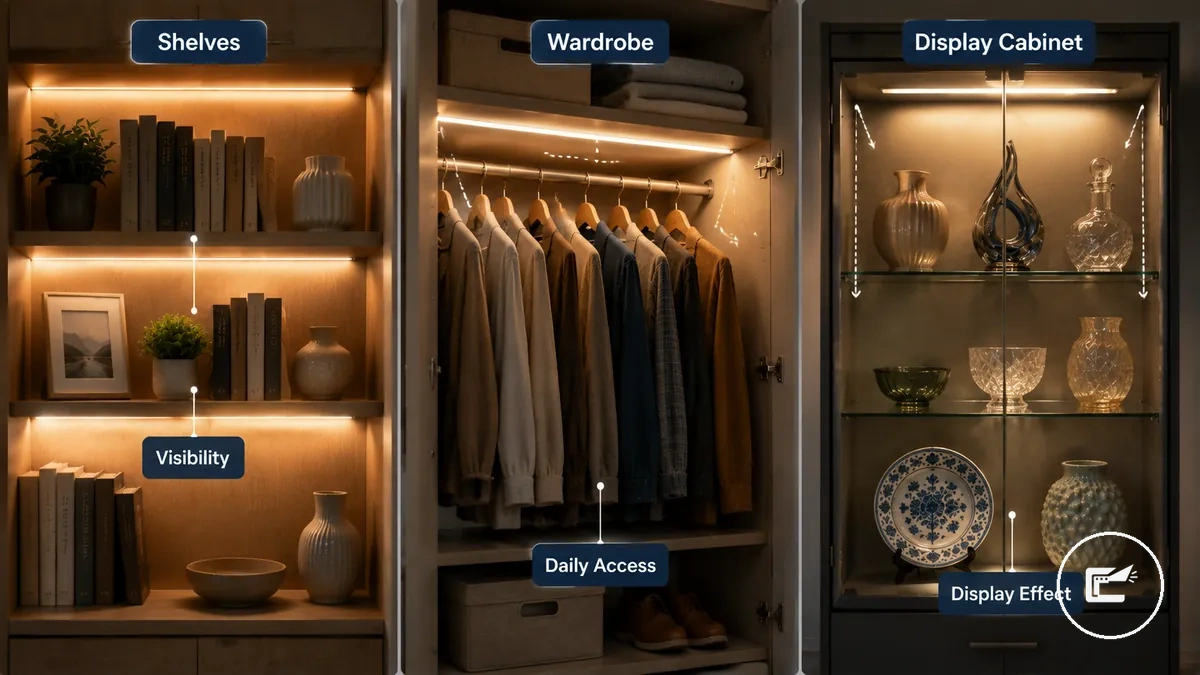
A shelf may focus on object visibility and reducing shadows around stored items. A wardrobe may need light directed toward hanging clothes when doors, shelves, or contents create blocked light. A display cabinet may prioritize object highlighting, where brightness direction can influence glare, reflection, and display quality.
Lighting Goals for Shelves, Closets, Wardrobes, and Display Cabinets can be organized by furniture context, lighting purpose, and expected outcome:
- Shelves: Purpose is object visibility; light directed toward the front edge or stored contents may reduce shadowing and improve usability when locating items.
- Bookcases: Purpose is object visibility across books and decorative items; balanced brightness direction can improve viewing without overwhelming the contents.
- Closets: Purpose is daily access; access lighting with motion activation may help users find clothing and stored items more comfortably.
- Wardrobes: Purpose is visibility around hanging clothes and interior storage; light direction may help offset blocked light caused by door style, shelves, or clothing.
- Display Cabinets: Purpose is display lighting and accent effect; controlled brightness direction may support highlighting while helping manage glare and reflection.
Daily-access closet lighting focuses on finding and using stored items, while object-highlighting display lighting focuses on presenting and viewing displayed objects.
Shelf and Bookcase Lighting for Objects, Books, and Open Displays
A bookcase filled with books or an open shelf displaying objects often benefits from shelf lighting that improves visibility while supporting display emphasis. Shelf and bookcase lighting can make books easier to identify and help objects stand out without drawing attention away from the contents. Shelf and Bookcase Lighting for Objects, Books, and Open Displays becomes easier to evaluate when shelf depth, object height, and strip direction are considered together.
Shelf and Bookcase Lighting for Objects, Books, and Open Displays becomes clearer when comparing how light reaches different shelf contents. The image below demonstrates how shelf depth and strip direction can affect visibility, shadowing, and visible strip risk.
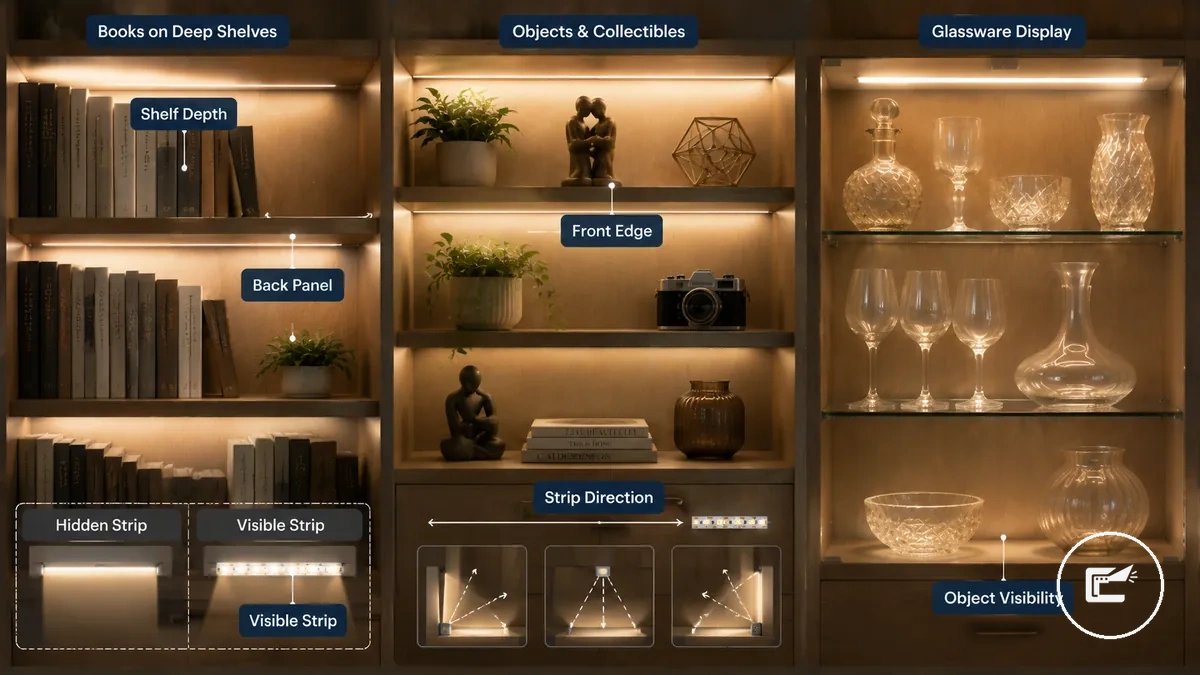
Shelf depth, object height, and strip direction directly affect visibility across books, objects, and open displays. A front edge position may improve book readability on deeper shelves, while a back panel wash may suit open displays when a softer background effect is preferred. Taller objects can create shadow areas, and a visible strip may become more noticeable when the light source is exposed to the viewing angle. Testing the light before final placement can help determine whether front-edge illumination or a back panel approach better suits the shelf contents.
- Books: Bookcase lighting may benefit from light directed toward book spines and reading surfaces, especially on deeper shelves.
- Glassware: Soft light and diffusion can help manage reflection while maintaining object visibility.
- Collectibles: A back panel wash may support open displays, while strip concealment can reduce visible strip distraction.
- Decorative objects: Shelf LED lighting may highlight shape and texture when strip direction aligns with the display focus.
Closet and Wardrobe Lighting for Visibility and Daily Access
Dark clothing areas, blocked light, and hard-to-reach switches can make closets and wardrobes less convenient during daily access. Closet LED strip lighting can improve visibility by placing light closer to shelves, drawers, and hanging clothes. Wardrobe lighting often becomes easier to use when strip placement and switching behavior are planned together.
- Check for hanging clothes, shelves, or drawers that may block light and create shadows.
- Confirm that door style and door movement do not interfere with strip placement or switch access.
- Verify motion sensor line of sight if motion activation is being considered.
- Review outlet, charging, or other power access options before choosing a setup.
- Look for glare on glossy or light-colored surfaces that may affect clothing visibility.
- Clean mounting surfaces before placing strips or related accessories.
Closet and wardrobe lighting is easier to plan when hanging clothes, shelves, drawers, and door style are evaluated before installation. Hanging clothes can create blocked light, while deeper interiors may leave drawers or rear storage areas less visible. Motion activation may improve convenience in certain layouts, but results can vary with door behavior, interior depth, and sensor line of sight. Neutral white or warm white light may support visibility differently depending on clothing color, surface finish, and glare conditions. Visibility outcomes can also depend on depth and available power access.
Dark corners and deep wardrobes may require additional attention because light can become less effective as storage depth increases. Closets without a nearby outlet may need an alternative power approach, but suitability depends on access patterns, charging convenience, and the overall wardrobe layout.
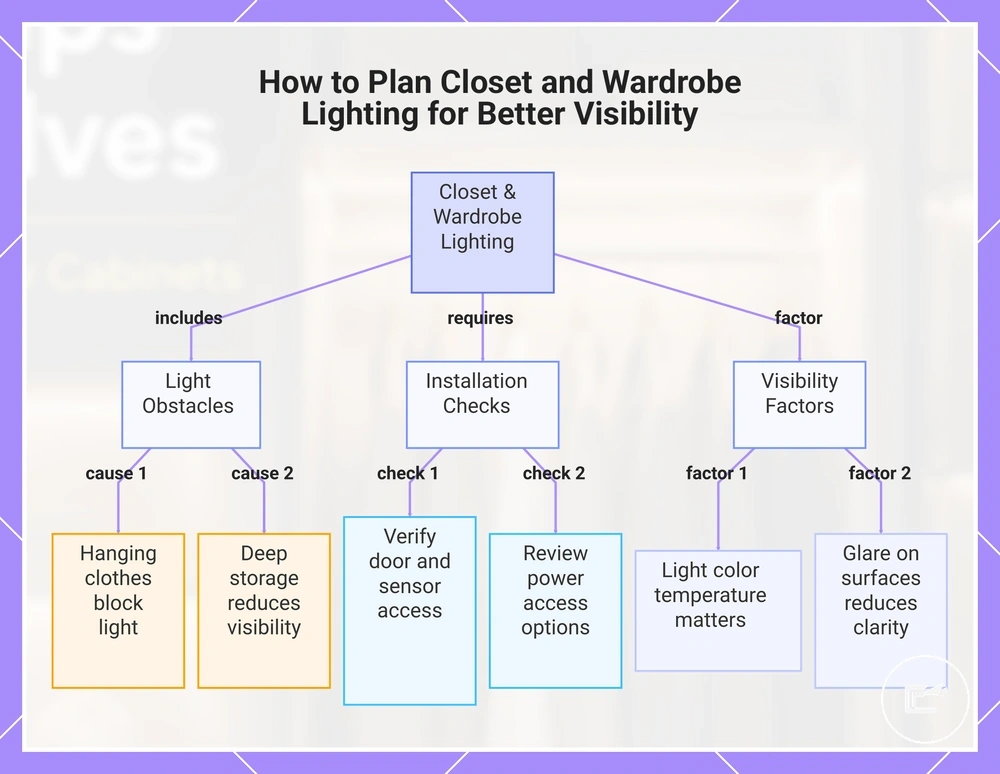
This chart shows the main lighting obstacles, installation checks, and visibility factors to consider when planning closet and wardrobe lighting.
Display Cabinet and Glass Cabinet Lighting for Highlighting Interior Items
A glass cabinet displaying collectibles or other interior items often benefits from lighting that highlights the contents while limiting reflections and visible strip lines. Display cabinet lighting and glass cabinet lighting can produce different results depending on shelf material, viewing angle, and light placement. Glass and glossy surfaces can increase glare risk, so reflection control is an important part of the lighting outcome.
| Glass Shelves | Wood or Opaque Shelves |
|---|---|
| Higher reflection risk and greater visibility of light sources | Lower reflection risk with reduced strip visibility |
| May benefit from diffused channels to soften visible strip lines | May allow more direct highlight lighting while keeping the strip less noticeable |
| Placement should consider viewing angle and glare control | Placement can focus more on object visibility and shadow management |
Display cabinet lighting can use side lighting or back-panel lighting to draw attention to interior items while helping manage reflections. Glass shelves may reveal light sources more easily, whereas wood shelves can make lighting components less visible. Side lighting may emphasize object shape, while back-panel lighting may create a softer backdrop behind collectibles and decorative items.
Diffused channels can help soften visible strip lines when reflective surfaces make the light source easier to notice. Warm light may suit displays where a softer appearance is preferred, while neutral light may improve item visibility depending on material, color, and viewing conditions. When a controlled highlight and softer presentation are desired, examples from indoor ambience ideas may provide additional context without expanding beyond furniture-focused lighting.
Strip Placement for Even Light, Hidden Strips, and Shadow Control
Strip placement controls light spread, strip visibility, and shadow behavior. Whether lighting appears as even light or creates stronger contrast often depends on furniture depth, surface color, and viewing angle. Placement also changes how easily the light source can be seen from normal viewing positions.
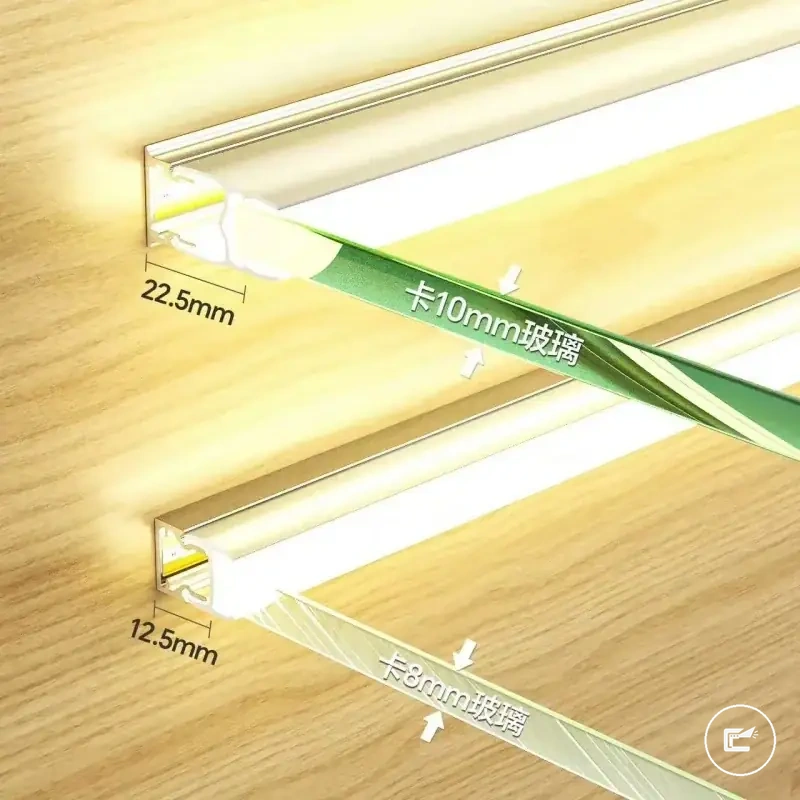
Front-edge placement directs light toward the contents but may increase glare risk when the strip remains visible. Back-edge placement directs light toward a rear surface, which may create a softer indirect effect while reducing visible-strip exposure. Side placement and vertical placement can help light reach taller objects, while under-shelf positions may improve shadow control when upper surfaces block light.
Strip Placement for Even Light, Hidden Strips, and Shadow Control is easier to evaluate when each mounting position is compared by light direction, intended effect, and potential risk. The table below organizes common placement positions and highlights where diffuser channels, recesses, or indirect bounce approaches may provide a more suitable correction.
| Placement position | Light direction | Best use | Main risk | Correction |
|---|---|---|---|---|
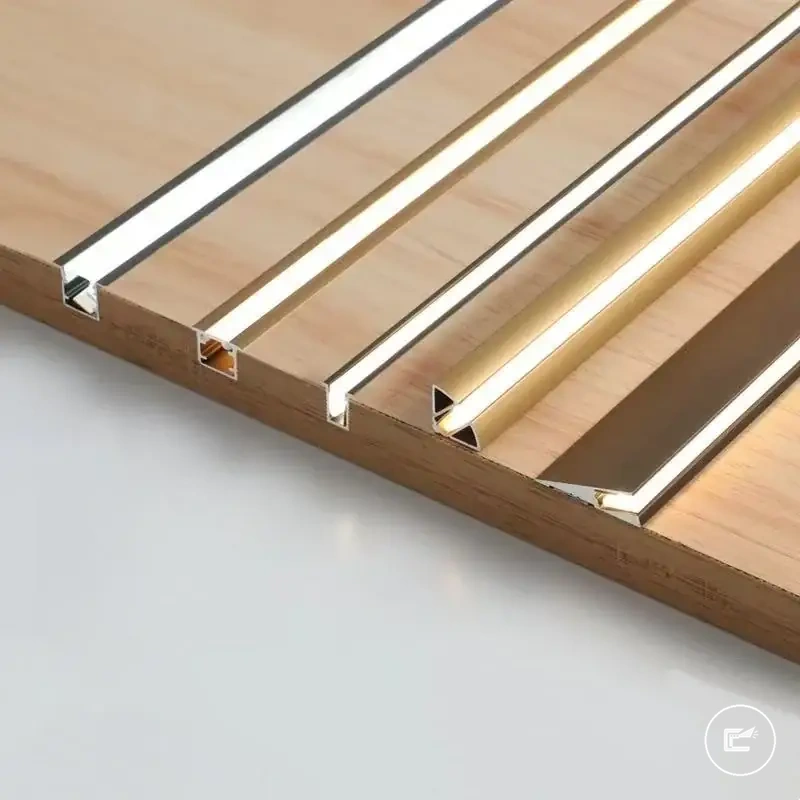
| Front-edge | Forward onto contents | Direct visibility | Glare risk and visible strip | Diffuser channel or recessed mounting |
| Back-edge | Toward rear surface | Indirect light and softer appearance | Reduced light on front-facing objects | Reflective surface or balanced positioning |
| Side | Across objects from one side | Highlighting depth and shape | Uneven shadows | Diffusion or complementary side placement |
| Vertical | Top-to-bottom spread | Tall storage areas and vertical surfaces | Visible strip lines | Recessed channel or hidden placement |
| Under-shelf | Downward onto lower levels | Shadow control between levels | Direct visibility from below | Diffuser channel and viewing-angle control |
| Inside-frame | Indirectly toward contents | Hidden strips and softer illumination | Reduced coverage in deeper areas | Indirect bounce positioning or additional light coverage |
Exposed adhesive strip placement may suit situations where direct light is the priority, while hidden placement often creates a cleaner appearance when visible-strip risk is a concern. A diffuser channel, recessed position, or indirect bounce approach may be more suitable when viewing angles expose the light source, because these methods can soften visible strip lines while helping maintain a more balanced light spread.
Front, Back, Side, and Vertical Strip Positions
Each strip position changes visibility, light direction, and shadow shape. A front lip position may place more light onto visible contents but can make the strip easier to notice from common viewing angles. A rear panel, side wall, vertical stile, or under-shelf position changes how light reaches objects and where shadows may appear.
Front, back, side, and vertical strip positions serve different local placement goals. The table below compares front lip, rear panel, side wall, vertical stile, and under-shelf position options by use, drawback, and correction.
| Position | Best local use | Drawback | Correction |
|---|---|---|---|
| Front lip | Shelves and bookcases where forward visibility is the priority | May increase glare and strip visibility | A diffuser may help when the strip is visible from normal viewing angles |
| Rear panel | Glass cabinets that benefit from a softer wall wash effect | Front-facing items may create stronger shadow areas | Indirect positioning may improve balance depending on depth and surface finish |
| Side wall | Wardrobes or storage spaces with tall objects that need vertical spread | Light may appear stronger on one side | An additional side placement may improve visibility when the layout allows |
| Vertical stile | Cabinet sides where a vertical run supports top-to-bottom coverage | Strip lines may remain visible | A recessed position may reduce direct visibility |
| Under-shelf | Lower shelf areas that benefit from downward light | Viewing angles from below may expose the strip | A diffuser or deeper mounting position may soften visibility |
Wire Routing Behind Shelves, Bookcases, and Cabinet Panels
Wire routing behind shelves, bookcases, and cabinet panels starts with reducing visible cable clutter and avoiding pinch points where furniture movement may contact a cable. A tidy low-voltage planning approach can help keep the cable path less noticeable while maintaining access to lighting components. Wire routing choices may vary based on rear gaps, power access, and how the furniture is used.
Rear gaps and panel edges can provide a route for hidden cable placement, while small drilled openings may help move cables between sections when the furniture design allows. Cable clips can support wire management by keeping cables aligned along cabinet panels and reducing loose sections that may become visible. Controller placement is often easier to maintain when controls remain reachable, and pinch points should be checked anywhere door movement or furniture movement may affect the cable path.
- Verify that rear gaps provide a practical cable route behind shelves, bookcases, or cabinet panels.
- Check that cable clips keep the cable path organized without interfering with furniture use.
- Keep controller placement reachable for adjustment or maintenance.
- Confirm that door movement does not create pinch points along the cable route.
- Review adapter location as part of low-voltage planning before finalizing wire routing.
- Check for pinch-point avoidance anywhere furniture movement could place pressure on a cable.
Hardwired or mains-level changes are outside this furniture-planning scope and may require appropriate installation guidance. This section focuses on low-voltage planning, cable routing, and wire management within shelves, bookcases, and cabinet panels.
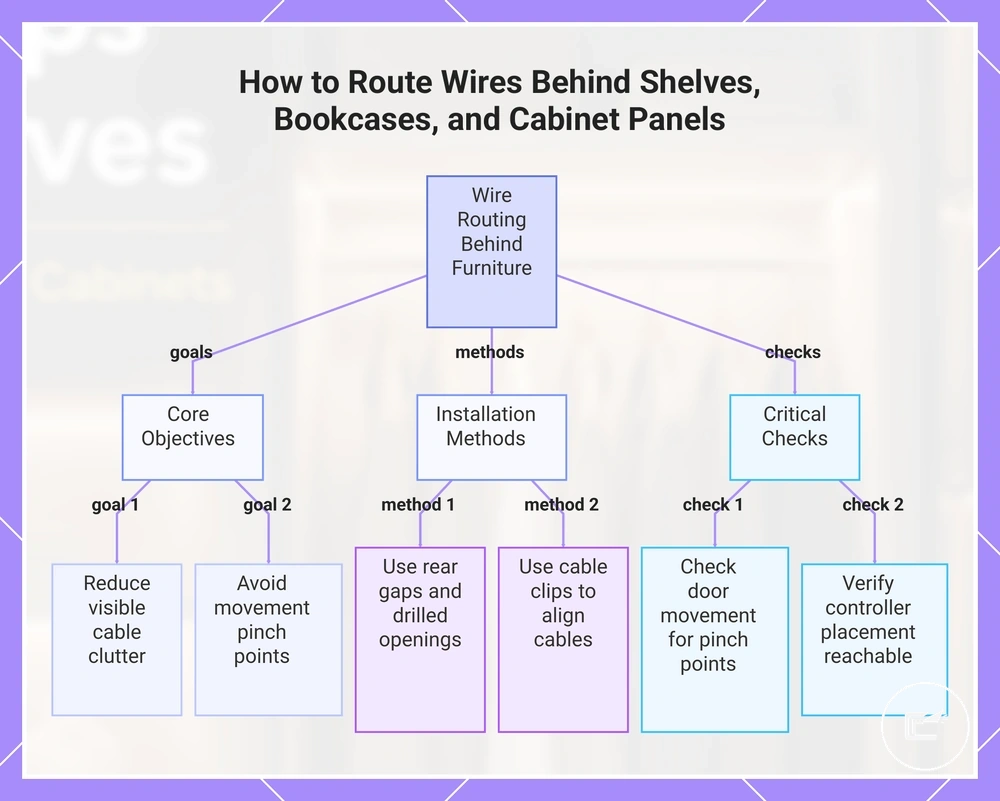
This chart outlines the key steps and checks for routing wires behind furniture to reduce clutter and avoid pinch points.
Light Quality Choices for Enclosed Furniture Spaces
Light quality choices for enclosed furniture spaces affect perceived brightness, glare, and color impression because enclosed areas can change how light interacts with surfaces and objects. Cabinet depth, surface finish, and viewing distance can make the same strip appear brighter or softer depending on the furniture layout. Reflections may become more noticeable in enclosed or semi-enclosed spaces, especially when light is viewed at close range or through glass surfaces.
Brightness, color temperature, and diffusion work together as linked attributes. Warm white may support a softer appearance, while neutral white may improve visibility depending on stored items, finishes, and viewing conditions. Diffusion can help reduce visible LED dots and support glare control when reflections or close viewing angles affect comfort and display appearance.
Light Quality Choices for Enclosed Furniture Spaces depend on how the furniture is used and how light interacts with interior surfaces. Closets often prioritize practical visibility, while display cabinets may place greater emphasis on controlled highlights and ambience. The table below organizes brightness, color temperature, diffusion, glare control, and visible LED dots by condition and effect inside enclosed furniture spaces.
| Attribute | Condition to check | Effect in enclosed furniture | Decision cue |
|---|---|---|---|
| Brightness | Cabinet depth and surface finish | Can change perceived brightness and object visibility | Adjust brightness according to depth and reflection level |
| Color temperature | Stored items and viewing purpose | May influence visibility and display appearance | Choose warm white or neutral white based on the intended use |
| Diffusion | Close viewing distance or exposed light source | Can soften light and reduce visible LED dots | Consider diffusion when individual light points are noticeable |
| Glare control | Reflections and viewing angle | May improve comfort and reduce distracting highlights | Review reflective surfaces before finalizing the lighting setup |
| Visible LED dots | Strip density and diffuser channel use | Can affect display appearance in enclosed furniture | Consider diffusion when a smoother lighting effect is preferred |
For broader criteria beyond enclosed furniture applications, see light quality for small spaces.
Brightness and Color Temperature for Small Cabinets and Closets
Brightness and color temperature should match the cabinet or closet use because they directly affect perception and visibility. Small cabinets, closets, wardrobes, and shelves can make light appear stronger or softer depending on cabinet size, surface color, and stored contents. Bright finishes may increase perceived brightness, while darker finishes may benefit from a different light level or dimming approach when visibility needs change.
- Warm white: When display ambience, wood finishes, or a softer appearance are preferred, warm white may create a more comfortable visual effect; however, clothing visibility can vary depending on room lighting, contents, and surface color.
- Neutral white: When closets, wardrobes, or daily-access shelves prioritize clothing visibility, neutral white may make item details easier to distinguish; results still depend on finishes, contents, and surrounding light.
- Cooler white: When reflective glass or lighter surfaces increase perceived brightness, a cooler white tone may enhance visibility; however, viewing angle and brightness level may influence visual comfort.
For example, a display cabinet focused on ambience may use warm white with controlled dimming to support the appearance of decorative objects. A closet focused on clothing visibility may benefit from neutral white and adjustable brightness when surface color, stored items, or room lighting affect how the light is perceived.
Diffusion, Glare Control, and Visible LED Dots
Visible LED dots and glare can make LED strip lighting appear harsher in small furniture spaces, especially at close viewing distances. Diffusion can soften the appearance of individual light points and support glare control without making a diffuser necessary in every setup. Diffused light may create a smoother visual effect when reflections, viewing angle, or exposed front-edge placement make the light source easier to notice.
Diffuser channels can help soften visible LED dots, while COB-style strips may provide a more continuous or dot-free look when viewed up close. The effect often depends on strip density and viewing angle because individual light points may become more noticeable when the strip is directly visible. Glossy surfaces and glass shelves can increase reflections, making glare reduction more relevant in display-focused furniture.
| Appearance Factor | Exposed Strip Look | Diffused or COB-Style Look |
|---|---|---|
| Visible LED dots | Individual light points may be easier to see | Dots may appear softer or less noticeable |
| Glare | Direct viewing may increase glare perception | Soft light may improve viewing comfort |
| Reflection | Glossy surfaces and glass shelves may reveal the light source more clearly | Diffusion can help soften reflected light appearance |
| Best use | Hidden or less visible locations | Display cabinets and eye-level viewing areas |
Hidden strips may reduce the need for diffusion because visible LED dots are often less noticeable when the light source is concealed from normal viewing positions. In glass cabinets or eye-level display cabinets, diffusion may have a greater effect on appearance because reflections and direct sight lines can make individual light points easier to detect.
Sensor and Switching Options for Closet and Cabinet Lighting
Sensor and switching options should match access frequency and power constraints because control choice directly affects convenience, accessibility, and daily usability. Closet lighting that is accessed frequently may benefit from automatic activation, while cabinet lighting used for display may prioritize user-controlled operation. Switching method affects convenience and access, but reliability can vary by sensor placement, power source, and usage pattern.
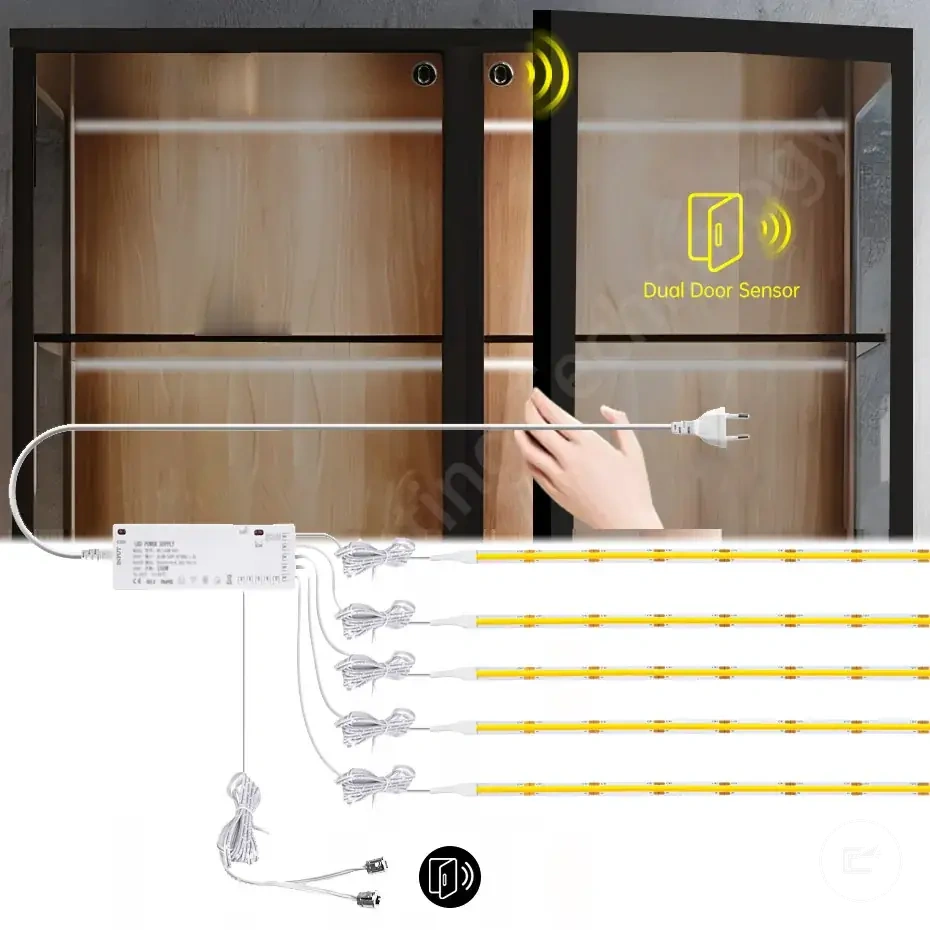
Motion sensors may suit closet lighting when frequent access makes automatic activation more practical, although false triggers can occur depending on sensor placement and nearby movement. Door sensors may suit wardrobes when door behavior aligns with lighting use. Automatic activation often depends on access frequency and how consistently the space is opened or approached.
Touch controls can support manual adjustment in display cabinets where direct dimming or operation changes are preferred. Remote dimmers may improve convenience when ambience or brightness control changes over time. Manual switches and timer behavior can provide predictable operation, although usability may depend on switch access, maintenance needs, and the intended lighting routine.
Sensor and Switching Options for Closet and Cabinet Lighting become easier to evaluate when control methods are compared by trigger condition, intended use, and trade-off. The table below compares control type, trigger or action, best use, and trade-off to qualify.
| Control option | Trigger or action | Best use | Trade-off to qualify |
|---|---|---|---|
| Motion sensor | Detected movement | Closet lighting with high access frequency | False triggers may occur depending on placement and surroundings |
| Door sensor | Door opening or closing | Wardrobes and enclosed storage | Reliability may depend on door behavior and alignment |
| Touch control | Manual touch input | Display cabinets requiring direct adjustment | Requires user interaction for activation |
| Remote dimmer | Remote brightness adjustment | Ambience and brightness control | Convenience may depend on remote access and maintenance |
| Manual switch | Physical switching action | Simple cabinet lighting setups | Requires direct access to the switch location |
| Timer behavior | Scheduled activation or shutoff | Predictable lighting routines | May be less responsive to changing usage patterns |
Automatic activation is often more suitable for closets when access frequency is high and hands-free operation improves convenience. Display cabinets may benefit from manual control or dimmed control when presentation and brightness adjustment are a higher priority than automation. Battery runtime, sensing distance, and automation consistency can vary by device type, sensor placement, and maintenance conditions, so selection is usually most effective when matched to the intended use case.
Here are product examples that may make comparison easier. Before buying, always review the compatibility criteria, essential features, and product details.
Motion Sensors, Door Sensors, Touch Controls, and Manual Switches
Each control method fits a different trigger condition and use pattern within closet and cabinet lighting. Motion sensors and door sensors rely on automatic activation, while touch controls, remote control options, and manual switches depend on direct user input. Convenience and reliability can vary based on access behavior, furniture layout, and how often the lighting is used.
Motion sensors, door sensors, touch controls, and manual switches can be compared by trigger, ideal space, and limitation. The comparison table below highlights how motion detection, door-triggered activation, touch dimming, remote control, and manual control may behave differently in closets, wardrobes, display cabinets, and open shelving.
| Control method | Trigger | Ideal space | Limitation |
|---|---|---|---|
| Motion sensor | Motion detection | Closets with frequent access | Pet movement or nearby activity may create false triggers depending on placement |
| Door sensor | Door-triggered activation | Wardrobes and enclosed cabinets | Reliability may vary with door style, alignment, and glass-door behavior |
| Touch control | Touch dimming or manual touch input | Display cabinets requiring direct adjustment | Requires physical interaction for brightness changes |
| Remote control | Remote command | Open shelving and display areas where convenient access is preferred | Convenience depends on keeping the remote accessible |
| Manual switch | Physical switching action | Cabinets and closets with a convenient switch location | Requires direct access to the switch each time lighting is used |
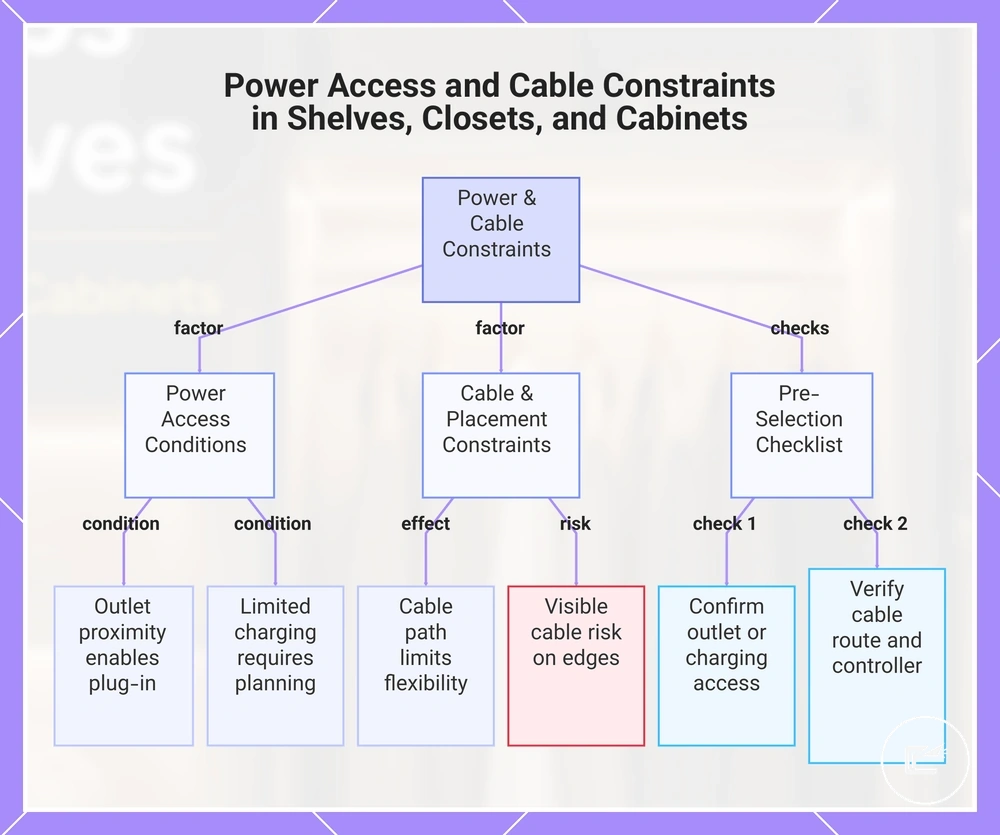
Power Access and Cable Constraints in Shelves, Closets, and Cabinets
Power access and cable constraints determine whether a setup is realistic before any lighting option is selected. Location affects which power source is practical and how easily a cable path can be managed. Furniture depth and usage frequency can influence setup feasibility because they may affect maintenance needs, visibility, and access to components.
If an outlet is close to the installation area, a plug-in setup may be more practical when adapter access remains available. If charging access is limited, a rechargeable option may require more planning for ongoing use. If a battery-powered setup is used frequently, battery maintenance may become a more important consideration.
The cable path should be evaluated before selecting a power source because cable constraints can limit placement flexibility. Controller position may affect adjustment access and maintenance when the controller is concealed behind shelves, closets, or cabinets. Visible cable risk may increase when the cable route relies on exposed edges, limited rear gaps, or open furniture layouts.
Power Access and Cable Constraints in Shelves, Closets, and Cabinets are easier to assess when setup feasibility is verified before choosing a lighting configuration. The compatibility checklist below helps confirm whether power availability, cable route, and controller access support the intended setup.
- Confirm outlet access or charging access near the intended location.
- Verify that the cable path follows a practical cable route with limited visibility.
- Check that controller position remains reachable for adjustment or maintenance.
- Review battery maintenance requirements if a battery-powered option is being considered.
- Confirm that furniture movement will not interfere with cables or connections.
- Assess visible cable risk along shelves, closets, or cabinet edges.
- Verify that a low-voltage setup suits the available power source and adapter access.
Plug-in, battery, rechargeable, and low-voltage setups each depend on different compatibility conditions rather than a single preferred approach. A plug-in option may suit locations with consistent power access, while battery or rechargeable setups may fit locations where cable constraints limit outlet access. This section focuses on selection-level compatibility for low-voltage setup choices and does not extend into broader electrical modification decisions.
Here are product examples that may make comparison easier. Before buying, always review the compatibility criteria, essential features, and product details.
This chart shows the main factors and pre-selection checklist for evaluating power access and cable constraints before choosing a lighting setup.
Battery, Rechargeable, Plug-In, and Low-Voltage Power Choices
Battery, rechargeable, plug-in, and low-voltage power choices depend on outlet access, brightness need, and maintenance tolerance. Closets without outlets may need a lower-cable option, while display cabinets near a socket may support plug-in adapters if cable visibility can be managed. Bookcases and shelves may require extra planning when cables must stay hidden behind panels or rear gaps.
Battery lights, rechargeable strips, plug-in adapters, USB-style power, and low-voltage systems each create different trade-offs. The table below compares each power choice by best condition, limitation, and maintenance need without expanding into a hardwired comparison.
| Power choice | Best condition | Limitation | Maintenance need |
|---|---|---|---|
| Battery | Closets without outlets where lower wiring effort is preferred | Brightness and runtime may vary by device and use frequency | Battery replacement or periodic battery checks |
| Rechargeable | Wardrobes or cabinets where charging access is available | Convenience depends on charging interval and access | Regular recharging based on usage pattern |
| Plug-in | Display cabinets near a socket where adapter access is practical | Cable visibility may be harder to hide in open furniture | Occasional check of adapter access and cable position |
| USB-style | Small shelves or cabinets where a compatible USB-style power source is available | Suitability depends on the power source and controller needs | Maintain access to the USB-style connection and cable path |
| Low-voltage | Cabinets or bookcases needing stronger control over brightness and controller placement | Installation complexity may increase when cables must be concealed | Check adapter, controller, and cable route accessibility |
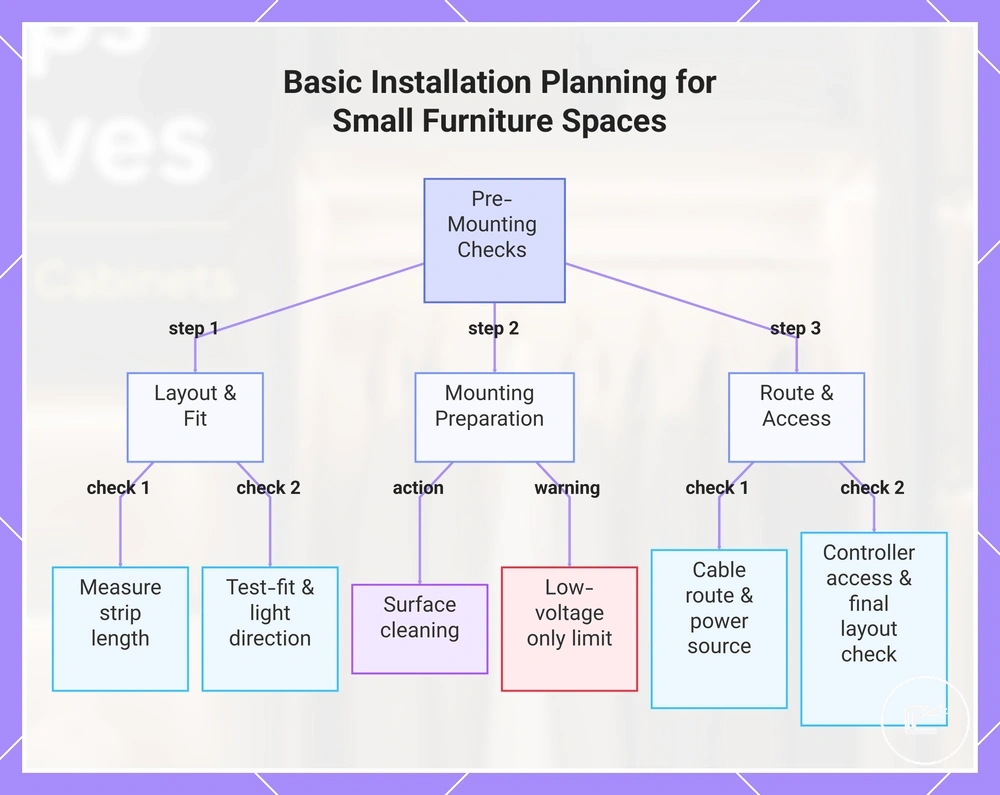
Basic Installation Planning for Small Furniture Spaces
Basic installation planning for small furniture spaces starts with checks that prevent poor placement, weak adhesion, and awkward cable paths. Test-fitting helps reveal whether the intended strip position suits the furniture layout before permanent mounting is considered. Surface checks also help identify areas where surface preparation, clips, or channels may improve placement stability and appearance.
Basic Installation Planning for Small Furniture Spaces follows a sequence that organizes pre-mounting checks before any strip is attached. The steps below focus on measuring strip length, test-fitting, light direction, surface preparation, cable route review, and controller access.
- Measure strip length against furniture depth and available mounting space to confirm fit and identify any relevant cut point requirements.
- Use test-fitting or test placement to check whether the proposed strip position suits the furniture layout before permanent mounting.
- Review light direction to identify potential shadow areas or glare that may affect shelves, closets, wardrobes, or display cabinets.
- Complete surface preparation with appropriate surface cleaning because dust, residue, or uneven surfaces may affect adhesive strip performance.
- Choose clips or channels when additional support, concealment, or alignment may improve the mounting plan.
- Confirm the cable route and power source location to reduce the risk of awkward cable visibility after mounting.
- Keep controller access practical so future adjustments or maintenance can be completed without removing mounted components.
Before permanent mounting, complete a final verification to confirm that the planned layout remains practical. This section is limited to low-voltage planning and does not provide instructions for mains wiring or permanent electrical work. Controller access should remain practical after mounting because future adjustments or maintenance may still be needed.
- Verify that measuring strip length matches the intended mounting area.
- Confirm that test-fitting supports the preferred light direction with acceptable shadow and glare conditions.
- Check that surface preparation is complete and that clips or channels have been considered where appropriate.
- Confirm that the cable route, power source access, and controller access remain practical after mounting.
This chart shows the key pre-mounting checks for planning LED strip installation in small furniture spaces.
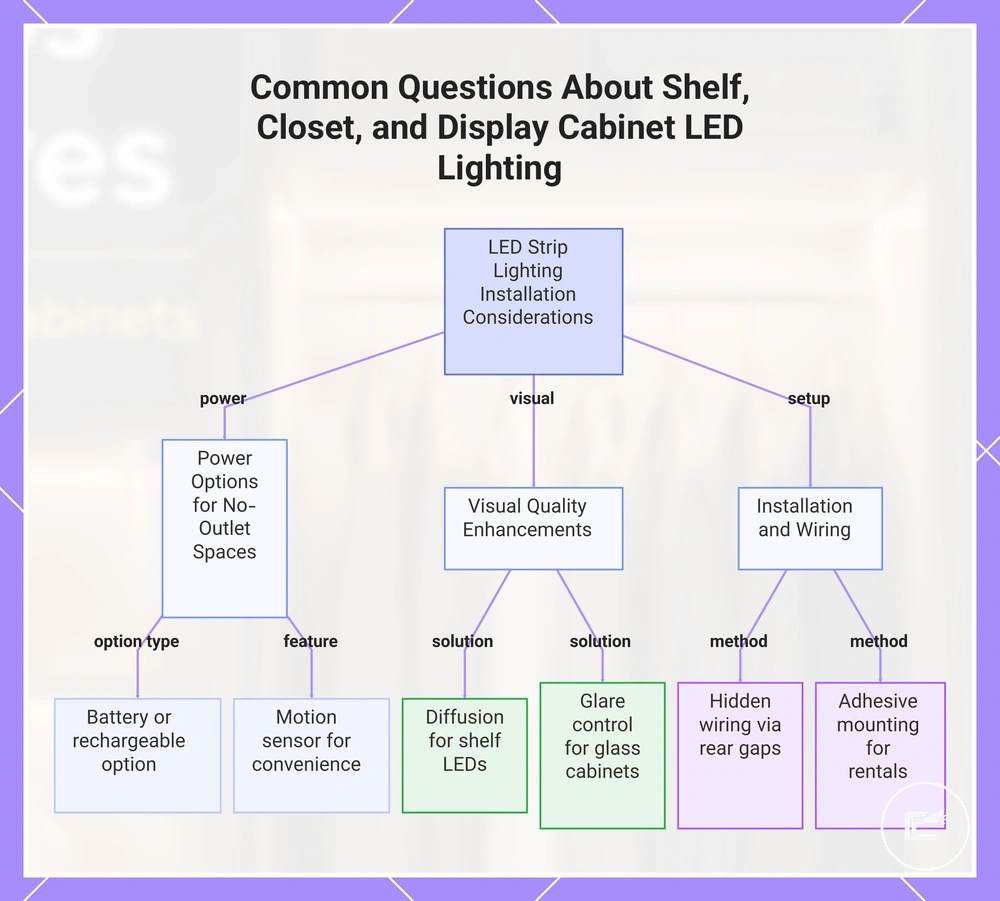
Common Questions About Shelf, Closet, and Display Cabinet LED Lighting
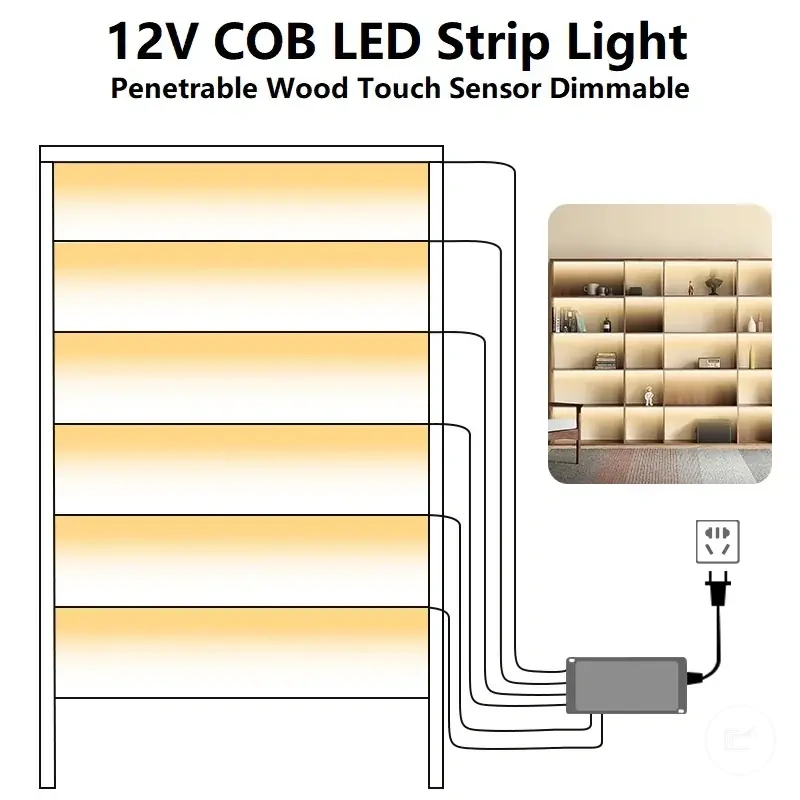
Can LED strips work in a closet without an outlet?
Closet LED strip lighting can work in a closet without an outlet when battery or rechargeable power options suit the available space. A motion sensor may improve convenience in closets with frequent access. Power choice depends on charging access, maintenance preference, and placement conditions.
Should shelf LED strips use diffusion?
Shelf LED lighting may benefit from diffusion when visible LED dots are noticeable from normal viewing angles. A diffused strip can create a smoother appearance, especially on open shelves or eye-level installations. The result may vary with strip density and placement.
Does glass cabinet lighting need glare control?
Display cabinet LED lighting often benefits from glare control when glass reflections make the light source more visible. A diffused channel may help soften reflections and reduce direct glare. The effect depends on glass position, viewing angle, and strip placement.
How can wires stay hidden in a bookcase?
Hidden wiring is often easier to manage when rear gaps, cable clips, and controller access are considered during planning. Cable routes may be less noticeable when they follow panel edges or concealed areas. Furniture design can influence how effectively wiring remains hidden.
When is a motion sensor useful?
A motion sensor is often useful when closet LED strip lighting is accessed frequently and hands-free activation is preferred. Sensor lighting may improve convenience in wardrobes and storage areas. Performance can vary with sensor placement and nearby movement.
Is adhesive mounting suitable for rental-friendly setups?
Adhesive mounting may be suitable for rental-friendly setups when surface cleaning is completed and the surface condition supports temporary attachment. Removable clips may be considered when reducing surface impact is a priority. Adhesion can vary by material and finish.
What causes visible LED dots in cabinet strip lights?
Visible LED dots often become more noticeable when cabinet strip lights are directly visible or viewed at close range. Diffusion or a COB-style strip may help create a more continuous appearance. Viewing angle and surface reflections can also affect visibility.
This chart summarizes the key answers to common questions about power, visual quality, and installation when using LED strip lighting in closets, shelves, and display cabinets.