LED Strip and Cabinet Lighting Lifespan and Maintenance
LED strip and cabinet lighting lifespan depends on strip quality, heat control, power stability, mounting condition, and daily use rather than one fixed number for every setup. LED strip lights may keep working longer in a clean, ventilated cabinet area, but heat buildup, weak connectors, unstable power supply output, peeling adhesive, or heavy daily use can shorten their usable life.
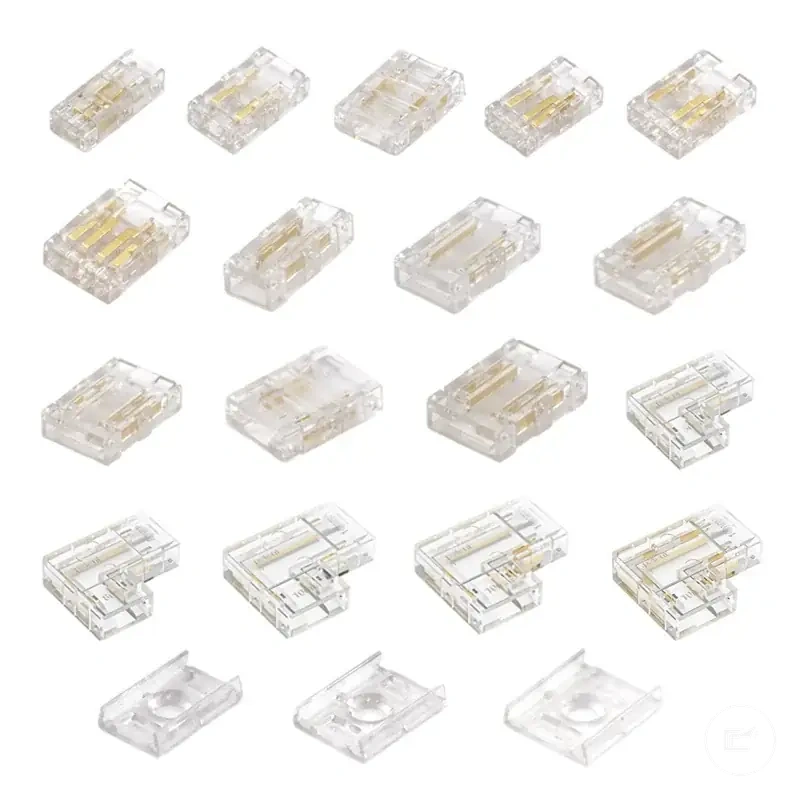
home LED strip and cabinet lighting accessories include the strip, power supply, connectors, mounting tape, channels, diffusers, and cabinet fixture parts that support the lighting setup. These parts age differently, so maintenance should look at the whole setup instead of treating dimming or failure as a strip-only problem.
LED Strip and Cabinet Lighting Lifespan and Maintenance focuses on how the lighting setup ages, what users can preserve through cleaning and inspection, and when replacement becomes safer than continued use. Dimming or failure can come from the LED strip, power supply, connector, or mounting condition, so the safer decision is usually based on persistent symptoms and part condition rather than a single visual change.
Good maintenance cannot make worn LEDs new again, but it can reduce avoidable stress from dust, heat, loose mounting, and unstable contact. This page moves from usual lifespan expectations into aging signs, lifespan-shortening conditions, maintenance actions, replacement timing, and safe long-term use without turning the topic into a product catalog or installation workflow.
How Long LED Strip and Cabinet Lighting Accessories Usually Last
How Long LED Strip and Cabinet Lighting Accessories Usually Last depends on operating hours, heat, ventilation, power stability, and part quality rather than a single lifespan figure. LED strip lights are often associated with long service lives, but actual lifespan can vary by installation conditions, daily use patterns, and the environment surrounding the lighting system.
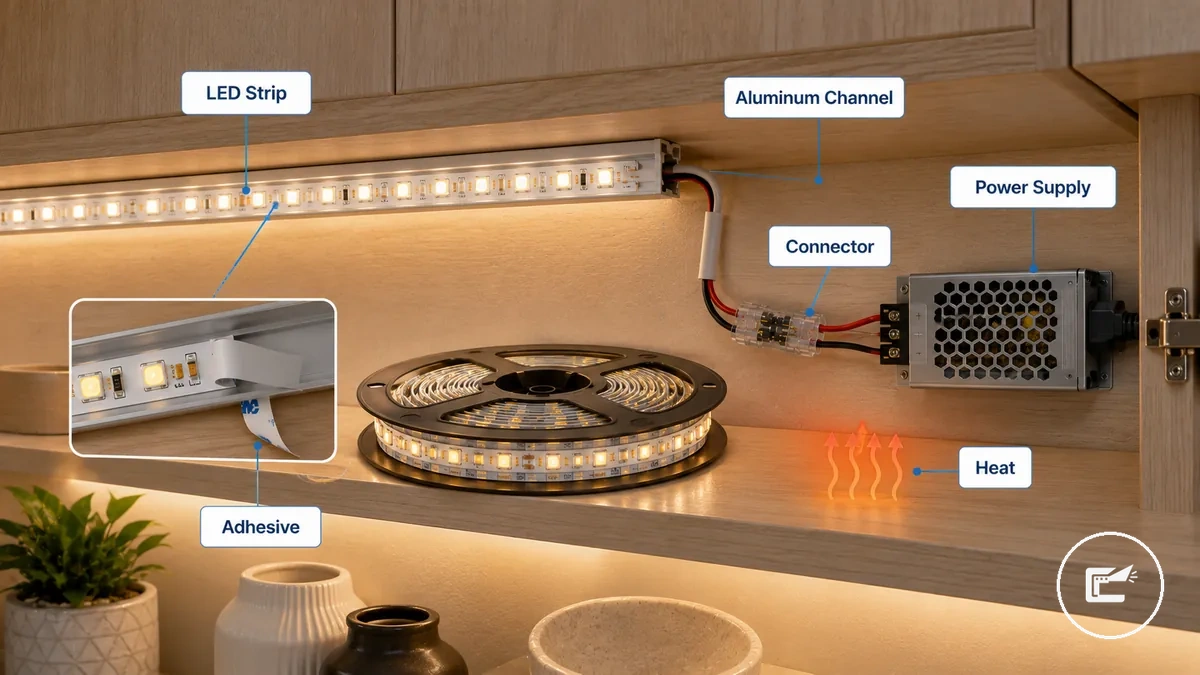
LED strip and cabinet lighting accessories do not age at the same rate. LED strip rolls, power supplies, connectors, adhesive, mounting tape, aluminum channels, and cabinet fixtures each respond differently to heat, electrical stress, surface conditions, and ongoing use.
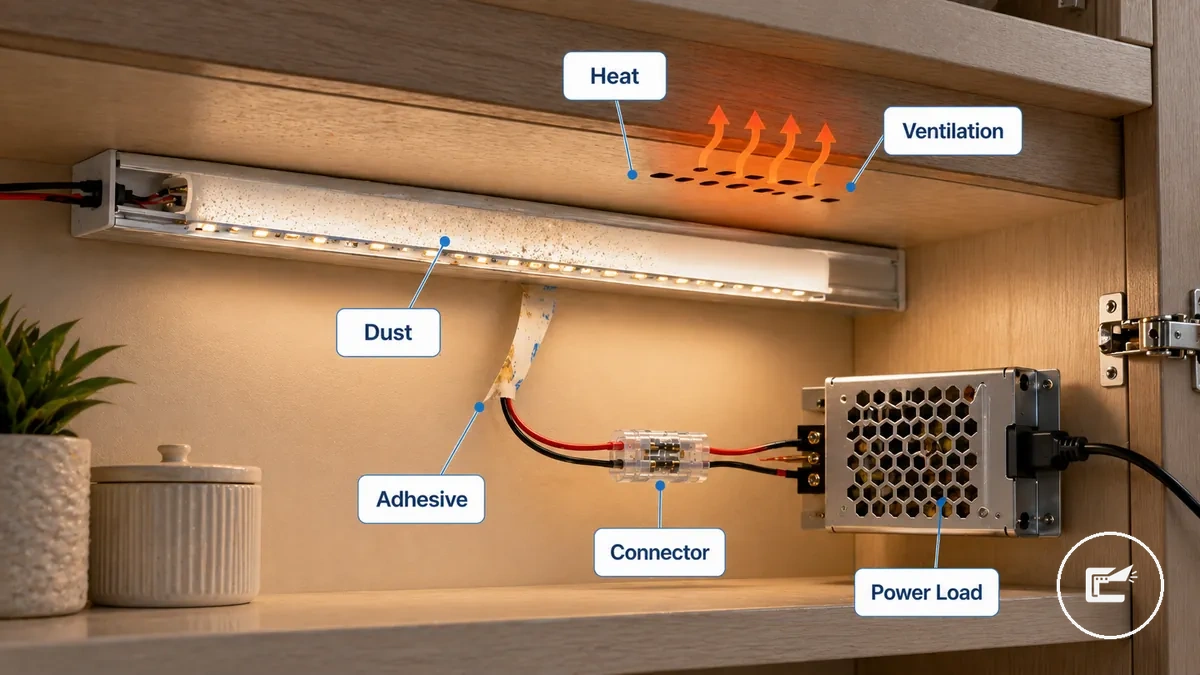
How Long LED Strip and Cabinet Lighting Accessories Usually Last becomes easier to evaluate when each component is viewed separately. The diagram below labels parts that may age at different rates within the same lighting setup.
| Part or accessory | What changes over time | Conditions that shorten life | What the reader should watch for |
|---|---|---|---|
| LED strip roll | Gradual reduction in light output | Heat, long operating hours, unstable power | Dimming or uneven brightness |
| Power supply | Electrical component wear | Heat, limited ventilation, sustained use | Flicker or intermittent operation |
| Connectors | Contact wear and connection degradation | Movement, vibration, moisture, heat | Inconsistent lighting performance |
| Adhesive and mounting tape | Reduced bonding strength | Warm surfaces, dust, humidity | Peeling or sagging sections |
| Aluminum channel | Surface wear or contamination | Dust accumulation and environmental exposure | Reduced cleanliness and heat dissipation |
| Cabinet fixture | Mounting surface deterioration | Heat, moisture, repeated adjustments | Less stable support for attached components |
LED Strips, Power Supplies, Connectors, and Cabinet Fixtures Age Differently
LED strips, power supplies, connectors, and cabinet fixtures age differently because each component is affected by a different aging mechanism within the same cabinet lighting setup. A lighting system may continue operating while one component begins to weaken, so overall lifespan often depends on the condition of individual parts rather than a shared aging pattern.
A working LED strip can still appear unreliable if an aging connector develops a weaker electrical contact or if a power supply becomes less stable over time. This weakest-part effect can influence lighting performance even when other components remain in usable condition.
- Strip LEDs: Light output may gradually decrease as operating hours and heat exposure accumulate.
- Power supply: Electrical components can age from heat and sustained load, which may affect output consistency.
- Connector: Contact quality can decline because of movement, vibration, moisture, or repeated handling.
- Adhesive backing and mounting tape: Bonding strength may reduce when exposed to warm surfaces, dust, or humidity.
- Aluminum channel: Surface contamination can build up over time and may influence heat-management performance.
- Diffuser and cabinet fixture: Material condition may change with age and environmental exposure, affecting appearance or component support.
This chart groups the aging mechanisms of electronic, connection, and structural components in a cabinet lighting system, illustrating how each part's deterioration differs.

Do LED Strip Lights Burn Out or Gradually Fade
LED strip lights more often gradually fade, dim, shift color, or lose sections over time, although complete failure can also happen through power supply or connection problems. The difference matters because dimming can come from LED aging, while sudden failure may come from a supporting component.
Gradual fading usually relates to lumen depreciation, where light output becomes lower as the strip ages. Heat stress can contribute to this process, and color consistency may also change over time. Gradual fading does not automatically mean the strip has completely failed or that every component in the lighting system needs replacement.
Sudden non-working sections can come from causes that differ from normal LED aging. Dead sections may appear when a connection becomes weak, a connector loses reliable contact, or a power supply develops a fault. Deeper diagnosis of non-working lights belongs outside this section because similar symptoms can come from multiple components.
The contrast below separates common aging behavior from more abrupt failure signs.
| Gradual aging signs | Sudden failure signs |
|---|---|
| Dimming from lumen depreciation | Entire strip stops working |
| Gradual color shift | Dead sections appear unexpectedly |
| Reduced brightness over time | Power supply failure interrupts operation |
| Heat-related performance decline | Connector weakness causes loss of connection |
Dimming, Brightness Loss, and Color Shift Over Time
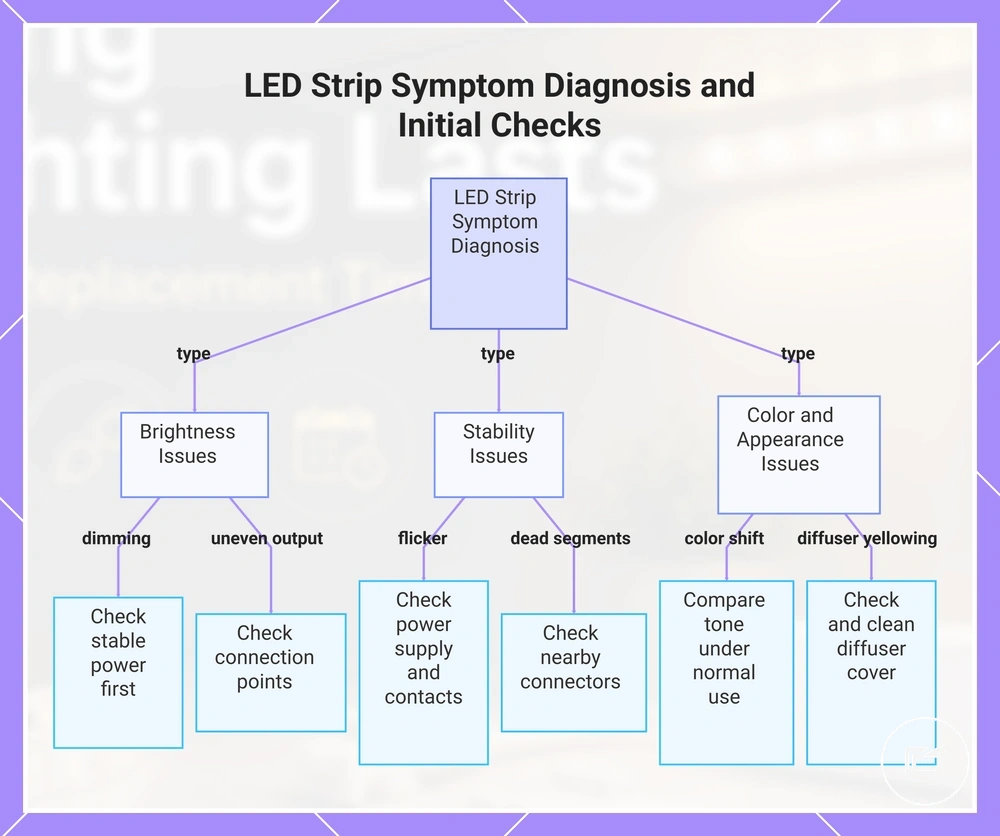
Dimming, brightness loss, and color shift over time can signal LED strip aging, but visible light changes should not be treated as certain strip failure by themselves. Uneven output, flicker, dead segments, or diffuser yellowing may also come from power instability, connector issues, heat exposure, or diffuser condition rather than the LED strip roll alone.
Visible symptoms should be checked under stable power before deciding that the strip roll needs replacement. The same lighting change can point to maintenance, a connection check, or part replacement depending on whether the symptom remains consistent after power and contact conditions are stable.
- Dimming: Gradual brightness loss may suggest strip aging; check stable power first; persistent dimming may indicate the strip or power supply needs closer review.
- Uneven output: Patchy brightness may suggest heat stress, voltage drop, or connector weakness; check connection points; the affected section may need maintenance or part-level replacement.
- Color shift: A visible change in tone may suggest LED aging or heat exposure; compare the affected run under normal use; replacement may depend on how consistent and disruptive the shift becomes.
- Flicker: Flicker may point to unstable power or a weak connector; check the power supply and contact points; avoid assuming the strip roll is the first part to replace.
- Dead segments: Non-working sections may come from damaged strip sections or connection loss; check nearby connectors before replacement; the issue may be local rather than system-wide.
- Diffuser yellowing: Yellowed or dirty diffuser material can change visible light quality; check and clean the cover when appropriate; replacement may involve the diffuser rather than the LED strip.
This chart groups LED strip symptoms into three categories and shows the recommended initial checks before concluding strip replacement.
What Shortens the Lifespan of LED Strips and Cabinet Lighting Parts
Heat, poor ventilation, dust, moisture exposure, adhesive stress, excessive bending, power load, voltage drop, and weak connections can shorten the lifespan of LED strips and cabinet lighting parts. The severity depends on cabinet enclosure, daily runtime, surface condition, power setup, and maintenance quality.
Environmental risk usually starts around heat, airflow, dust, and moisture exposure, while electrical risk usually comes from power load, voltage drop, or weak connections. Physical risk comes from adhesive strain, loose mounting tape, excessive bending, and stressed connectors that make the lighting setup less stable over time.
What Shortens the Lifespan of LED Strips and Cabinet Lighting Parts is easiest to evaluate as a condition map: some issues are preventable through cleaning, ventilation, and secure mounting, while persistent heat, repeated connection loss, damaged adhesive support, or unstable power may point toward replacement-level wear. The image below labels common wear-accelerating conditions around cabinet lighting parts before the table separates preventable wear from conditions that may require replacement.
| Condition | Affected part | Value or trigger | Effect or decision |
|---|---|---|---|
| Heat and poor ventilation | LED strip, power supply, aluminum channel | Warm enclosed cabinet space or limited airflow | Improve airflow when possible; consider replacement if heat-related symptoms persist. |
| Dust buildup | Diffuser, channel, strip surface | Visible dust on light path or heat-transfer surfaces | Clean accessible parts first; monitor if brightness or heat issues remain. |
| Moisture exposure | Connectors, adhesive, cabinet fixture | Damp surface, humidity, or residue near contact points | Dry and inspect the area; avoid continued use if contact points look damaged. |
| Adhesive stress | Adhesive backing and mounting tape | Peeling, sagging, or repeated detachment | Resecure only if the surface and material remain sound; replace mounting material when bonding fails repeatedly. |
| Excessive bending | LED strip, connector, mounting path | Sharp bends, stressed corners, or pulled sections | Reduce strain where possible; damaged sections may need part-level replacement. |
| Power load and voltage drop | Power supply, strip run, connectors | Flicker, uneven output, or dimming along the run | Check power stability and connections before assuming the strip itself is finished. |
| Weak connections | Connector, contact point, extension cable | Loose contact, intermittent light, or movement-sensitive output | Secure the connection if it remains stable; replace the affected connector if contact stays unreliable. |
Heat, Ventilation, Dust, and Long Daily Use
Heat, ventilation, dust, and long daily use can accelerate aging in LED strip and cabinet lighting systems because cabinet enclosure conditions influence airflow, surface cleanliness, and heat buildup around the strip, diffuser, channel, and nearby components. Lifespan risk often increases when warm operating conditions persist and airflow remains limited for extended periods.
A ventilated open shelf may allow heat to disperse more easily than a warm enclosed under-cabinet run, although outcomes depend on operating hours, enclosure design, and maintenance. The checklist below helps verify environmental and usage conditions that may contribute to faster wear without treating any single condition as a fixed lifespan predictor.
- Check whether heat tends to accumulate inside the cabinet enclosure during normal use.
- Check whether ventilation and airflow around the strip and channel remain unobstructed.
- Check for dust buildup on the diffuser, channel, or nearby surfaces that may reduce surface cleanliness.
- Check whether long daily use keeps the lighting system operating for extended periods.
- Check whether surface cleanliness helps adhesive and mounting components remain properly supported.
- Check whether airflow paths remain open after stored items, cabinet changes, or routine cleaning.
Power Supply Load, Voltage Drop, and Weak Connections
Power supply load, voltage drop, and weak connections can shorten component life or create symptoms that resemble LED strip aging because power stability influences both visible performance and operating conditions. Flicker, dimming, or uneven output may come from power-related conditions rather than from the LED strip itself, especially when connection quality changes over time.
Voltage mismatch, connector looseness, corroded or stressed contacts, and overextended runs can affect how consistently power reaches the lighting system. These conditions may contribute to intermittent behavior or reduced performance, but visible symptoms alone do not confirm a specific cause without further checking. The checklist below helps identify maintenance-level signs that point toward power-related conditions rather than normal aging.
- Check whether the power supply appears heavily loaded during normal operation.
- Check for dimming or uneven brightness that may suggest voltage drop along the run.
- Check whether connectors feel loose or show signs of inconsistent contact.
- Check whether contacts appear corroded, stressed, bent, or exposed to conditions that may weaken connection quality.
- Check whether overextended runs coincide with flicker, dimming, or uneven light output.
For broader planning considerations beyond basic maintenance observations, see energy use over time. Complex power planning should remain separate from routine lifespan and maintenance decisions.
How to Maintain LED Strip and Cabinet Lighting Accessories
Maintaining LED strip and cabinet lighting accessories starts with power-off cleaning and routine inspection of the components most affected by dust, heat, and everyday use. Regular maintenance may help slow visible aging and reduce avoidable replacement, but it cannot restore worn-out LEDs to new condition.
How to Maintain LED Strip and Cabinet Lighting Accessories is most effective when cleaning and inspection follow a consistent sequence. The visual below demonstrates the safe order before the maintenance steps.
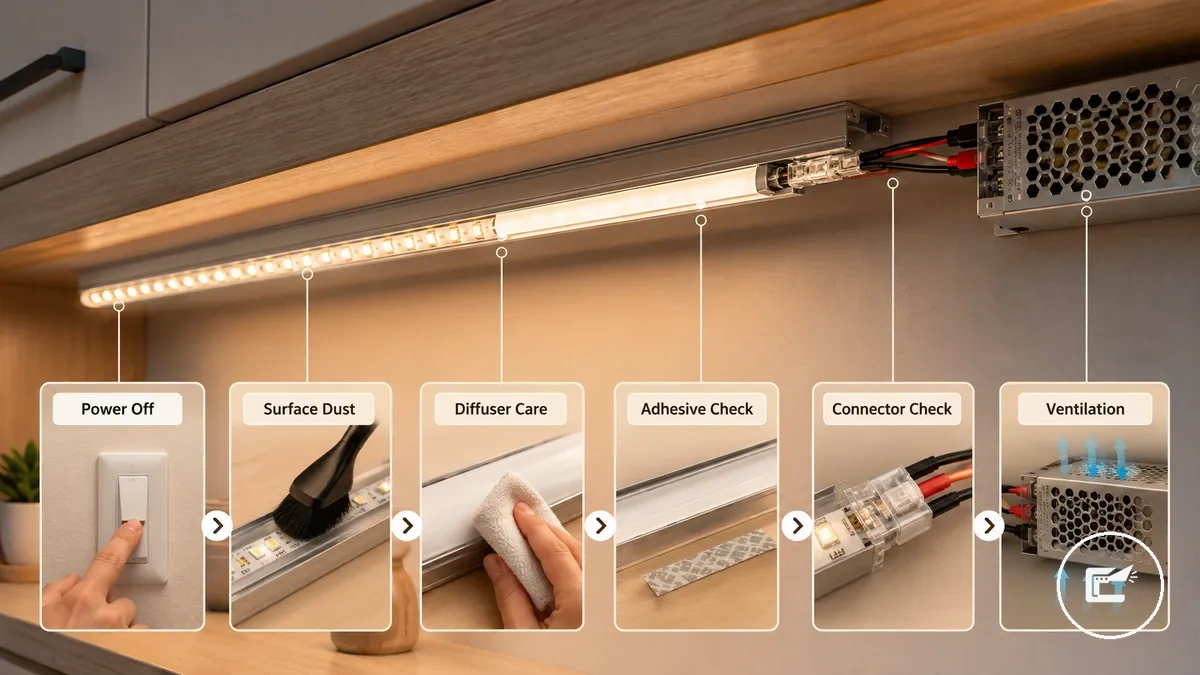
- Power off the lighting system: Disconnect power before cleaning or inspection to avoid working around energized components.
- Remove surface dust: Clean dust from exposed strip surfaces, channels, and nearby cabinet areas using a soft, dry cleaning method.
- Perform diffuser care: Check the diffuser for dust or residue and clean it gently when buildup affects visibility or appearance.
- Inspect adhesive support: Look for peeling, sagging, or weakened attachment points that may reduce strip stability.
- Check connectors: Verify that connectors remain secure and show no obvious signs of looseness or stress.
- Review channel support and power supply ventilation: Confirm that channels remain properly supported and that ventilation areas around the power supply are unobstructed.
Recurring checks help identify maintenance needs before visible issues become more noticeable. Avoid wet cleaning, harsh solvents, or live repair because they can affect component condition or make inspection less reliable. A warm enclosed cabinet may require more frequent observation than a ventilated shelf because dust accumulation and heat retention can differ by placement and use conditions.
- Check for surface dust on strips, diffusers, channels, and nearby cabinet surfaces.
- Check diffuser condition and cleanliness.
- Check adhesive attachment points for peeling or movement.
- Check connector stability and visible condition.
- Check channel support along the installed run.
- Check that power supply ventilation areas remain unobstructed.
Cleaning Strips, Diffusers, Channels, and Cabinet Surfaces
Cleaning LED strip surfaces, diffuser covers, aluminum channels, and cabinet surfaces starts with powering the lighting system off and using methods that protect visible parts without disturbing electrical components. Cleaning can help reduce dust buildup and maintain light appearance, but it does not reverse normal LED aging.
Cleaning should protect light output and surrounding electrical parts by focusing on dust removal and gentle surface care. Use the short steps below to clean visible and protective parts without damaging the LED strip setup.
- Power off: Do not clean while the lighting system is powered.
- Remove dust buildup: Use a dry brush to clear dust from LED strip surfaces, diffuser covers, and aluminum channels.
- Wipe protective parts: Use a soft cloth with a non-dripping method to clean diffuser covers and aluminum channels.
- Clean cabinet surfaces: Remove dust and residue from nearby cabinet surfaces without allowing moisture to reach lighting components.
- Dry and inspect: Confirm visible parts are dry and check for remaining dust, residue, or surface contamination.
- Handle grease carefully: If kitchen grease or residue is present near the strip, a surface-appropriate non-dripping method may be needed, but avoid soaking, harsh solvents, and abrasive scrubbing.
Keeping Adhesive, Mounting Tape, and Connectors Secure
Keeping adhesive, mounting tape, and connectors secure starts with checking whether the lighting setup remains firmly supported and electrically stable over time. Peeling adhesive, loose tape, sagging strips, stressed corners, and connector movement can reduce stability even when the LED strip itself continues to operate normally.
Adhesive condition, mounting support, connector stability, and cabinet surface preparation all influence whether a component can be resecured or whether replacement mounting material is safer. Use the checks below to evaluate long-term stability without turning maintenance into a new installation project.
- Adhesive: If adhesive shows minor peeling but still holds securely on a clean cabinet surface, resecuring may be possible after checking surface preparation and attachment quality.
- Mounting tape: If loose tape repeatedly separates or no longer supports the strip consistently, replacement mounting material is usually safer because worn bonding surfaces may not remain stable.
- Clips or channels: If clips or channels remain secure and aligned, verify that sagging strips are not creating extra stress on mounting points.
- Stressed corners: If corners pull, twist, or place tension on the strip path, reduce strain where possible and monitor whether mounting support remains secure.
- Connectors: If connector movement occurs during normal use, check that connectors remain properly seated and supported before assuming component replacement is necessary.
- Connector stability: If connectors continue to loosen or lose stable contact after resecuring, replacement may be safer because wear can affect connection reliability.
When LED Strips and Cabinet Lighting Accessories Need Replacement
Replacement depends on symptom persistence, visible damage, and which component appears responsible after reasonable checks have been completed. Maintenance may no longer be enough when the same problem continues to return, when a part shows clear deterioration, or when performance remains unreliable despite stable mounting and connection conditions.
Not every lighting issue requires immediate replacement. A temporary flicker, minor brightness variation, or isolated mounting concern may still fall into a monitor-or-maintain situation, while persistent dimming, recurring failures, or visibly damaged components can indicate that replacement may be the more practical choice.
Replacement decisions are usually clearer when symptoms are matched to the part most likely responsible. Replacing a connector, power supply, mounting component, or cabinet fixture may be sufficient in some cases, while a full strip replacement may only be necessary when the strip itself shows continuing performance decline or physical damage.
Use the checklist below to distinguish replace-now signals from monitor-or-maintain signals.
- Persistent dimming: Consider replacement when dimming remains after connection and power-related causes have been checked; monitor if brightness changes appear occasional or inconsistent.
- Dead sections: Replacement may be appropriate when sections remain non-functional and the issue does not appear to originate from a nearby connector or contact point.
- Flicker after checks: Consider replacing the responsible component when flicker continues after connector stability and power-related conditions have been reviewed.
- Color shift: Monitor minor changes that do not affect use; consider replacement when color shift becomes persistent and noticeably different from the rest of the lighting run.
- Adhesive failure: Resecure when attachment issues are limited and support remains reliable; replacement mounting material is often safer when adhesive failure repeatedly returns.
- Damaged connectors, failing power supply, or cabinet fixture wear: Visible damage or continuing instability can justify replacing the affected part rather than replacing the entire lighting setup.
This chart shows the key signals for deciding whether to replace or monitor LED strip lighting components, based on symptom persistence, visible damage, and component responsibility.

Flickering, Dead Sections, Uneven Output, and Persistent Dimming
Flickering, dead sections, uneven output, and persistent dimming can suggest that a lighting part has moved beyond normal aging, but each visible symptom still needs a simple check before a replacement decision. These symptoms may come from the LED strip, a connector, a power supply, or a contact point rather than one guaranteed source.
The checklist below maps each visible symptom to a likely part, a simple check, and the next decision without turning the section into a full troubleshooting tree.
- Flickering: The likely part may be the power supply or connector; check whether the flicker continues after stable contact is confirmed; consider replacing the responsible part if flicker persists.
- Dead sections: The likely part may be a strip segment or nearby connector; check the closest connector and contact point first; consider strip-section or connector replacement if the section remains non-working.
- Uneven output: The likely part may be the strip run, power supply, or connection path; check whether uneven brightness changes with connector movement; monitor or replace the affected part based on persistence.
- Persistent dimming: The likely part may be the LED strip or power supply; check whether dimming remains after connection checks; replacement may be useful when dimming stays consistent.
- Intermittent operation: The likely part may be a weak connection or stressed contact; check whether movement affects operation; replace the connector or contact-related part if instability continues.
- Failure after connector checks: The likely part may be beyond a simple connector issue; if sections still fail after connector checks, deeper diagnosis may be needed before replacement parts are selected.
Unresolved non-working symptoms may need a broader review of problems before replacement before choosing a specific replacement part.
Adhesive Failure and Physical Wear That Maintenance Cannot Fix
Adhesive failure and physical wear become replacement criteria when the affected component can no longer provide reliable support, protection, or secure mounting despite reasonable maintenance. Repeated detachment, material deterioration, or visible physical damage may indicate that resecuring alone is no longer a dependable solution, although adhesive failure does not automatically mean the LED strip itself is defective.
A worn mounting surface and a damaged lighting component are different conditions. For example, if mounting tape repeatedly loses adhesion but the strip, diffuser, and channel remain physically sound, replacing the mounting material may be enough. When physical damage affects the component itself, replacement may be the more practical decision.
Use the criteria below to separate resecuring, mounting-material replacement, and damaged-part replacement.
- Adhesive failure: If attachment repeatedly loosens while the strip remains physically intact, replacing mounting tape or support material may be more appropriate than replacing the LED strip.
- Brittle strip backing: If the strip backing cracks, breaks apart, or no longer supports stable attachment, replacing the affected strip section may be appropriate.
- Damaged diffuser or cracked channel: If physical damage affects protection, appearance, or support, replacing the damaged diffuser cover or channel may be more reliable than continued maintenance.
- Exposed or strained connectors: If connectors show visible strain, exposure, damage, or continuing instability after resecuring, replacing the affected connector may be justified.
- Cabinet surface and secure mounting: If the cabinet surface no longer supports secure mounting, reassess the mounting method first; if the supporting component itself is damaged, replacement may be necessary.
Which Part to Replace Before Replacing the Whole Lighting Setup
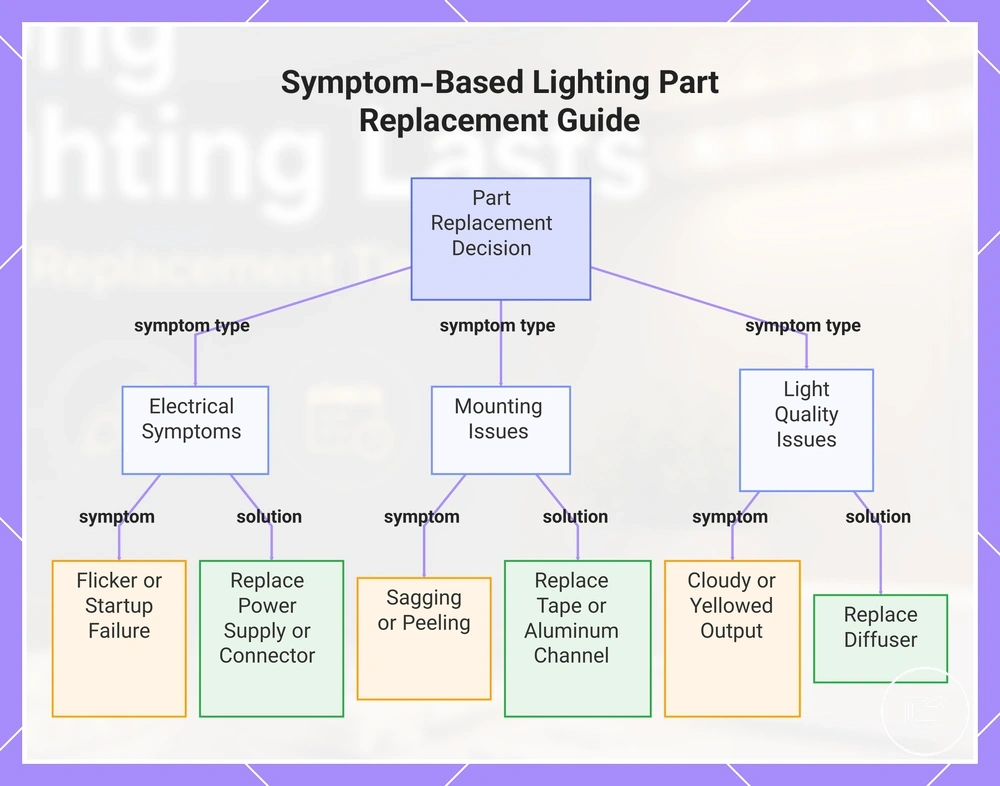
Choosing which part to replace before replacing the whole lighting setup should start with symptom-based replacement rather than replacing functioning parts without a clear reason. The useful first choice is usually the part most closely connected to the visible symptom, such as the power supply, connector, mounting tape, aluminum channel, diffuser, replacement roll, or cabinet LED fixture.
A full lighting setup replacement may be unnecessary when one accessory is responsible for the outcome. Flicker may point toward a power supply or connector, sagging may point toward mounting tape or channel support, and cloudy light output may point toward a diffuser rather than the LED strip roll.
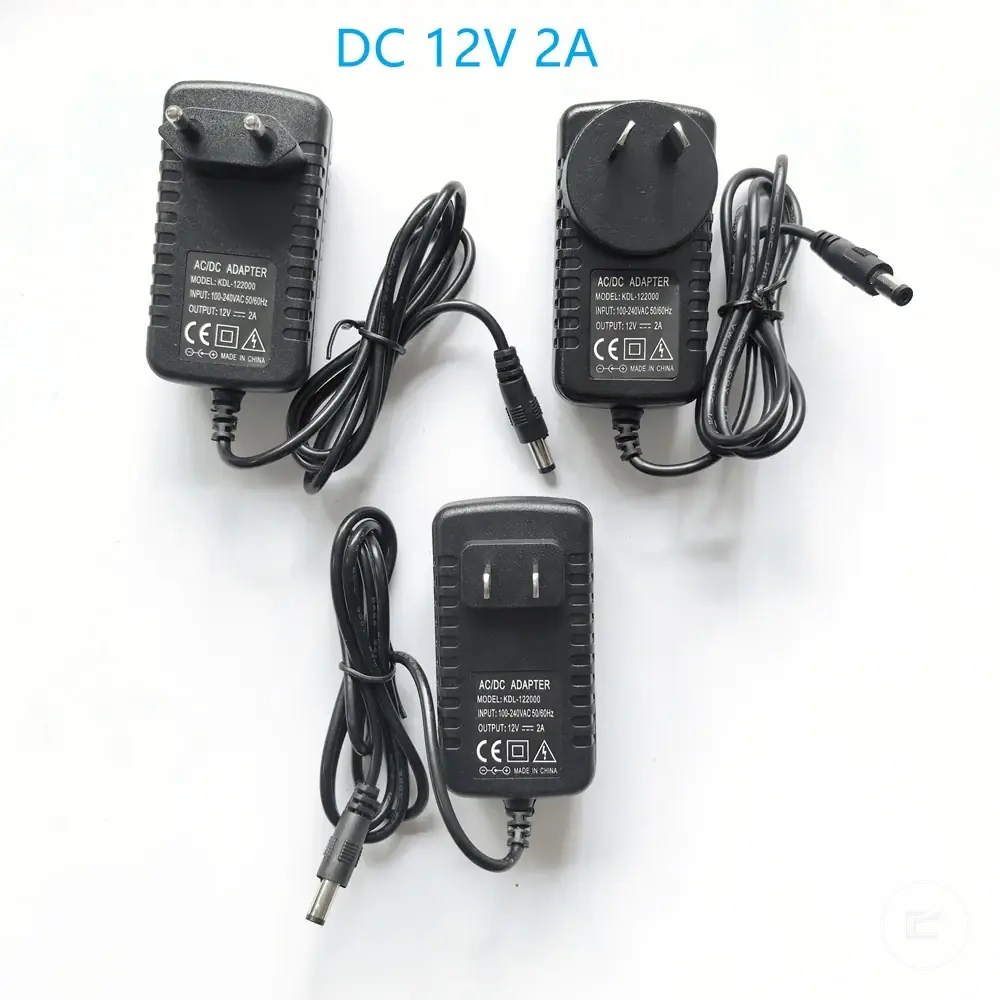
- Power supply: Replace when flicker, startup issues, or unstable output continue after basic connection checks; the outcome may be steadier operation if the power supply is the responsible part.
- Connector: Replace when movement-sensitive output or loose contact persists; the outcome may be restored connection stability without replacing the strip roll.
- Mounting tape: Replace when peeling or sagging returns after resecuring; the outcome may be better physical support if the strip remains otherwise usable.
- Aluminum channel: Replace when the channel is bent, cracked, or no longer supports the strip properly; the outcome may be improved mounting stability and protection.
- Diffuser: Replace when yellowing, cracking, or surface damage changes visible light quality; the outcome may improve appearance without changing working LEDs.
- Replacement roll or cabinet LED fixture: Replace the strip roll or fixture when the main lighting component has persistent dead sections, physical deterioration, or continuing output decline after smaller part causes have been ruled out.
Part-level replacement works best when the symptom, affected component, and expected outcome match. If the symptom changes when a connector moves, the connector deserves attention before the whole lighting setup; if the light remains weak across the strip after checks, the replacement roll may become more relevant.
The safer selection logic is to replace the smallest responsible part first when the evidence points to that part. Replace the whole lighting setup only when multiple components are worn, the cabinet LED fixture itself is damaged, or part-level replacement would not address the continuing symptom.
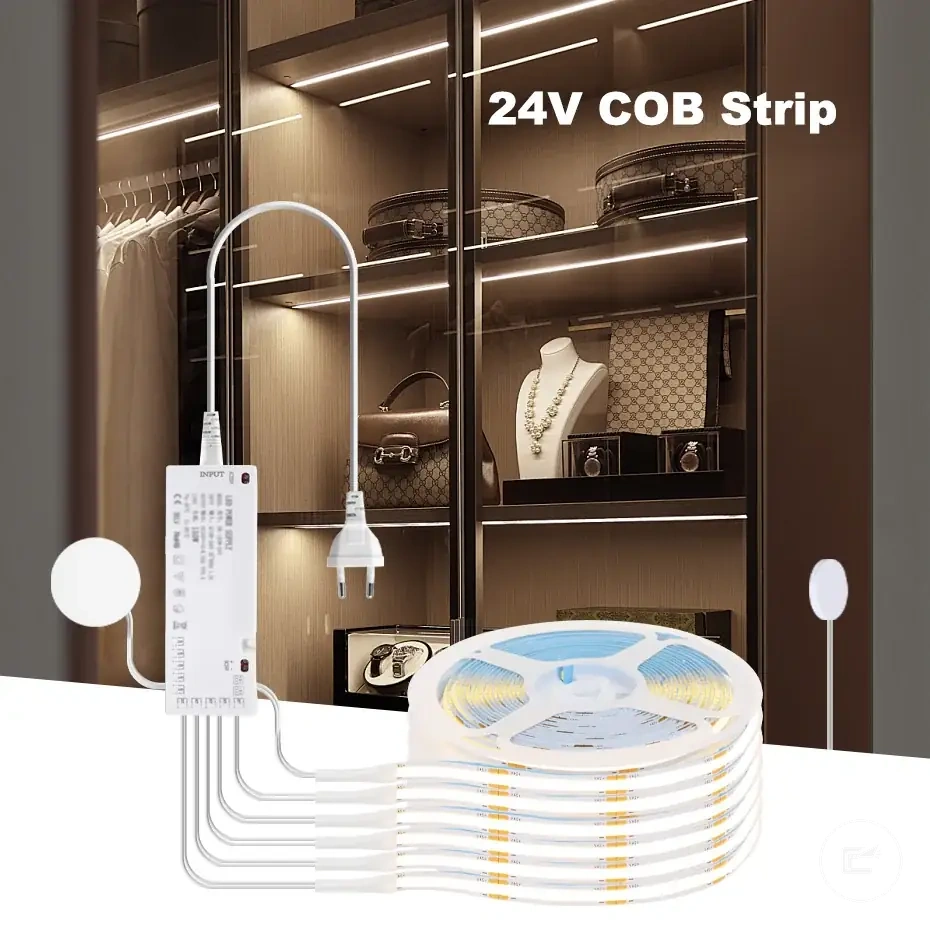
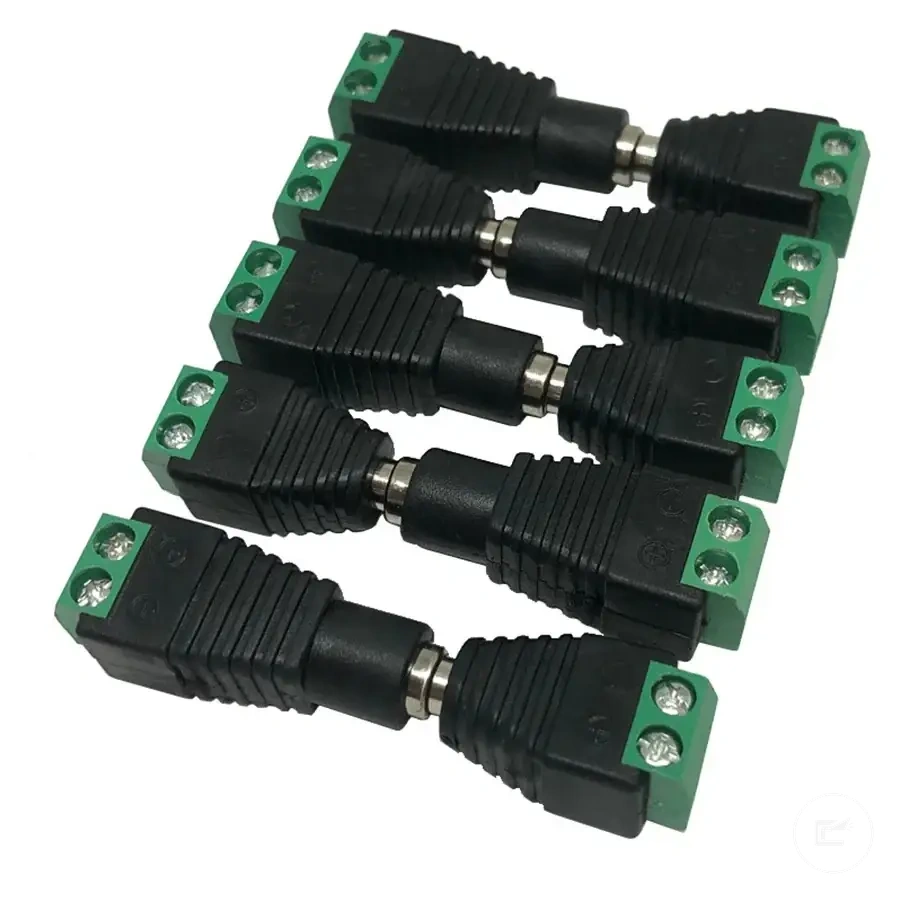
The products below are useful examples for comparing available options. Before buying, check that the compatibility criteria, key features, and product details match your needs.

This chart shows how to choose which part to replace based on the visible symptom, helping you avoid unnecessary full setup replacements.
Power Supplies, Connectors, Mounting Parts, and Replacement Rolls
Power supplies, connectors, mounting parts, and replacement rolls solve different types of lighting problems, so the appropriate replacement depends on the symptom being addressed. A smaller replacement part may resolve the issue when the symptom points to a specific component rather than the entire lighting run.
For example, a loose connector may contribute to unstable output or intermittent operation even when the LED strip remains usable. Understanding the role of each replacement part helps distinguish between a local component issue and a problem that affects a larger portion of the lighting setup.
- Power supplies: May be relevant when unstable output, flicker, or inconsistent operation continues; replacement may not solve the issue if weak contact or strip-related problems are the underlying cause.
- Connectors: May help when weak contact, intermittent operation, or movement-sensitive lighting is present; replacement may not resolve symptoms that originate from the power supply or strip section.
- Mounting parts: May address adhesion failure, sagging, or reduced physical support; replacement may not improve light output when the electrical components remain the source of the issue.
- Aluminum channels: May improve heat support, physical protection, or mounting stability when the existing channel is damaged; replacement may not correct electrical faults or dead strip sections.
- Replacement rolls: May be appropriate when worn or dead strip sections continue to affect operation; replacement may not solve symptoms caused by connectors, mounting parts, or power-related conditions.
Safe Long-Term Use After Maintenance or Replacement
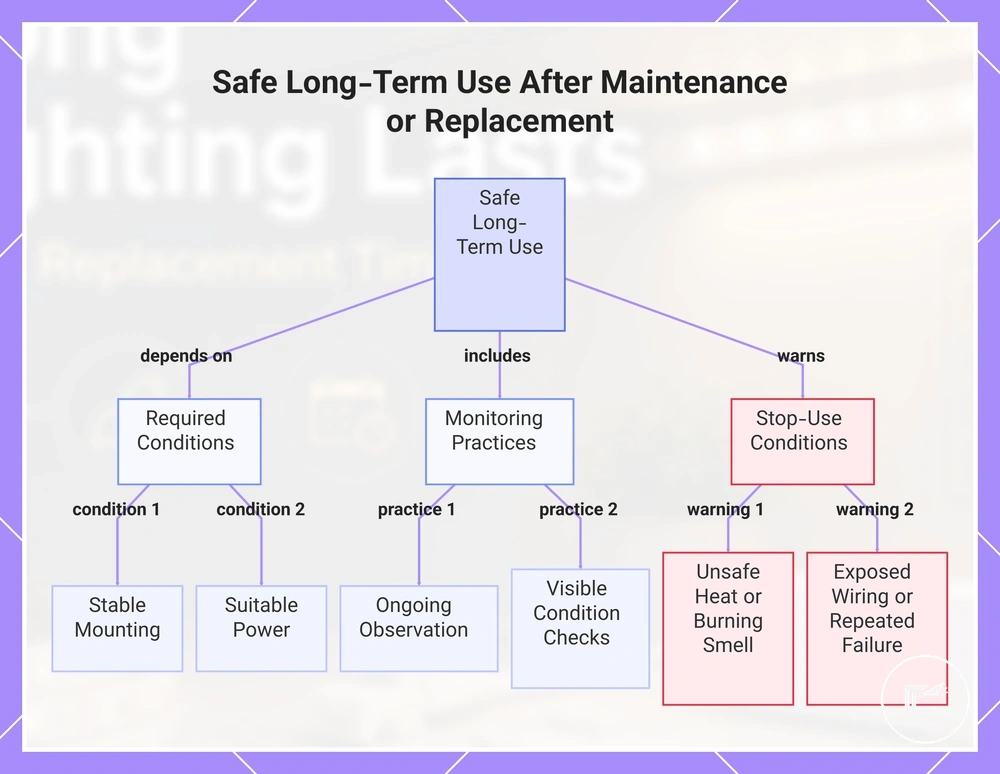
Safe long-term use after maintenance or replacement depends on stable mounting, suitable power, heat control, and visible condition checks. A lighting system that remains physically secure and operates without recurring warning signs is generally easier to monitor over time than one with repeated connection, mounting, or power-related issues.
Maintenance and replacement can address specific problems, but ongoing observation remains important because operating conditions may change after work is completed. Visible condition checks can help identify developing concerns, although visual inspection alone may not reveal every underlying issue or replace further evaluation when unsafe symptoms appear.
Use the checklist below as a practical safety review after maintenance or replacement. It focuses on continued monitoring rather than installation procedures or advanced electrical repair.
- Perform maintenance or replacement work only when power is off.
- Keep surfaces dry before returning the lighting system to normal operation.
- Confirm that connectors remain secure and do not show signs of looseness or instability.
- Maintain ventilation around lighting components and monitor for unusual heat buildup.
- Check for damaged insulation, exposed conductors, or visible deterioration around cables and connectors.
- Watch for signs that may indicate an overloaded power supply, including recurring instability after normal operation resumes.
- Monitor the lighting system after replacement to verify that the original symptom does not continue to return.
Unsafe heat, burning smell, exposed wiring, or repeated failure are stop-use conditions and should not be ignored until the cause is resolved. For broader guidance beyond routine monitoring, see safe long-term use.
This chart shows the key conditions for safe long-term use after maintenance or replacement, the required monitoring practices, and the stop-use warnings.